Questions, problems, missing parts? Before returning to the store, call Customer Service 8 a.m. – 7 p.m., EST, Monday-Friday, 9 a.m. – 6 p.m., EST, Saturday 1-877-527-0313 HOMEDEPOT.
Table of Contents ........................................................................ 2 Safety Information ...................................................................... 2 Warranty .................................................................................... 2 What is Covered ....................................................................... 2 What is Not Covered ................................................................. 2 Pre-Installation ....................................
PLANNING INSTALLATION Read all instructions before assembly. Before starting installation of this fixture or removal of a previous fixture, disconnect the power by turning off the circuit breaker or by removing the fuse at the fuse box. To avoid damaging this product, assemble it on a soft, non-abrasive surface, such as carpet or cardboard. Keep your receipt and these instructions for proof of purchase.
PACKAGE CONTENTS Part A B C D E Description Canopy Socket Globe Cover Finial Quantity 1 2 1 1 1 4
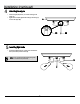
1 □ □ □ 2 Making the electrical connections Attaching the mounting strap to the outlet box Screw the mounting screws (GG) into the outside holes on the mounting strap (BB). Place the outlet box screws (FF) through the long oval holes on the mounting strap (BB) and screw the outlet box screws (FF) into the screw holes on the outlet box (not included). Make sure the heads of the mounting screws (GG) are facing out when the mounting strap (BB) is attached to the outlet box.
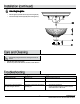
4 □ □ Attaching the nipple Screw the nipple (EE) about 1/4 in. into the bushing on the canopy (A). Tighten the hex nut (DD) against the bushing on the canopy (A) to secure the nipple (EE). 5 Installing light bulbs □ Install two 60-Watt maximum, medium-base incandescent bulbs (not included) into the sockets (B). NOTE: You can use two LED equivalent energy-saving bulbs that do not exceed 8W each (not included).
6 Attaching the globe □ □ Place the globe (C) and then the cover (D) over the nipple (EE). Screw the finial (E) onto the nipple (EE) to secure the globe (C). CAUTION: Before attempting to clean the fixture, disconnect the power to the fixture by turning the breaker off or removing the fuse from the fuse box. □ □ Clean the fixture with a soft, dry cloth. Do not use any cleaners with chemicals, solvents, or harsh abrasives. Problem The fixture will not light.
Questions, problems, missing parts? Before returning to the store, call Customer Service 8 a.m. – 7 p.m., EST, Monday-Friday, 9 a.m. – 6 p.m., EST, Saturday 1-877-527-0313 HOMEDEPOT.COM Retain this manual for future use.
Preguntas, problemas o piezas faltantes? Antes de regresar a la tienda, llama al Servicio al Cliente de Lunes a Viernes entre 8 a.m. y 7 p.m., El Sábado entre 9 a.m. y 6 p.m., (hora del Este de EE. UU.) 1-877-527-0313 HOMEDEPOT.
Índice ...................................................................................... 10 Información de Seguridad .......................................................... 10 Garantía ................................................................................... 10 Pre-Instalación ......................................................................... 11 Planificación de la Instalatión ................................................. 11 Herraminentas Necesarias .............................
PLANIFICACIÓN DE LA INSTALACIÓN Lee todas las instrucciones antes de ensamblar. Antes de comenzar la instalación o de quitar la instalación anterior, desconecte la alimentacion apagando el interruptor del circuito o quitando el fusible en la caja de fusible. Para evitar dañar el artículo, ensámblalo sobre una superficie suave, no abrasiva, como por ejemplo una alfombra o cartón. Conserva el recibo y estas Instrucciones como Comprobante de Compra.
CONTENIDO DEL PAQUETE Pieza A B C D E Descripción Dosel Portalámpara Pantalla Cubierta Embellecedor 12 Cantidad 1 2 1 1 1
1 □ □ □ Acoplar la correa de montaje a la caja de salida 2 Atornille los tornillos de montaje (GG) en los agujeros exteriores en la correa de montaje (BB). Coloque los tornillos de la caja de salida (FF) a través de los orificios ovalados largos en la correa de montaje (BB) y atornille los tornillos de la caja de salida (FF) en los orificios para tornillos de la caja de salida (no includio).
4 □ □ 5 □ Acoplar la entrerrosca Atornille la entrerrosca (EE) 1/4 pulgada en la buje en el dosel (A). Apriete la tuerca hexagonal (DD) contra la buje en el dosel (A) para fijar la entrerrosca (EE). Instalar bombillas Instala dos bombillas incandescentes de base mediana de hasta 60 Vatios (no includio) en los portalámparas (B). NOTA También puede usar bombillas de ahorro de energí a equivalente a LED que no supere los 8 vatios cada una (no includio).
6 □ □ Acoplar la pantalla Coloque la pantalla (C) y la cubierta (D) sobre la entrerrosca (EE). Atornille el embellecedor (E) en la entrerrosca (EE) para asegurar la pantalla (C). PRECAUCIÓN: Antes de intentar limpiar la pieza, desconéctela o apague el interruptor o remueva el fusible de la caja de fusibles. □ □ Limpia la lámpara con un paño suave y seco. No uses limpiadores con químicos, solvents, o productos abrasivos. Problema La bombilla no enciende.
Preguntas, problemas o piezas faltantes? Antes de regresar a la tienda, llama al Servicio al Cliente de Lunes a Viernes entre 8 a.m. y 7 p.m., El Sábado entre 9 a.m. y 6 p.m., (hora del Este de EE. UU.) 1-877-527-0313 HOMEDEPOT.COM CONSERVA ESTE MANUAL PARA REFERENCIAS FUTURAS.
Questions, problèmes, pièces manquantes? Avant de retourner au magasin, veuillez communiquez avec le service à la clientèle entre 8h00 et 19h00 (HNE) du lundi au vendredi, entre 9h00 et 18h00 (HNE) du samedi 1-877-527-0313 HOMEDEPOT.
Table des Matières .................................................................... 18 Consignes de Sécurité ............................................................... 18 Garantie ................................................................................... 18 Pré-Installation ......................................................................... 19 Planification de l’installation .................................................. 19 Outils Requis ..........................................
PLANIFICATION DE L'INSTALLATION Lisez toutes les instructions avant de procéder à l’assemblage. Avant de commencer à installer ce luminaire ou d’enlever l’ancien luminaire, déconnectez le courant en eteignant le disjoncteur ou en enlevant le fusible correspondent du coffret à fusibles. Pour éviter d’endommager ce produit, assemblez-le sur une surface molle et non abrasive telle qu’un tapis ou un carton. Conservez le reçu, ainsi que ces instructions, à titre de preuve d’achat.
CONTENU DE L'EMBALLAG Pièce A B C D E Description Pavillon Douille Abat-jour Capuchon Écrou Décoratif 20 Quantité 1 2 1 1 1
1 □ □ □ Attacher la sangle de montage à la boîte de sortie Visser la vis de montage (GG) dans les trous extérieurs dans la sangle de montage (BB). Placez les vis de boîte de sortie (FF) à travers les longs trous ovales de la sangle de montage (BB) et vissez les vis de boîte de sortie (FF) dans les trous de vis sur la boîte de sortie (non inclus). Assurez-vous que les têtes des vis de montage (GG) sont orientées vers l'extérieur lorsque la sangle de montage (BB) est fixée à la boîte de sortie.
4 □ □ 5 □ Fixer l’embout Visser I’embout (EE) environ 1/4 pouce dans la bague sur le pavillon (A). Serer l’ecrou hexagonal (DD) sur la bague sur le pavillon (A) pour fixer I’embout (EE). Installer ampoules nstallez deux ampoules incandescentes a culot moyen de 60 watts maximum (non inclus) dans les douilles (B).
6 □ □ Mettre en place I’abat-jour Placer le abat-jour (C) et le capuchon (D) au-dessus de l’embout (EE). Visser I’écrou décoratif (E) sur l’embout (EE) pour maintenir l’abat-jour (C). AVERTISSEMENT: Débrancher l’alimentation électrique avant de nettoyer le luminaire en enlevant les fusibles concernés ou en désactivant le disjoncteur. □ Nettoyez la lampe avec un linge doux, sec. □ N'utilisez jamais de nettoyant contenant des produits chimiques, des solvants ou des abrasifs.
Questions, problèmes, pièces manquantes? Avant de retourner au magasin, veuillez communiquez avec le service à la clientèle entre 8h00 et 19h00 (HNE) du lundi au vendredi, entre 9h00 et 18h00 (HNE) du samedi 1-877-527-0313 HOMEDEPOT.COM CONSERVEZ CE GUIDE POUR UN USAGE ULTERIEUR.