
Installation Guide

C)
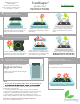
B)
Using garden mat with a
combination drip irrigation system
D)
Thank you for purchasing
TREEDIAPER
®
For best results, please follow
these procedures to install and use
your TreeDiaper
®
product!
2. Simply plant into the pre-cut holes of
the garden mat, and along the edges if
space allows.
3. Rain or irrigation will keep plants
watered. If soil becomes dry, water as
usual.
1. Place the garden mat as soon as possible
with darker side up to begin catching and
storing rain and snow for your garden.
Using garden mat in a
to-be-planted garden bed.
A)
Using garden mat when garden is
already planted (DURING WET SEASON)
1. If your garden is already planted, you
may place a dry garden mat around existing
plants using the cut slits in the material.
2. If the spacing is not right for your
plants, do not cut or stretch the garden
mat. Instead, leave a spot empty and/or
plant outside the edge of the mat.
3. Water as often as you usually would for
the soil is dry.
Using garden mat when garden is
already planted (DURING DRY SEASON)
1. Soak the garden mat in a 5 gallon bucket
overnight.
2. Follow steps from Procedure B using the
soaked garden mat.
1. Follow procedure A or B.
2. Let drip irrigation water the top of the mat.
NOTE:
•
or tomato cage on top of garden mats. This may result in the loss of
functionalities of garden mats.
• Covering with mulch, pine needles, or leaves is recommended.
• Direct contact of fertilizers with the material in use or in storage may
temporarily or permanently affect the performance of the product.
• Do not poke the garden mat with sticks. Damage to the surface
integrity of the garden mat may decrease the functionality of the product.
If you have any questions, please email info@treediaper.com.
Version 2.0.17. Updated on 04/03/18
or
TreeDiaper
®
garden mat
For Garden Beds
or
INSTRUCTIONS
• Always place the mat with the darker black woven side facing up!