
Instructions / Assembly

Assembly Instructions
Part Name:
Quantity:
Hardware Type:
Quantity:
Back Section
1
Slotted Head Bolt
4
Seat Section
1
Slotted Headless Bolt
12
Arms
2
Flat Washer
12
Legs
4
Lock Washer
12
Nut
12
Before assembling the product, please read all instructions carefully. Two
capable adults are recommended for assembly. Assemble on soft flat surface. Loosely tighten all hardware by hand during
assembly, and do final tightening after all parts are connected. Do not over-tighten as you may strip holes. Do not use power
tools.
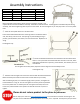
① Place the seat upside down on a soft flat surface.
Fasten the slotted headless bolt into all the leg holes on the bottom side of
seat, slot side up, two at a time. Then put leg on; while holding the leg in
position, put flat washer, lock washer, and nut onto the bolt. Repeat for all
4 legs.
Hand tighten only.
② Fasten the slotted headless bolts onto the bottom of the loveseat back
section. Line up the bolts of loveseat back with the holes in the seat, while
holding the loveseat back in position, put flat washer, lock washers, and nut
onto the bolt.
Do not tighten all the way down, keep bolts lose for alignment and assembly of arms.
Hand tighten only.
③ Attach the left and right arms to the back and seat with the slotted head bolts.
Make sure back piece remains loose so that arm bolt will line up correctly.
After assembling all parts, turn loveseat upright, hold in position, and tighten all
loose hardware to “snug” fit. Do not over tighten as this may cause striped holes.
Do not use power tools. If loveseat parts do not appear to be level, be sure to
loosen nuts, hold loveseat in level position on desired surface of use, then re-
tighten.
Please do not return product to the place of purchase.
We can help you! E-mail us at service@oakland-living.com to connect with a customer service agent. You
may also call us at 248-652-1404 during business hours M-F, 9 am – 5 pm EST. Thank you for your purchase!