
Installation Guide


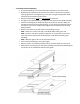

o Overlap Reducer Transition Moulding
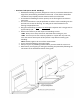
Overlap reducer was primarily designed to allow a wood floor installation expand
under the lip when the floor is abutted to a lower floorcovering.
It is important that the depth of thickness of the floor very closely mates with
the finished installation height of the moulding.
The moulding should sit squarely on the lower floor covering and have minimum
clearance under the tongue with the wood flooring.
This is one case where it may be preferable to surface nail the moulding onto the
carpet. This will give the most freedom for the flooring to expand.
If you are reducing the wood flooring to tile, then the moulding can be glued
directly to the tile.
In either case the flooring must have room to expand.
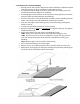
Bring the new flooring up to but not touching the adjacent flooring. This gap can
be approximately 3/8”.
Measure the distance you will require the moulding to cover.
HINT: Always use a sharp saw and or saw blade when making any cuts.
HINT: To insure you do not create any splinters or rip-out with any saw cuts,
cover the saw line with a piece of blue painter’s tape before trimming your
moulding.
HINT: Measure again to be sure of this measurement.
Trim a piece of moulding to this exact length.
Always “dry-fit” any moulding to determine if you have made the correct cut.
Determine if you are gluing or nailing the moulding and proceed by following the
instructions in the Installation Section of this guide.