
Installation Guide
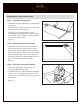
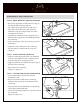


STEP 6 - ATTACH SINK ON THE COUNTERTOP
It is recommended to install a faucet before •
installing the sink.
Please be aware that solid surface countertop •
hardware may vary based on the material of the
countertop.
Insert the anchors into drilled holes and gently tap •
with a rubber mallet until ush
Attach the mounting hardware to secure the sink on •
the countertop.
(Figure 6.1, Figure 6.2
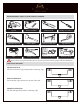
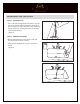
STEP 4 - DRILL HOLES ON THE COUNTERTOP
Review the clip length carefully where the edge of •
the clips should overlap the sink rim.
Use 3 clips on the long sides of the sink. Use 2 •
clips on the short sides of the sink. e holes
should be evenly spaced apart from each other
starting near the corner.
Determine the thickness of the countertop. Use a •
drill bit with a stop block to avoid drilling through
the countertop.
Always wear proper safety gear to protect yourself •
from injury.
Drill holes on the underside of the countertop. •
All holes must be smaller than the screw size.
(Figure 4
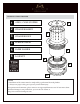
STEP 5 APPLY SILICONE ADHESIVE
With the countertop upside down, use denatured •
alcohol to thoroughly clean the countertop holes
and sink rim prior to attaching the sink.
Apply a bead of silicone adhesive along the edge of •
the hole in the countertop.
Place sink on the countertop. •
(Figure 5.1, Figure 5.2
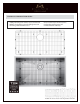
UNDERMOUNT SINK APPLICATION
Figure 4
Figure 5.1
Figure 5.2
Figure 6.1