
Use and Care Manual


22 INSTALLATION — Shower base with Schluter
®
-KERDI-DRAIN
Schluter
®
-KERDI-SHOWER-T/-TS/-TT shower trays and KERDI-DRAIN
Please refer to Schluter
®
-Systems' installation videos in addition to reading the instructions below.
INSTALLATION
Preparation
Locate and cut a hole in the substrate for the drain outlet and coupling to the waste line using the template provided. Limit the diameter of the hole to
5" (125 mm) maximum to ensure proper support for the tile assembly.
Note: Fill in box-outs in concrete floors with dry-pack mortar or concrete. A pipe coupling or similar can be used as a form around the waste line.
Schluter
®
-KERDI-DRAIN with Schluter
®
-KERDI-SHOWER-T/-TS/-TT prefabricated
shower trays
The substrate must be clean, even, and load bearing. Any leveling must be done prior to shower tray installation. If necessary, cut the tray to size prior to
application; ideally, the tray is cut equally on all sides to ensure a consistent perimeter height. The base can also be extended beyond the tray using dry-pack
mortar.
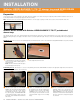
Plumbing Access: If there is access to the plumbing from below and the waste line can be connected after installing KERDI-DRAIN, the tray can be installed
prior to the drain.
No Plumbing Access: When there is no access to the plumbing from below, KERDI-DRAIN is installed to the appropriate height and connected to the
waste line prior to the installation of the shower tray.
Apply Schluter SET
TM
, ALL-SET
TM
, FAST-SET
TM
,
or unmodified thin-set mortar to the substrate
using a 1/4" x 3/8" (6 mm x 10 mm) square- or
U-notched trowel.
Note: The thin-set mortar used in this step is
to bed and support the tray only.
1
Place the KERDI-SHOWER-T/-TS/-TT tray
and solidly embed in the mortar.
2
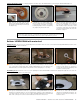
Begin by dry-fitting the components. Measure
and cut a section of pipe to connect KERDI-
DRAIN to the odor trap using the detachable
center section of the tray or foam spacers
included with the drain as a spacer. Prepare
the odor trap, pipe, and KERDI-DRAIN with
cleaner, primer and ABS or PVC cement per
the solvent cement manufacturer’s instructions
and connect.
1
Apply Schluter SET™, ALL-SET™, FAST-
SET™, or unmodified thin-set mortar to
the substrate and to the top and bottom of
the detached center section of the KERDI-
SHOWER-T/-TS/-TT tray. Slide the center
section into place below the drain to ensure
solid and uniform support of the bonding
flange.
2
Apply Schluter SET™, ALL-SET™, FAST-
SET™, or unmodified thin-set mortar to the
substrate using a 1/4" x 3/8" (6 mm x 10
mm) square- or U-notched trowel. Place the
KERDI-SHOWER-T/-TS/-TT tray and solidly
embed in the mortar. Check the underside of
the tray to ensure full coverage and support
are achieved.
3