
Use and Care Manual


INSTALLATION
Shower base with Schluter
®
-KERDI-LINE
Please refer to Schluter
®
-Systems installation videos in addition to reading the instructions below.
Schluter
®
-KERDI-LINE channel body installation
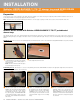
Plumbing Access: When there is access to the plumbing from below and the waste line can be connected after installing KERDI-LINE, the channel body
may be set without making a connection to the waste line simultaneously.
Apply Schluter SET
TM
, ALL-SET
TM
, FAST-
SET
TM
, or unmodified thin-set mortar to the
substrate where the drain is to be placed
with a notched trowel and solidly embed the
channel support in the mortar.
1
Apply Schluter SET
TM
, ALL-SET
TM
, FAST-SET
TM
,
or unmodified thin-set mortar to the top of
the channel support and press the channel
body firmly into the mortar, ensuring full
support of the bonding flange. Check to
make sure the KERDI-LINE is level.
2
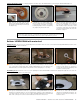
No Plumbing Access: When there is no access to the plumbing from below, the channel body must be set and connected to the waste line simultaneously.
Begin the drain installation by dry fitting the
components. Measure and cut a section of
pipe to connect the coupling to the odor trap
below the floor, using the channel support
as a spacer.
1
Apply Schluter SET
TM
, ALL-SET
TM
, FAST-SET
TM
,
or unmodified thin-set mortar to the top of
the channel support with a notched trowel
and press the channel support firmly onto
the underside of the channel body. Attach
the mechanical coupling to the drain outlet
and the cut section of the pipe per the
coupling manufacturer’s instructions.
2
Apply Schluter SET
TM
, ALL-SET
TM
, FAST-
SET
TM
, or unmodified thin-set mortar to the
substrate where the drain is to be placed
with a notched trowel. Prepare the cut
section of pipe and odor trap with cleaner,
primer and ABS or PVC cement per the
solvent cement manufacturer’s instructions.
3
Solidly embed the channel support and KERDI-LINE into the mortar on the floor and connect the
cut section of pipe to the odor trap. Check to make sure the KERDI-LINE is level.
Note: KERDI-FIX or other adhesives that are compatible with EPS foam can be used to install the
channel support and channel body as an alternative to thin-set mortar. Apply a generous bead of
KERDI-FIX to the top and bottom of the channel support. The use of KERDI-FIX limits the ability
to level KERDI-LINE.
4
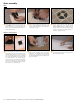
Clamping Ring Drain Installed: If a clamping ring drain is already installed, the drain must be replaced with KERDI-LINE.
Preparation
Locate and cut a hole in the substrate for the drain outlet and coupling to the waste line using the template
provided. Limit the diameter of the hole to 5" (125 mm) maximum to ensure proper support for the tile assembly.
When installing KERDI-LINE against a wall, be sure to factor in the wall board thickness before cutting the hole
in the substrate. Note: Fill in box-outs in concrete floors with dry-pack mortar or concrete. A pipe coupling or
similar can be used as a form around the waste line.
Note: Schluter
®
-Systems strongly recommends a leak test be performed on the connection between
the drain and the waste line prior to continuing with the remainder of the installation whenever
possible. Refer to local plumbing and/or building codes for any specific requirements in your area.
INSTALLATION — Shower base with Schluter
®
-KERDI-LINE 27