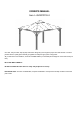
OWNER'S MANUAL Item: L-GZ401PCO-2 Our clear, easy-to-follow, step-by-step instructions will guide you through the project from start to finish. The final product will be a quality piece that will go together smoothly and give years of enjoyment. All you will need is a screwdriver, a hammer and two ladders (not included) whose height is no less than 2.5m (8.2 feet). Note: THIS UNIT IS HEAVY! Do NOT assemble this item alone for safety. Six people are necessary.
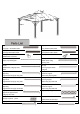
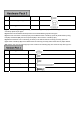
A1 (x2) B1 (x2) Long right decorative beam Long left decorative beam C1(x2) D1(x2) Short right decorative beam Short left decorative beam E1(x4) G1(x4) Corner connector Middle beam Connector B2 (x2) A2(x4) Top slanting bar Middle beam of big top long side C2(x2) D2 (x2) Middle beam of big top short Left long support beam side of big top E2 (x2) F2 (x2) Right long Left short support support beam of big top long side beam of big top long side G2 (x2) H2 (x2) Right short Left long su
Bottom beam of small top 2 Upper beam of small top C3 (x2) D3 (x2) Roof cover of small top long side Roof cover of small top short side E3 (x2) F3 (x2) Long side support Bar Short side support Bar G3 (x1) H3 (x1) Connector of small top Top cover of small top I3 (x1) Top décor A4(x4) Post base B4 (x4) Base protector C4 (x4) Post D4 (x4) Top block E4(x4) Block plate F4(x4) Arc support bar G4(x4) Arc support bar A5(x2) B5 (x2) Left roof cover of long side 1 Right roof cover of long sid
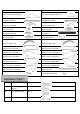
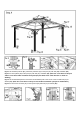
Fig.1: Insert the decorative beam B1 (D1) to A1 (C1); tighten with bolt (CC) & flat washer (BB). Fig.2: Attach assembled beams to another respectively and tighten with bolt (JJ) & flat washer (BB). Fig.3: Fix the Middle beam connecter (E1) on the middle of decorative beams by using bolt (CC) & flat washer (BB). Fig.4: Fix the Corner connector (G1) on the corner of the decorative beam with bolt (CC) & flat washer (BB). AA 1/4" – 20x1 hex bolt 8 PCS BB Φ1/4" bigger flat washer 72 PCS CC 1/4" – 20x0.
Fig.5: Attach the Top short panel (M2) to the Top long panel (L2) with bolt (AA) & washer (BB). Fig.6: Fix the Top slanting bar (A2) onto the Corner connector (G1) with bolt (EE) & washer (BB) & nut (FF). Fig.7: Fix Top slanting bar (A2) onto the assembled small top frame with bolt (CC) & washer (BB). Fig.8: Fix the Middle beam of big top B2 (C2) onto the assembled Middle beam connector E1 with bolt (EE), washer (BB) and nut (FF). Fig.
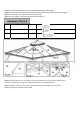
DD 1/4"-20x0.6 bolt 4 PCS KK 1/4"-20 hexagonal capped nut 8 PCS BB Φ1/4" bigger flat washer 12 PCS Fig.11: Insert the Long side support bar (E3) & short side support bar (F3) into the corner pipe of bottom beam of small top (A3 & A6) as figure. Fig.12: Attach the assembled small top frame into the assembled big top frame as figure. Fig.
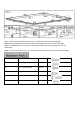
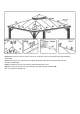
Fig.15: Lift the Base protector (B4), attach the post base (A4) to the post (C4) with bolt (DD) & washer (BB). Fig.16: Fix the top block (D4) to the post (C4) with bolt (CC) & washer (BB). (Note: the screw holes on the post and the screw holes which install the block plate (E4) should be in the same direction as shown on drawing.) Fig.17: Lift the assembled pavilion roof and fix the assembled post to the corner of the roof with bolt (CC) & washer (BB).
Fig.19: Fix the block plate (E4) to the top block (D4) with bolt (DD) & washer (BB). Fig.20: Fix the arc support bar (F4/G4) to the post (C4) & decorative beam with bolt (CC) & washer (BB). Fig.21: Fix the gazebo on the grass ground with the peg (HH). Fig.21-1: Fix the gazebo on the cement ground with the anchor (II). BB Φ1/4" bigger flat washer 50PCS DD 1/4"-20x0.6 bolt 42PCS GG 1/4"-20x1.6 bolt 8PCS Fig.
Fig.24: Attach the roof covers C5, D5, E5, F5, H5, I5, J5, K5, B 5 to the top slant ing b ar (A2) with bolt (DD) & washer (BB). Fig.25: Press up the roof covers with the roof press sheet (N5), and fix N5 on the decorative beam with bolt (DD) & washer (BB). Fig.26: Insert the top cover (L5) into the hole of the small top frame corner. Fig.27: Fix the top cover (L5) on the top slanting bar (A2) with bolt (GG) & washer (BB). Now, your Pavilion is ready for use.
Limited Warranty: This limited warranty is extended to the original purchaser and applies to defects in materials and workmanship of your item provided the item is maintained with care and used only for personal, residential purposes. The item is warranted to be free from defects in material or workmanship for a period of one (1) year. We don't reimburse for transportation or delivery costs, or compensate the individual or any outside party for assembling or disassembling the product.
MANUAL DEL PROPIETARIO Artículo: L-GZ401PCO-2 Nuestras instrucciones, claras, fáciles de seguir, etapa por etapa le guiaran por el procedimiento de montaje desde el principio hasta el final. El producto final será una pieza de calidad que se montara fácilmente y le dará años de distracción. Lo única que necesitara es un destornillador, un martillo y dos escaleras (no incluidas) de una altura de más de 2.5m (8.2pies). Aviso: ¡ESTA UNIDAD ES MUY PESADA! NO MONTE este articulo a solas para su seguridad.
Etapa 3 Etapa 2 Etapa 5 Etapa 1 Etapa 4 Lista de Piezas A1 (x2) B1 (x2) Viga Ornamental larga derecha Viga ornamental larga izquierda C1(x2) D1(x2) Viga ornamental corta derecha Viga ornamental corta izquierda E1(x4) G1(x4) Conexión de esquina Conexión de vigas central A2(x4) B2 (x2) Viga central del techo grande Viga inclinada del techo lado largo C2(x2) D2 (x2) Viga central del techo grande Viga de apoyo larga izquierda lado corto del techo grande E2 (x2) F2 (x2) Viga de apoyo la
C3 (x2) D3 (x2) Lámina del techo pequeño, lado largo Lámina del techo pequeño lado o corto E3 (x2) F3 (x2) Barra de apoyo, lado largo Barra de apoyo, lado corto G3 (x1) H3 (x1) Conexión del techo pequeño Lámina del techo pequeño I3 (x1) Florón A4(x4) Base de la Columna B4 (x4) Protección de la Base C4 (x4) Columna D4 (x4) Bloque del techo E4(x4) Placa del bloque G4(x4) Barra de apoyo arqueada F4(x4) Barra de apoyo arqueada A5(x2) B5 (x2)Lámina derecha del Lámina izquierda del techo, lado
Etapa 1 Fig.1: Introduzca la viga ornamental B1 (D1) en A1 (C1); fije con tornillo (CC) y arandela plana (BB). Fig.2: Conecte las vigas fijadas con la siguiente respectivamente y fije con tornillo (JJ) y arandela plana (BB). Fig.3: Fije la conexión central de la viga (E1) a la viga ornamental central con tornillo (CC) y arandela plana (BB). Fig.4: Fije la conexión central (G1) a la esquina de la viga ornamental con tornillo (CC) y arandela plana (BB).
Etapa 2 Etapa 2 Fig.5: Conecte la sección del techo corta (M2) a la sección del techo larga (L2) con tornillo (AA) y arandela (BB). Fig.6: Fije la Barra inclinada (A2) a la conexión de la esquina (G1) con tornillo (EE), arandela (BB) y tuerca (FF). Fig.7: Fije la barra inclinada (A2) a la estructura del techo pequeño montada con tornillo (CC) y arandela (BB). Fig.8: Fije la Viga central del techo grande B2 (C2) en la Viga de conexión central E1 montada, con tornillo (EE), arandela (BB) y tuerca (FF).
Bolsa de Ferretería 3 DD 1/4"-20x0.6 tornillo 4 Piezas KK 1/4"-20 Tuerca cerrada 8 Piezas hexagonal BB Φ1/4"Arandela plana grande 12 Piezas Fig.11: Introduzca la Barra de apoyo, lado largo (E3) y la barra de apoyo, lado corto (F3) en el tubo de la esquina de la viga inferior del techo pequeño (A3 & A6) como en el diagrama. Fig.12: Conecte la estructura del techo pequeño montada en la estructura montada del techo grande come en el diagrama. Fig.
Etapa 4 Fig.15: Levante el protector de la base (B4), fije la base de la columna (A4) a la columna (C4) con tornillo (DD) y arandela (BB). Fig.16: Fije el bloque del techo (D4) a la columna (C4) con tornillo (CC) y arandela (BB). (Aviso: los agujeros para tornillos de la columna y los que instalan la placa del bloque (E4) deben dirigirse en el sentido que señala el diagrama.) Fig.
Fig.19: Fije la placa del bloque (E4) sobre el bloque del techo (D4) con tornillo (DD) y arandela (BB). Fig.20: Fije la barra de apoyo arqueada (F4/G4) sobre la columna (C4) y la viga ornamental con tornillo (CC) y arandela (BB). Fig.21: Fije el pabellón a la tierra o al césped con los piquetes (HH). Fig.21-1: Fije el pabellón al cemento con las anclas (II). Bolsa de Ferretería 5 BB Φ1/4" Arandela plana 50 Piezas grande DD 1/4"-20x0.6 Tornillo 42 Piezas GG 1/4"-20x1.6 Tornillo 8 Piezas Fig.
Fig.24: Fije las Láminas del techo C5, D5, E5, F5, H5, I5, J5, K5, B 5 a las barras inclinadas del techo (A2) con tornillo (DD) y arandela (BB). Fig.25: Apriete las hojas de Láminas del techo (N5), y fije N5 sobre la viga ornamental con Tornillo (DD) y arandela (BB). Fig.26: Introduzca la Lámina del techo (L5) en el agujero de la esquina de la estructura del techo pequeño. Fig.27: Fije la Lámina del techo (L5) sobre la barra inclinada del techo (A2) con tornillo (GG) y arandela (BB).
Garantía Limitada: Esta garantía limitada se extiende al comprador original y se aplica a defectos materiales y de mano de obra de su artículo siempre y cuando el articula haya sido mantenido con cuidado y empleado para uso personal, y residencial únicamente. El artículo está garantizado de carecer de defectos materiales o de mano de obra por un periodo de un (1) año.