Assembly Instructions Item#: L-GZ472PST-C-A
Table of Contents Table of Contents .......................................................... 2 Safety Information ......................................................... 2 Warranty ......................................................................... 2 What is Covered ......................................................... 2 What is Not Covered .................................................. 2 Pre-Assembly ................................................................ 3 Planning Assembly ....
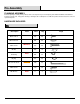
Pre-Assembly PLANNING ASSEMBLY Before beginning assembly of this product, make sure all parts are present. Compare parts with the Hardware Included and Package Contents lists. If any part is missing or damaged, do not attempt to assemble the product. Contact customer service for replacement parts. HARDWARE INCLUDED NOTE: Hardware not shown to actual size. Description M6 X 15 Bolt M6 Flat washer M6 X 35 bolt M6 Nut Small ring Big ring Dia.
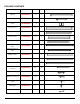
PACKAGE CONTENTS Description Part# Label Qty Big post GZ0472XCA01 A 4 Small post GZ0472XCA02 B 8 Fence GZ0472XCA03 Long screen 1 GZ0472XCA04 D 2 Long screen 2 GZ0472XCA05 E 2 Short screen 1 GZ0472XCA06 F 2 Short screen 2 GZ0472XCA07 G 2 Long mosquito net tube GZ0472XCA08 H 4 Short mosquito net tube GZ0472XCA09 I 4 Middle beam 1 GZ0472XCA10 J 2 Middle beam 2 GZ0472XCA11 K 2 Oblique beam GZ0472XCA12 L 4 Oblique beam connector GZ0472XCA13 M 4 Big roof conne
Description Part# Label Qty Straight pipe connector GZ0472XCA19 S 4 Small canopy GZ0472XCA20 T 1 Big canopy GZ0472XCA21 U 1 Mosquito net GZ0472XCA22 V 1 Wall GZ0472XCA23 W 1 Image
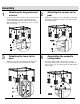
Assembly 1 □ 3 □ Attaching the long and short screens Insert the long screen 1 (D) into long screen 2 (E). Then install straight pipe connector (S between the two screens (D and E) using bolts (AA) and flat washers (BB). Repeat this step to attach short screen 1 (F) and short screen 2 (G). Attaching the fence to the post Attach the fences (C) to the big posts (A) and small posts (B) using bolts (HH) and flat washers (BB).
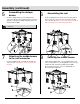
Assembly (continued) 5 □ Assembling the oblique beams Insert the oblique beams (L) into oblique beam connectors (M). Secure the oblique beam connectors (M) to the U-shaped assembly using bolts (CC), flat washer and nuts (DD). 6 □ Assembling the roof Insert the oblique beams (L) into the connecting tube of big roof connector (N). Secure the hook (R) to the big roof connector (N). Please note Connector (N) is marked with K & L labels for insertion into proper tubes.
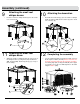
Assembly (continued) Attaching the small roof oblique beams 9 □ Insert the small roof oblique beams (P) into the small roof connector (O). 11 □ Attaching the small roof oblique beam Attach the small roof oblique beams (P) to the holes of the oblique beams (L) using bolts (CC), flat washers (BB), and nuts (DD). Put the big canopy (U) on top of the assembly. 10 □ Assemble the small canopy (T) to the small roof oblique beam (P) and assemble the decoration (Q) to the small roof connector (O).
Care and Cleaning Before using, clean the product completely with a soft, dry towel. When not in use, wipe free of any dirt or loose objects, wash with a mild solution of soap and water; rinse thoroughly and dry completely. •Do not use strong detergent or abrasive cleaners. •Do not machine wash. •Bolts can loosen over time. Be sure to check bolts occasionally, tightening as needed. •This gazebo is not a permanent structure and should be disassembled & stored away after use.