
Instructions / Assembly

ASSEMBLY & INSTALLATION INSTRUCTIONS:
LEWISTON MAILBOX COLLECTION
QualArc
11300 Trade Center Dr., Ste. A
Rancho Cordova, CA 95742
916-273-1576
Fax 916-635-0228
www.qualarc.com
READ ALL INSTRUCTIONS PRIOR
TO ASSEMBLY AND INSTALLATION.
Important Note:
Customers are required to contact their local
post office before installing the mailbox to
ensure its correct placement and height at the
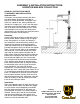
street. As a general rule, most mailboxes are
installed at a height of 41" to 45" from the top of
the street surface to the bottom of the mailbox
and 8" set back from front edge of curb. These
measurements can vary per your local postal
requirements, so check with your local post office
before installation. (see Diagram A)
Assembly:
Attach scroll support brace to round pole using 2
bolts provided. Attach mailbox to top of support
brace using either 4 or 5 bolts as provided. If
you ordered the standard economy mailbox, the
support brace attaches to the wood platform
under the mailbox with the 4 large wood screws
provided. Snug bolts firmly, but do not over-tighten
them. If a finial (or solar light) is not attached to
the round pole, slide it over the top of the pole
and snug set screws against the pole with an
Allen wrench. Slide the decorative base onto the
bottom of the round pole, but keep it low on the
pole and do not tighten yet. Get a measuring
tape and measure the distance from the bottom
of the mailbox to the bottom of the decorative
base. Gently slide the base up the pole (without
scratching the pole) until you have the correct
measurement for your local USPS code
requirement. This measurement will typically be
between 36" to 42", which will leave around 12" to
16" of round pole extending below the decorative
base. This extension is what you will put into the
hole and pour concrete around. Once you have
the correct decorative base adjustment, snug the
Allen set screw(s) at the top of the base so the
base will not slide up or down.
Installation:
Dig a hole approximately 16" deep (this will vary
due to local postal codes) with post hole digger
or small shovel. Install completely assembled
post into hole and check for fit. Mix quick set
style concrete and pack it in around the post in
the hole. Place a spirit level on the round pole
and level the mailbox post front to back and
side to side. Some temporary supports may be
necessary until the concrete dries.
Diagram A