
Installation Guide

4
IMPORTANT!: Signature Baths are intended for indoor use only with installation in
accordance with all instructions in this book.
IMPORTANT!:To reduce the risk of personal injury and discoloration of the acrylic
surface, water temperatures from the inlet should not exceed 140º F. Use supply
lines suitable for 167º F, including the temperature rating of supply conductors to
be used.
IMPORTANT!: Do not drop or insert any object into any opening.
IMPORTANT!: Do not use attachments or accessories not recommended by Signature
Bath.
IMPORTANT!: When required by local codes, install a RPZ (reduced pressure zone)
back ow prevention device to each faucet supply line.
IMPORTANT!: Unauthorized modication may cause unsafe operation and poor
performance. Do not relocate the blower or make other modications as it could
adversely aect the performance and safe operation of this bath. Signature Baths
is not responsible under the warranty or otherwise liable for personal injury or
damage caused by unauthorized modications.
IMPORTANT!: To prevent overheating, building materials and wiring should be routed
away from the blower or other heat producing components in this bath.
Installation of your Signature Bath requires a working knowledge of construction, plumbing and electrical installation. The owner/installer bears
all responsibility to comply with all state and local codes when installing this product. For optimal enjoyment and satisfaction, Signature Bath
recommends installation and servicing be performed by qualied, licensed professionals in compliance with State and Local Codes. Walls and
oors should be re safe. Problems resulting from improper installation are not covered under the warranty.
This bath does not require support in excess of other baths of the same size, weight and gallon capacity. Signature Bath has obtained
applicable code listings available on a national basis that are generally available for products of this type. It is the responsibility of the
owner/installer to determine specic local code compliance prior to installation. Signature Bath does not warrant or represent and is not
responsible for any code compliance. Product specications are subject to change from time to time at the manufacturer’s discretion
without notice.
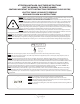
!!ATTENTION INSTALLER!!
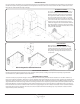
To prevent damage to the bath and the installed components, use only the bath shell to lift and move the bath.
DO NOT LIFT OR MOVE THE BATH BY THE INSTALLED COMPONENTS AT ANY TIME.
Before taking the bath indoors for installation, thoroughly inspect bath for:
• Shipping Damage: Report shipping damage to the carrier immediately. DO NOT INSTALL A DAMAGED BATH. Signature Bath is not
responsible for damage that occurred during transit.
• Factory Defect: Manufacturing defects must be reported to Signature Bath before installation. Defects or damage claimed after
installation are not covered under the warranty.
• Measurement Variances: Each Signature Bath is hand crafted which may result in slight variations during the manufacturing process.
The manufacturer recommends measuring the bath to determine actual cut-out dimensions. Signature Bath is not responsible for
preparatory materials or labor costs associated with variations in the manufacturing process..
This bath must be tested for operation and leaks prior to placement and enclosure. Failure to do so will void the warranty. Signature Baths
are water tested at the manufacturing facility and found to be fully operational and leak-free prior to shipping. Freight, handling and site
exposure may adversely affect the bath’s condition. It is the responsibility of the installer to inspect the bath shell and components for
defects and to test the bath prior to installation. This bath is intended for indoor use only and is warranted for indoor installation in a
climate controlled environment only.
TESTING YOUR BATH:
1. To protect the bath, lay a clean heavy drop cloth on a at surface where the bath can be drained easily after testing, like a driveway.
2. Remove the packing materials being careful not to scratch or damage the surface. Inspect the bath to make sure the model, color and
features in the bath received match the bath that was ordered exactly.
3. Carefully place the bath on the drop cloth. Do not use the plumbing harness or electrical components to lift the bath.
4. Seal the drain with tape.
5. Hand tighten plumbing unions at the blower.
6. Fill the bath until the water level is above the jets and allow bath to stand for ve minutes without the blower running.
7. Check for leaks by examining the area underneath and surrounding the bath. The controls installed above the normal water line are
water resistant. They are not water proof. Under normal use the controls will not leak. However, the controls are not warranted against
damage caused by improper use or that occurs when they are subjected to conditions for which they are not designed like leaks or
submersion
4