
Installation Guide

8
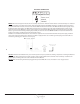
PLUMBING CONNECTIONS
Important: Risk of damage to bath bottom and sub-oor. It is the installer’s responsibility to ensure watertight seal on installed
connections.
Important: Proper installation of the hardware and compliance with codes is the responsibility of the installer. Signature Bath does not
warrant connections of water supply ttings and lines, ll systems, or drain/overow systems and is not responsible for damage to the
bath that occurs during installation.
With the GFCI o, connect the supply lines and plug the blower into the GFCI. Close the bath drain, turn on hot and cold water, check
supply lines for leaks as bath lls. Turn the water o when the bath is lled approximately half way. Turn the components on and allow
them to operate for 10 minutes. Conrm proper operation and check for leaks. Turn the components o and check for leaks as the bath
drains.
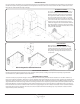
FINISH WALL AND INSTALL BATH ENCLOSURE:
With the drain plugged and the bath surface protected, follow the manufacturer’s instructions to mount anges, cover framing with
appropriate wallboard, install wall nishing treatments and bath enclosure, seal the space between the bath and the walls, oors,
platforms and enclosures.
CLEANING AFTER INSTALLATION
• To prevent clogging the drain, remove debris and wallboard dust before rinsing your bath.
• Remove large plaster spills with a plastic edge. Metal will scratch the surface.
• Small spots can be removed by rubbing with a soft, damp cloth.
• Paint and other dicult stains that are not water soluble can be removed with paint thinner, rubbing alcohol or turpentine.
• Minor scratches that do not penetrate the surface can be removed with a light sanding with 600 grit wet/dry sandpaper.
• Bu area with automotive bung compound followed by automotive paste wax.
• Major scratches and gouges require renishing. Contact your dealer for special instruction.
8