
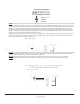
Installation Guide


10
CLEANING YOUR SIGNATURE BATH
• After each use, clear hair and lint from the suction cover and rinse your bath well.
• Clean frequently with a soft cloth and mild liquid detergent mixed with warm water. Rinse well after cleaning.
• Once each month, ll your bath with hot water above the jets and add a sanitizer safe for acrylic surfaces following the instructions
on the label. Turn the pump on, run for 10 minutes and drain. Fill bath with cold water 2” above the jets, turn on, run for 15 minutes
and drain. *Never use dish soap, hand soap, laundry detergent or any other cleaner that creates suds.
CARING FOR YOUR SIGNATURE BATH
• Do not use bubble bath or oil based additives in your Signature Bath.
• The bath should be drained after each use. Each bather should use fresh water.
• Certain cleaning products will permanently damage the bath surface. Read the product label carefully before use to be certain it
specically says it’s safe for acrylic surfaces. Never use scouring pads, harsh or abrasive chemicals, aerosol sprays marketed to clean
sinks, baths and tile, disinfectant sprays or ammonia based cleaning products that are commonly used to clean windows on your
Signature Bath.
• Never circulate drain cleaner. It will cause serious damage to your bath.
• Avoid contact with nail polish, nail polish remover, lacquer thinners, gasoline, and certain oils like pine.
• Minor scratches that do not penetrate the surface can be removed with a light sanding with 600 grit wet/dry sandpaper. Bu area
with automotive bung compound followed by automotive paste wax. Do not wax areas where you stand
• Major scratches and gouges require renishing. Contact your dealer for special instruction.
• Do not use bath mats in your Signature Bath.
TROUBLESHOOTING
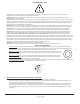
DANGER: Risk of severe injury by electric shock or death by electrocution. Disconnect power before servicing.
Pump does not come on:
Button not pressed to turn pump on. Press pump button.
Hose from pump to pump button is disconnected. Reconnect.
Hose disconnected from pump. Reconnect.
Breaker at main power supply tripped or malfunctioned. Reset or replace breaker.
GFCI tripped or malfunctioning. Reset or replace.
Power cord not plugged in. Plug cord into GFCI.
In-line heater (if bath is equipped) and pump plugged into same GFCI. Contact electrician to have dedicated GFCI installed for in-line
heater.
No water ows from jets:
LARGE JETS ONLY - Jet is rotated to closed position. Rotate jet counter clockwise to open.
Jet is not secured in housing. Pull jet outward rmly to re-seat jet.
Debris or hair on suction cover. Remove.
Return line is higher than the normal waterline. Contact installer it correct elevation of return line.
Low Voltage. Contact electrician to correct wiring.
Pump Shutting O:
Overheating. Let pump cool. Remove debris from components, increase ventilation around components.
Pump has automatically timed out. Press pump button to turn back on.
In-line heater (if bath is equipped) and pump plugged into same GFCI. Contact electrician to have dedicated GFCI installed for in-line
heater.
Breaker at power supply or GFCI tripped or malfunctioned. Reset or replace GFCI.
Bath is wired on shared circuit or with an extension cord. Contact electrician to correct wiring.
Air injectors don’t work:
Line to pump, controls or manifold not connected, kinked, or damaged. Reconnect. Straighten or replace if necessary.
Rust colored ring in bath:
Sediment in water heater. Flush water heater and clean bath with grease cutting dish soap.
SAVE THESE INSTRUCTIONS
CONTAINS IMPORTANT SAFETY INSTRUCTIONS PERTAINING TO RISK OF FIRE,
ELECTRIC SHOCK, OR INJURY TO PERSONS
READ AND FOLLOW ALL INSTRUCTIONS
10