EQUIPMENT SET UP COMPOUND BOW Archery Australia Inc Coaching and Standards Committee Proudly Sponsored By
EQUIPMENT SET UP COMPOUND BOW It is important that equipment to be used must be set up correctly to allow the archer to obtain maximum accuracy and performance. This article assumes a person has just purchased a new compound bow and wants to set the bow up. This process is very straight forward and set out in clear steps that should be followed. 1. STRING LENGTH AND BRACE HEIGHT Compound bows come set up from the factory and you should not make any adjustment to string length or brace height.
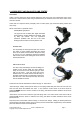
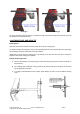
. ARROW REST AND BALANCED LIMB CENTRE Arrow Rest Unlike a recurve where the arrow pushed against the side of the bow upon release the action of the arrow from a compound bow (shot using a release device) is downward, this is due to the action of the cams and wheels. Arrow rests for compound bows principally come in three styles, rigid, downward spring actions and drop-a-way. Which one is best is a personal choice. RIGID (Blade type) REST .
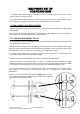
Ideally arrow rests should be fitted to the bow window so the contact point of the arrow on the rest is directly above the “pivot point” of the bow. Recurve bows usually come pre-drilled with hole in the riser for the plunger button. Balanced Limb Centre Unlike recurve bows, arrow rests on compound bows are not set up in centreshot but should be set up in the “Balanced Limb Centre”. To find the “Balanced Limb Centre” :1) Place a piece of tape on the inside of each limb as it leaves the riser.
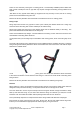
For single cam bows carry out the same test using the single cam. As the string on many single cam bows sits at an angle across the bow, set the rest up using the “Balanced Limb Centre” marks as a best guess. To set up the arrow rest: – 1) Stand the bow up (with the long stabiliser attached and acting as a support) vertical with an arrow attached to the string and on the arrow rest.
Drawing 5 Drawing 6 Of course we need to ensure there is no interference with the arrow rest and bow shelf and the arrow has clearance as it passes the bow. 4. NOCKING POINT AND NOCK FIT Nocking Point Now that you have set up the arrow rest it is time to set up the nocking point. To obtain consistent arrow flight, a point on the bowstring must be found at which the force of the string will act directly along the shaft of the arrow upon release.
There are two commonly used types of nocking points, a commercially available product called “Nok Sets” (made of metal) and a tie on type that only requires a length of bowstring serving material to be applied. “Nok Sets” are very popular when setting up equipment as they are easy to move, but tie on nocking points are recommended for long term use. Refer to the Archery Australia “How to Manual” to find directions on tie on nocking points. String Loops String loops have become very popular in recent years.
You can also vary the nock fit by using different size serving material. Alternatively you can increase the strings diameter laying additional strands of string material under the serving. Never wrap material (usually dental floss or cotton thread) around the nocking point to build up the serving. This should be used as a temporary measure only and should never be used permanently. This material can quickly wear giving you a poor fitting nock. 5. CABLE GUARD Compound bows come fitted with a “Cable Guard”.
4) The peep sight is now installed. You will possibly find as you draw the bow back the peep will rotate. This is normal and it may be necessary to make adjustments to prevent this from happening. Ideally the peep should be square to the eye at full draw, you should be looking through a perfect circle. If not, to correct, pull the knots apart holding the peep in place and move one or two strands from side of the peep to the other, changing the balance of the string.
Before you check the timing again it is important to reposition the nocking points as they may have altered position in relationship to the arrow rest. You must check and if necessary re-adjust the nocking points after each time you add twists to the cables. 9 BOW SIGHT Compound bows use a sight and scope combination. The scope is a magnifying sight with a bubble level to help in holding the bow vertical. You need to set the sight up to ensure the sight bar and the bubble is square to the bow string.
rd 3 Axis This axis is critical when shooting up and down hills such as in Field Archery and relates to the scope lens being square to the eye. The best method for vertically setting the sight bar with the bow string is to:st 1) Fit the scope onto the sight, and set the 1 axis. 2) Lay the bow onto a flat surface, a table or bench.
10. TUNING YOUR BOW Where to from here? For new archers setting up their first bow this should be all you need to do. The bow has been set up and is good enough to shoot and for them to gain experience and raise their ability. If you wish to tune your bow further you should follow the “Paper Test” method to check and fine tune the bow, but it should be remembered the results you obtain are directly reflected by your ability and your shooting standard.