INSTRUCTION MANUAL 22INCH KETTLE CHARCOAL GRILL ITEM#MAMNR19012CG SKU#2591045
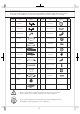
PARTS LIST Please check parts against the list below before assembling your Barbecue Grill. Take a few moments to familiarise yourself with the contents. Check that all holes are clear of paint before assembly. Part ID Figure Qty. Part ID Part Figure Qty.
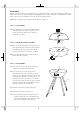
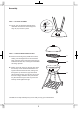
Assembly Please read all instructions thoroughly before proceeding. Find a large, clean area in which to assemble your BBQ. Please refer to the parts list and assembly diagram as necessary. Assembly of the BBQ involves many large components, it is advisable to have two people assemble the unit. NOTICE: Do not tighten the screws until all assembly is completed. STEP 1 - LID ASSEMBLY 1a. Place lid handle (A) on lid (E) and align lid handle with hanging hook (C) which you place inside of the lid.
Assembly STEP 4 - WIRE SHELF ASSEMBLY (M) 4a. Place the fire bowl upside down on the floor so that the four legs point upwards and make sure that the short legs are closest to you.Take the wire shelf (M) and position it so the threaded bar is closest to your body and the two kinks at the other end of the shelf point upwards. Insert the kinked ends of the shelf into the holes nearest the end of the long legs.You may need to tilt the shelf upwards slightly to fit them in.
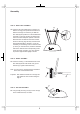
Assembly (U) (V) STEP 7 - AIR VENT ASSEMBLY 7a. The air vent (O) should be attached to the (O) underside of the fie bowl. Use bolt (R) and wing nut (U) to secure in place. (R) STEP 8 - PLACEING GRIDS AND ASH TRAY (F) 8a. Place the charcoal grid (G) inside the fire bowl, seating it on the ledge that runs around the fire bowl, part away down. Place the cooking grid (F) inside the fire bowl also, ensuring its two handles are facing upwards. (G) 8b. Finally, fix the ash tray (K) to the four legs.
INSTRUCTIONS FOR USE BARBECUE SAFETY HINTS ensure there is at least 1 metre clearance around all of the BBQ. 3. Once lit DO NOT move your BBQ or leave it unattended. 4. Keep children and pets a safe distance from the BBQ. 7. During use the BBQ will become hot, so only handle lids etc with an oven glove. 8. Ensure that the BBQ has .completely cooled before removing the ash. BARBECUE HELPFUL HINTS Remember to leave ventilation holes clear by piercing the foil where necessary. This process will 4.