
Installation Instructions


Bottom
Top
A-1
K
A-2
D-3
D-3
3/6
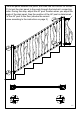
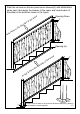
Important - Every stair installation will be different. The rise and run,
post position, and post height all need to be carefully laid out before
posts are permanently installed and panels are cut.
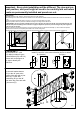
***IMPORTANT***
Each hardware kit – stair
(171-0884) includes 2 types
of Stair Bracket (D-2 and D-3)
Please refer to the figure on
the right to identify the
difference.
Fix the stair bracket-bottom
(D-2) to the 44" post at the
bottom of the stair with a joint
screw (E); Fix the stair
bracket-top (D-3) to the 38"
post at the top of the stair with
a joint screw (E).
Mount posts:
-The stairs start with a 44" post(A-1) and the other end uses a 38" post(A-2).
-Wood blocking tied to deck frame must be installed and constructed with treated dimensional lumber with a minimum thickness of
1-1/2".
-Position the edge of post base plate a minumum of 1/2" from the inside edge of rim joist.
-Select the position where the posts are installed according to the length of the stair fence.
-***IMPORTANT***Fix 38” post first, but DON’T fix 44” post on the floor for now. Place the 44” post at the desired spot, then
install the stair panel according to the instruction on page 4. Adjust the spot of 44” post according to the panel angle, then
fix the 44” post on the floor.
-Use 5/16" drill bit to pre-drill wood flooring, and fix the post with 3/8"x3" hex head wood screws(F-1). If the screws are exposed
outside the floor thickness, the exposed part needs to be cut with cutting tools.
-The concrete floor is pre-drill with a 3/8" impact drill and bolted with 3/8"x3" hexagonal galvanized expansion screws(F-2).
1
2"minimum
Deck framing
Deck framing
F-1
A-1
F-2
A-1
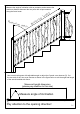
D-2 and D-3 have codes marked on them. Pay attention to
install D-2 and D-3 in the correct direction shown as below
D-2 (bottom) D-3 (top)
1-1/8
7/8