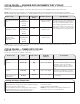
ELECTRIC OR GAS DRYER USE AND CARE GUIDE SÉCHEUSE ÉLECTRIQUE OU À GAZ GUIDE D’UTILISATION ET D’ENTRETIEN Para una versión de estas instrucciones en español, visite www.maytag.com Table of Contents DRYER SAFETY...................................................................2 CHECK YOUR VENT SYSTEM FOR GOOD AIR FLOW.......................................................4 USE SENSOR DRY/AUTOMATIC DRY CYCLES FOR BETTER FABRIC CARE AND ENERGY SAVINGS......4 CONTROL PANEL & FEATURES.....................
DRYER SAFETY IMPORTANT: The gas installation must conform with local codes, or in the absence of local codes, with the National Fuel Gas Code, ANSI Z223.1/NFPA 54, or the Natural Gas and Propane Installation Code, CSA B149.1. The dryer must be electrically grounded in accordance with local codes, or in the absence of local codes, with the National Electrical Code, ANSI/NFPA 70, or the Canadian Electrical Code, Part 1, CSA C22.1.
WARNING: FIRE OR EXPLOSION HAZARD Failure to follow safety warnings exactly could result in serious injury, death or property damage. – Do not store or use gasoline or other flammable vapors and liquids in the vicinity of this or any other appliance. – WHAT TO DO IF YOU SMELL GAS: • Do not try to light any appliance. • Do not touch any electrical switch; do not use any phone in your building. • Clear the room, building, or area of all occupants. • Immediately call your gas supplier from a neighbor's phone.
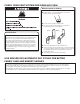
CHECK YOUR VENT SYSTEM FOR GOOD AIR FLOW Maintain good air flow by: ■ Cleaning your lint screen before each load. ■ Replace plastic or foil vent material with 4" (102 mm) diameter heavy, rigid vent material. ■ Use the shortest length of vent possible. ■ Use no more than four 90° elbows in a vent system; each bend and curve reduces air flow. Good Better Good air flow Along with heat, dryers require good air flow to efficiently dry laundry.
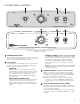
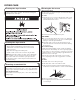
CONTROL PANEL & FEATURES 2 1 2 3 4 1 4 Not all features and options are available on all models. Appearance may vary. 1 WRINKLE CONTROL Feature (on some models) TEMPERATURE/FABRIC The WRINKLE CONTROL feature will run after your drying cycle is complete. It periodically starts and stops the dryer, tumbling the load without heat to help avoid wrinkling. On some models, WRINKLE CONTROL automatically starts at the end of the cycle. Opening the door will stop this feature.
CYCLE GUIDE — SENSOR DRY/AUTOMATIC DRY CYCLES SENSOR DRY/AUTOMATIC DRY - Senses moisture in the load or air temperature and shuts off when the load reaches the selected dryness level. Not all cycles and settings are available on all models. Settings and options shown in bold are default settings for that cycle. NOTE: Government energy certifications for the Maytag Gas and Electric models were based on the Timed Dry cycle with the Maximum drying temperature setting.
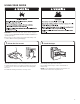
USING YOUR DRYER WARNING: To reduce the risk of fire, electric shock, or injury to persons, read the IMPORTANT SAFETY INSTRUCTIONS before operating this dryer. Before using your dryer, wipe the dryer drum with a damp cloth to remove dust from storing and shipping. 1. Clean the lint screen Clean the lint screen before each load. Pull the lint screen out of its holder. Roll lint off the screen with your fingers. Do not rinse or wash screen to remove lint. Push the lint screen firmly back into place.
3. Select the desired cycle 5. Set Wrinkle Control (on some models) normal Select the desired cycle for your load. See the Cycle Guide for more information about each cycle. SENSOR DRY/AUTOMATIC DRY Cycles You can select a different dryness level, depending on your load, by turning the knob to dryness level. Selecting More Dry, Energy Preferred, Normal, or Less Dry automatically adjusts the dryness level of the fabrics at which the dryer will shut off.
DRYER CARE Cleaning the dryer location Cleaning the lint screen Keep dryer area clear and free from items that would block the air flow for proper dryer operation. This includes clearing piles of laundry in front of the dryer. Every load cleaning The lint screen is located in the dryer. A screen blocked by lint can increase drying time. To clean: 1. Pull the lint screen out of its holder. Roll lint off the screen with your fingers. Do not rinse or wash screen to remove lint. Wet lint is hard to remove.
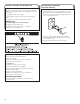
Vacation, storage, and moving care Non-Use or Storage Care Operate your dryer only when you are at home. If you will be on vacation or not using your dryer for an extended period of time, you should: 1. Unplug dryer or disconnect power. 2. (For gas dryers only): Close shut-off valve to gas supply line. 3. Clean lint screen. See “Cleaning the Lint Screen.” Changing the drum light (on some models) 1. Unplug dryer or disconnect power. 2. Open the dryer door.
TROUBLESHOOTING First try the solutions suggested here or visit our website at www.maytag.com/product_help In Canada www.maytag.ca for assistance and to possibly avoid a service call. If you experience Possible Causes Solution Dryer Operation Dryer will not run Door not closed completely. Make sure the dryer door is closed completely. PUSH to START knob not pressed firmly or held long enough. Press and hold the PUSH to START knob until you hear the dryer drum moving.
TROUBLESHOOTING First try the solutions suggested here or visit our website at www.maytag.com/product_help In Canada www.maytag.ca for assistance and to possibly avoid a service call. If you experience Possible Causes Solution Dryer Results Clothes are not drying satisfactorily or drying times are too long (cont.) Cycle time is too short Fabric softener sheets are blocking the grille. The air outlet grille is just inside the door, behind the lint screen.
MAYTAG® LAUNDRY LIMITED WARRANTY ATTACH YOUR RECEIPT HERE. PROOF OF PURCHASE IS REQUIRED TO OBTAIN WARRANTY SERVICE. Please have the following information available when you call the Customer eXperience Center: n Name, address, and telephone number n Model number and serial number n A clear, detailed description of the problem n Proof of purchase including dealer or retailer name and address IF YOU NEED SERVICE: 1.
SÉCURITÉ DE LA SÉCHEUSE IMPORTANT : L L'installation du gaz doit se conformer aux codes locaux, ou en l'absence de codes locaux, au code d'installation du gaz naturel ou du propane, CSA B149.1. La sécheuse doit être électriquement reliée à la terre conformément aux codes locaux, ou en l'absence de codes locaux, au Code canadien de l'électricité, partie 1, CSA C22.1.
AVERTISSEMENT : RISQUE D'INCENDIE OU D'EXPLOSION Le non-respect des avertissements de sécurité peut causer des dommages à la propriété, des blessures graves, voire la mort. – Ne pas entreposer ou utiliser de l’essence ou d’autres vapeurs ou liquidesinflammables à proximité de cet appareil ou de tout autre appareil électroménager. – QUE FAIRE DANS LE CAS D’UNE ODEUR DE GAZ : • Ne pas tenter d’allumer un appareil.
VÉRIFICATION D’UNE CIRCULATION D’AIR ADÉQUATE POUR LE SYSTÈME D’ÉVACUATION Maintenir une bonne circulation d’air en effectuant les opérations suivantes : ■ ■ Nettoyer le filtre à charpie avant chaque charge. Remplacer le matériau de conduits d’évacuation en plastique ou en aluminium par des conduits d’évacuation lourds et rigides de 4" (102 mm) de diamètre. ■ Toujours employer les conduits d’évacuation les plus courts possible.
TABLEAU DE COMMANDE ET CARACTÉRISTIQUES 1 2 2 3 4 1 4 Certains programmes et options ne sont pas disponibles sur certains modèles. L’apparence des appareils peut varier. 1 TEMPERATURE/FABRIC (température/tissu) Caractéristique WRINKLE CONTROL (antifroissement) (sur certains modèles) La caractéristique antifroissement démarre après la fin du programme de séchage. Elle met la sécheuse en marche et l’arrête périodiquement tout en faisant culbuter la charge sans chaleur pour éviter le froissement.
GUIDE DE PROGRAMMES — PROGRAMMES DE SÉCHAGE AUTOMATIQUE/DE SÉCHAGE PAR DÉTECTION SÉCHAGE AUTOMATIQUE/SÉCHAGE PAR DÉTECTION - Détecte l’humidité présente dans la charge ou la température de l’air et s’éteint lorsque la charge atteint le degré de séchage sélectionné. Certains programmes ne sont pas disponibles sur certains modèles. Les réglages et options indiqués en gras sont les réglages par défaut pour ce programme.
UTILISATION DE LA SÉCHEUSE AVERTISSEMENT : Pour réduire le risque d’incendie, de choc électrique ou de blessures à autrui, lire les IMPORTANTES INSTRUCTIONS DE SÉCURITÉ avant de faire fonctionner cette sécheuse. Avant d’utiliser la sécheuse, essuyer le tambour de la sécheuse avec un linge humide pour enlever la poussière accumulée au cours de l’entreposage et de l’expédition. 1. Nettoyer le filtre à charpie Nettoyer le filtre à charpie avant chaque charge. Tirer le filtre à charpie de son support.
3. Sélectionner le programme désiré Sélectionner le programme souhaité pour la charge. Voir le Guide de programmes pour plus d’informations sur chaque programme. PROGRAMMES DE SÉCHAGE AUTOMATIQUE/DE SÉCHAGE PAR DÉTECTION Selon votre charge, vous pouvez sélectionner un degré de séchage différent en tournant le bouton sur le degré de séchage. Lorsqu’on sélectionne More Dry (plus sec), Normal ou Less Dry (moins sec), le degré de séchage qui commandera l’arrêt de la sécheuse est automatiquement ajusté.
7. Appuyer sur le bouton PUSH TO START (enfoncer pour mettre en marche) pour démarrer un programme ENTRETIEN DE LA SÉCHEUSE Nettoyer l’emplacement de la sécheuse Éviter de laisser autour de la sécheuse des éléments qui pourraient obstruer la circulation de l’air et empêcher le bon fonctionnement de la sécheuse. Ceci implique de dégager également les éventuelles piles de linge placées devant la sécheuse.
Nettoyer le filtre à charpie Nettoyage avant chaque charge Le filtre à charpie se trouve dans la sécheuse. Un filtre obstrué de charpie peut augmenter la durée de séchage. Nettoyage : 1. Tirer le filtre à charpie de son support. Enlever la charpie du filtre en la roulant avec les doigts. Ne pas rincer ni laver le filtre pour enlever la charpie. La charpie mouillée s’enlève difficilement.
Pour les sécheuses à gaz : 1. Débrancher la sécheuse ou déconnecter la source de courant électrique. 2. Fermer le robinet d’arrêt de la canalisation de gaz. 3. Débrancher le tuyau de la canalisation de gaz et retirer les raccords fixés sur le tuyau de la sécheuse. 4. Recouvrir la canalisation de gaz ouverte. 5. S’assurer que les pieds de nivellement sont solidement fixés à la base de la sécheuse. 6. Utiliser du ruban adhésif pour fixer la porte de la sécheuse.
DÉPANNAGE Essayer d’abord les solutions suggérées ici ou consulter notre site web www.maytag.ca pour obtenir de l’aide et pour éviter une intervention de dépannage. Si les phénomènes suivants se produisent Causes possibles Solution Sons inhabituels Bruit saccadé La sécheuse n’a pas été utilisée pendant un moment. Ceci est normal. La bruit saccadé devrait s’atténuer après quelques minutes d’utilisation.
DÉPANNAGE Essayer d’abord les solutions suggérées ici ou consulter notre site web www.maytag.ca pour obtenir de l’aide et pour éviter une intervention de dépannage. Si les phénomènes suivants se produisent Causes possibles Solution Résultats de la sécheuse (suite) Temps de programme trop Un programme automatique se termine court prématurément. La charge n’est peut-être pas en contact avec les bandes de détection. Régler l’aplomb de la sécheuse.
ATTACHEZ ICI VOTRE REÇU DE VENTE. UNE PREUVE D’ACHAT EST OBLIGATOIRE POUR OBTENIR L’APPLICATION DE LA GARANTIE.
CLAUSE D’EXONÉRATION DE RESPONSABILITÉ AU TITRE DES GARANTIES IMPLICITES LES GARANTIES IMPLICITES, Y COMPRIS LES GARANTIES APPLICABLES DE QUALITÉ MARCHANDE OU D’APTITUDE À UN USAGE PARTICULIER, SONT LIMITÉES DIX ANS OU À LA PLUS COURTE PÉRIODE AUTORISÉE PAR LA LOI. Certains états et certaines provinces ne permettent pas de limitation sur la durée de garanties implicites de qualité marchande ou d’aptitude à un usage particulier, de sorte que la limitation ci-dessus peut ne pas être applicable dans votre cas.
ASSISTANCE OR SERVICE Before calling for assistance or service, please check “Troubleshooting” or visit www.maytag.com/help. It may save you the cost of a service call. If you still need help, follow the instructions below. When calling, please know the purchase date and the complete model and serial number of your appliance. This information will help us to better respond to your request. If you need replacement parts or to order accessories We recommend that you use only Factory Specified Parts.