
Installation Guide


OPERATING PROCEDURES AND MAINTENANCE (CONT.)
CARE AND MAINTENANCE
The ice maker should be cleaned on a regular basis. (See the “HOW TO CLEAN” section on p.6)
It is necessary to have an adequate ventilation space around the ice maker in order to sustain
proper performance, dissipation of heat, maintain efficiency, and low power consumption.
Clearance of a minimum of 5 inches should be maintained at the rear and sides of the unit,
and 8 inches at the top of the unit.
To attain proper performance, be sure to plug the appliance into a properly grounded
120/60Hz outlet.
To avoid heat damage to the power cord, please ensure that it does not come in proximity or
in direct contact with the compressor of the ice maker.
Please avoid installing the ice maker in a location where the appliance will come in contact
with water or moisture, to minimize the buildup of rust on the metal parts.
ONLY FRESH, CLEAN WATER CAN BE USED ON THIS APPLIANCE. THE USE OF JUICES, MILK,
SODA, AND THE LIKE MAY DAMAGE THE UNIT.
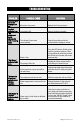
USING YOUR ICE MAKER
1. Clean your ice maker before using. Make sure the unit is off and unplugged from the outlet.
2. Open the cover and pour water into the tank.
NOTE: Make sure the water level in the water reservoir is not over the Ice Basket.
NOTE:
Use distilled water for best results.
3. Close the lid.
4. Plug the unit into the electrical outlet. When the Ice Maker is first plugged in, it will default to
the Small (S) ice setting which will be flashing.
5. Select the ice size you wish by pressing the S/L button to cycle between Small or Large ice.
6. Once the size has been selected, press ON/OFF to begin the ice making cycle. The indicator
light for the size button will become solid.
NOTE: For the first three cycles, the ice may be small and irregular in size.
7.
While the icemaker is on, regularly check the “Add Water” indicator. If the water pump can’t
inject water, the ice maker will stop automatically and the “Add Water” indicator will be on.
Turn the unit off using the “ON/OFF” button, then fill it with water right up to the bottom of
the Ice Basket.
Allow 3 minutes for the refrigerant to settle.
After the refrigerant has settled,
press the “ON/OFF” button again to restart the ice making cycle.
NOTE: If no water is pumped up to the water tray over two cycles but there is enough water in
the water tank, please unplug the silicon stopper and let several drops of water run out.
Restart the unit.
8. When the ice basket is full the “ICE FULL” indicator light will turn on. At this point, you can
remove some of the ice with the scoop or you can allow the ice to remain in the Ice Maker.
9. Press “ON/OFF” button to stop the machine.
Please note: This unit is not a freezer, it will not keep the Ice frozen permanently. The ice will
eventually melt and as it melts, the internal temperature of the unit will rise and the Ice
Maker will begin making ice once again. You have the option of removing the ice as it is
formed and bagging it to store inside your freezer.
www.maxi-matic.com
7
info@maxi-matic.com