
Instructions


www.ti.com
Getting Started
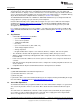
Figure 2. Jumper Requirements Necessary for Software Demo
Step 1: Install a Software Development Platform
The development platform can be Code Composer Studio IDE (CCS), IAR Embedded Workbench IDE
(IAR), mspgcc, or Energia open-source platform. See Section 3.2 for help choosing a platform.
The out-of-box demo works without this step, but the host reports that the integrated eZ-FET lite emulator
did not enumerate.
(Be aware that the USB API does not yet fully support mspgcc development, but mspgcc does contain the
eZ-FET drivers.)
Step 2: Connect the Hardware
Connect the LaunchPad to a host PC using the USB cable included with the LaunchPad. The demo
should work on any recent version of these operating systems. If prompted, let the PC automatically install
software. The install is "silent", which means that the PC's operating system already has the drivers it
needs.
When you connect a USB device to your computer, the computer goes through the enumeration process.
During enumeration, the host asks for the device's USB descriptors to learn the device's identity,
capabilities, and more. Using the descriptors, the device presents one or more USB interfaces to the host,
where each interface is associated with either a pre-defined device class, or a custom driver. The major
operating systems already ship with drivers for most common device classes, which is why you do not
need to provide them during installation.
The F5529 LaunchPad software demo presents two USB interfaces to the host:
• A Mass Storage Class (MSC) interface, which results in a storage volume
• A Human Interface Device (HID) interface, which is configured as a keyboard
All major host operating systems already have drivers for these classes.
Note: The eZ-FET emulator, application UART, and USB hub also enumerate when the LaunchPad is
attached. These are part of the LaunchPad emulator, and so they always enumerate on Windows and
Linux PCs, no matter what software is loaded into the MSP430F5529 device. In contrast, the MSC and
HID interfaces described in this section are generated by the software demo application that is loaded
onto the LaunchPad as shipped from TI. See Section 2.2.3 for more information.
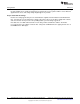
Step 3: Verify the storage volume has been loaded
When you attach the LaunchPad to the PC, a storage volume is mounted on the host. This volume can be
seen in "My Computer", with the name "F5529LP":
7
SLAU533A–September 2013–Revised January 2014 MSP430F5529 LaunchPad™ Development Tool (MSP
‑
EXP430F5529LP)
Submit Documentation Feedback
Copyright © 2013–2014, Texas Instruments Incorporated