
Instructions / Assembly

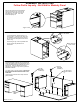


SILVER SCREW-
(2) for each CONNECTOR
Insert a SILVER SCREW
here (both ADAPTERS)
CONNECTOR
PLATE
CONNECTOR
PLATE
(Fasten with
(2) SILVER SCREWS)
ADAPTER (2 REQ'D)
Fasten with (1) SILVER SCREW
into TOP, and (2) BLACK
SCREWS into credenza leg (use
additional 2 screws for desk leg).
(Do not tighten adapter screws yet)
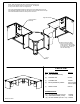
END MODEL-
72 X 30 Desk shown
END MODEL- 72 X 24 Credenza shown
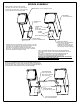
BLACK SCREWS
SILVER
SCREW
TOP
MACHINE SCREW
goes in the hole that
aligns with the threaded
insert in the TOP.
SILVER SCREWS
go into the other (2) holes.
Before assembly, make sure that you have
everything you need- check your parts against
the parts list on the last page. If you are missing
anything, please call us at 1-800-621-8846.
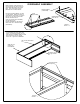
BRIDGE ASSEMBLY
Assemble the two end models that you want to connect. It is best
to locate the two end models in their final location before attaching
the bridge. (the completed assembly is tough to move!)
Place them as shown above (viewed from underneath), facing
each other. The pedestals should be face-to-face, so the sides
without the pedestals will accept the bridge.
Attach (2) CONNECTOR PLATES using (2) SILVER SCREWS for
each plate (total of 4 screws). Attach the (2) ADAPTERS- one to each
end model.
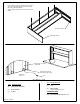
Use (1) SILVER SCREW and (2) BLACK SCREWS to fasten the
ADAPTER to a credenza leg. Use (1) SILVER SCREW and
(4) black screws to fasten the ADAPTER to a desk leg.
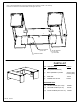
NOTE- DO NOT TIGHTEN ADAPTER SCREWS UNTIL YOU ATTACH
THE MODESTY PANEL!! (see next page)
.
Attach TOP to CONNECTOR PLATES using (1) MACHINE SCREW and (2)
SILVER SCREWS on each side. Make sure that the TOP is correctly aligned
with the two other desks. Then attach the TOP to the two ADAPTERS using (1)
SILVER SCREW per ADAPTER (total of (2) SILVER SCREWS).