
Instructions / Assembly


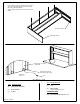

A
Holes
(6 per SIDE)
J
Lay the SHELF face-down (back holes
are up). Thread the three slots over the
three screws in the SIDES (Detail J). Make
sure the slots are fully set. Repeat
for the TOP. Tighten all 12 SCREWS.
The SHELF has this
Task Light bracket
on it.
The TOP has NO bracket
on it.
Slide TOP and
SHELF over
the SCREWS
DETAIL J
SCALE 1 : 4
Holes toward back
face upward
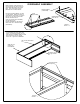
DETAIL A
SCALE 1 : 4
BLACK SCREW
(6 PER SIDE)
SCREW sticks out
about 1/8 inch
OVERSHELF ASSEMBLY
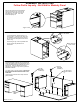
Find the non-handed SIDES. Lay them
on a flat surface. Make sure nothing is
underneath to scratch them! A carpet is
best, but you can also use the carton
that the Overshelf came in.
Screw (12) screws (6 for each SIDE)
into the holes shown.
DO NOT SCREW ALL THE WAY IN-
leave about 1/8" of thread showing.
(See Detail A)
Before assembly, make sure that you
have everything you need- check your
parts against the parts list on the last
page. If you are missing anything,
please call us at 1-800-621-8846.