
Instructions / Assembly


STEP 16: TOP COVER INSTALLATION
After all top rails have been installed, tighten all screws and attach the top covers as shown in the appropriate diagram for your pool.
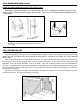
2 PC RESIN TOP COVER:
Center small half over hole in the top plate as shown and attach with
a #12 screw. Slide the large half over the small half and secure using
two #10 screws.
#12
#10
TWO PIECE RESIN WITH ANGLE SUPPORT
ATTACHMENTS ON THE SIDES:
1) Hook large half of cover under inside lip of top rail. Swivel cover down
flat, centered over the upright.
2) Take angle support (small half) and position underneath top half,
securing angle support to upright with 2 #10 screws on the sides (leave
loose for adjustment). Then, take a #12 screw and connect angle support to
top cover. A small space will occur- this is designed to take up expansion &
contraction in manufacturing tolerances in the top rails.
TOP
COVER
SCREW
LIP
USE #12
SCREW
INSIDE
EMBOSS
ANGLE
SUPPORT
USE #10 SCREW
TO ATTACH TO UPRIGHT
ONE PIECE RESIN CLIP-ON COVER:
This installation requires no hardware. Simply hook the back end of the
top cover into place, and use your fingers or a screwdriver to gently flex
the front tabs enough to hook the cover in place. Make sure that the top
cover is centered over the upright when installing.
*Bullnose rail is used for the
illustration, but installation is
the same for all 1 pc. clip-on
resin covers.
Side view of top
cover and top rail
Hook this
end first.
Swing this end around
and gently flex tab
into place.
TWO PIECE RESIN WITH ANGLE
SUPPORT ATTACHMENT IN THE FRONT:
1) Hook large half of cover under inside lip of top rail. Swivel cover down
flat, centered over the upright.
2) Take angle support (small half) and position underneath top half,
securing angle support to upright with a #10 screw in the front. Then, take
a #12 screw and connect angle support to top cover. A small space will
occur- this is designed to take up expansion & contraction in
manufacturing tolerances in the top rails.
TOP COVER
SCREW
EMBOSS
INSIDE
USE #10
SCREW
LIP
ANGLE
SUPPORT
USE #12
SCREW
2) Attach the resin outer Top Cap using a #12 screw into hole.
1) Attach the inner top cap using a #12 Screw into hole #2.
Put the grill over the screw when finished.
See diagram below
See Diagram below.
#12 screw
Small Half
Inner Cap
#12 x 3/4” screw
Top Cap Grill
Large Half Outer
Cap Curved