
Instructions / Assembly


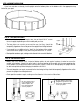


*Wall joint is hidden behind the upright
on most pools. This assures that the
skimmer and the skimmer return holes
are not obstructed. It is not possible
to hide the wall bars on some of the
smaller size pools that we make, such
as the 12’ round, and the 8' round.
Upright
Note: Skimmer and skimmer return hole locations.
STEP 8: UPRIGHT INSTALLATION
If you have not done so already, install uprights onto the bottom plates or the bottom cuffs. See appropriate step
below for your pool.
TYPE #1 – BOTTOM PLATE POOLS:
• Models with bottom plates will require one, two, or three #10x ½” screws
for each upright, depending on which model pool you have.
• The top plates can remain unsecured for now, but they should be
temporarily clipped over the wall to prevent the uprights from falling backward.
• If your pool has an additional resin “boot” for the bottom of the upright,
secure them to the upright at this point using two more #10x ½” screws.
• Check pool for roundness again, making sure the diameter is the same in all directions.
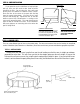
Upright
#10
Screw
Bottom
Plate
#10
Screw
TYPE #2 – BOTTOM CUFF POOLS:
• Models with resin bottom cuffs, instead of bottom plates, do not require hardware in order to secure the
upright at the bottom. Simply line up the holes in the lower portion of the upright with the corresponding clips
in the bottom cuff and push them down until they lock in place. When this is done properly the upright will not
be able to be pulled up without bringing the bottom cuff with it.
• The metal top plates can remain unsecured for the time being, but they should be temporarily clipped over the wall to
prevent the uprights from falling backward.
• Check pool for roundness again, making sure the diameter is the same in all directions.
Be sure that the holes
in the upright line up
with the clips in the
boot, and that snap
securely in place.
Be sure that the holes in the
upright line up with the clips
in the boot, and that snap
securely in place.