
Instructions / Assembly


STEP 8: UPRIGHT INSTALLATION continued
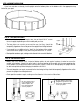
ACCENT CLIP INSTALLATION (Not applicable to all models of pools):
Some bottom cuffs and/or uprights have separate accent clips. This is a good time to snap those pieces on if your
pool has these. Below are some examples of accent clips. These may be in different locations depending on the
model of pool.
Please note the difference of the accent clips for the resin
boot and the steel Upright. For proper fit be sure to use the
correct clips.
1/4”
1/16”
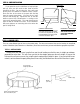
STEP 9: PREPARING THE COVE
Using neutral alkalinity sifted earth, or fine sand without pebbles, build a 2” base over the entire pool area to protect the liner.
DO NOT USE ANY SUBSTANCE WITH HIGH ALKALINE OR ACID CONTENT, ESPECIALLY PEAT MOSS, AS IT WILL CORRODE
METAL PARTS!
Next, using the sifted earth or fine sand, build a pool cove 6” to 8” high inside the metal wall along the entire circumference.
This will prevent the liner from creeping under the wall, and it will also protect the liner from any metal edges of the pool
framework. THIS STEP IS NOT OPTIONAL- IT MUST BE DONE! Since earth containing chemicals can cause discoloration or
corrosion, it is suggested that you place polyethylene plastic sheeting under the cove around the perimeter of the wall, so no earth
comes in contact with the metal. Since the presence of such chemicals is beyond the control of the manufacturer, such damage is
not covered by the warranty.
After the cove and the base are in place, rake and tamp the entire pool area. Make sure that no sand is allowed to remain on
the wall above the cove. This could cause pinholes in your liner.
8”