version number: 1.1.1.140508_PRO Redsail Tech Co., Ltd www.hflaser.
version number: 1.1.1.140508_PRO Contents Welcome .................................................................................................. 3 Cutter Parts ............................................................................................ 4 Front View .............................................................................................. 4 Detail of Carriage Arm .............................................................................. 5 Right Side View ........................
version number: 1.1.1.140508_PRO WELCOME Thank you for choosing a RS series cutter from RESASIL. The RESASIL cutters give users the ability to afford a quality entry level cutter while still receiving the durability and dependability needed to move you through all stages of your cutting experience, from beginner to expert alike. This manual is here to help provide a starting point in the learning process of the RESASIL cutters or to vinyl cutting in general.
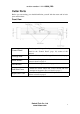
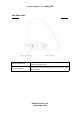
version number: 1.1.1.140508_PRO Cutter Parts Before you start cutting, you should familiarize yourself with the cutter and its basic parts and functions: Front View Control Panel Carriage Arm Pinch Rollers Feed Rollers Left Side Cover Right Side Cover Used to provide input directly to the cutter. Covered in detail in the “Control Panel” (page 10) section of this manual. Holds the Blade (or Pen) Carriage. Shown in detail on page 5. Holds the media tightly to the feed roller below.
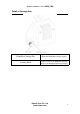
version number: 1.1.1.140508_PRO Detail of Carriage Arm Blade/Pen Carriage Slot Holds the Blade/Pen Carriage in place. Locking Knob Allows access to the Blade/Pen Carriage Slots for exchanging/replacing Carriages. Redsail Tech Co., Ltd www.hflaser.
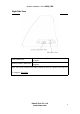
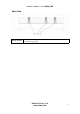
version number: 1.1.1.140508_PRO Right Side View USB Cable Port Serial (COM) Cable Port Used to connect a USB cable from the cutter to a computer. Used to connect a serial cable from the cutter to a computer. Only one of the connection cables should be used to connect the cutter to a computer. Not both. Redsail Tech Co., Ltd www.hflaser.
version number: 1.1.1.140508_PRO Left Side View Power Cable Port Power Switch Used to connect a power cable from the cutter to a wall outlet or surge protector. Main power switch for turning the power of the cutter on(1) or off(0). Redsail Tech Co., Ltd www.hflaser.
version number: 1.1.1.140508_PRO Back View Pinch Rollers Holds the media tightly to the feed roller below. Back view shown in detail on next page. Redsail Tech Co., Ltd www.hflaser.
version number: 1.1.1.140508_PRO Detail of Pinch Roller (Back View) Pinch Roller Tension Knobs Pinch Roller Release Lever Adjusts the tension of how tightly the pinch roller is held to the feed roller below. Allows you to release Pinch Rollers (either so they can be moved from side to side or to allow media to be easily fed below them) by pulling up on the Release Levers. Redsail Tech Co., Ltd www.hflaser.
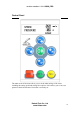
version number: 1.1.1.140508_PRO Control Panel The main screen of the cutter allows you to set the main settings of the cutter including the cutting speed and cutting force options. It also allows you to cut a test pattern or check the amount of force that is currently set. Redsail Tech Co., Ltd www.hflaser.
version number: 1.1.1.140508_PRO RESET Button Press “RESET” button when online or offline, clearing the memory of the machine, and setting the origin of carriage arm to its rightmost position. RESET ONLINE Button Press “Online” button when online, then it will be Offline. Press “Online” button when offline, then it will be Online. Press “Online” button when the machine working, then the machine will stop working. Press “Online” button again, recover the last work. ONLINE Redsail Tech Co., Ltd www.
version number: 1.1.1.140508_PRO TEST Button Will cut a small test shape so that the current force and speed settings cutter will be tested. You can use this to determine the proper force and speed setting needed for different materials without wasting large amount materials from cutting full designs. Press “TEST” button when offline, the machine will make self-test. TEST P+ Button Adjust the cutting force For increasing the force when online, the highest force is 500g.
version number: 1.1.1.140508_PRO P- Button Adjust the cutting force For reducing the force when online, the lowest force is 50g. A cutting force of 100g is a good general starting place to work from when trying to determine the force needed for a specific material. All cuttable materials will differ in the amount of force needed so proper testing should be always made to determine the amount of force to use.
version number: 1.1.1.140508_PRO S+ Button Adjusts the cutting speed For reducing the speed when online, the lowest speed is 25mm/s A cutting speed of 16 inch/s is a reasonable default speed that can be used for most cuts. When working with smaller and more detailed images, a slower speed may be required. When working with larger and less detailed images, a higher speed can be used to shorten the operation time. For moving Y axis to the front position when offline.
version number: 1.1.1.140508_PRO Setting up If you are setting up for the first time please take a moment to refer to the Packaging Guide to take account off all the included components and accessories. For help with Stand Assembly, please refer to the included instructions. Selecting a Location for Your Cutter The first step to setting up your cutter is finding a good location for the machine.
version number: 1.1.1.140508_PRO If Using the USB Cable to connect your cutter to a Computer: You will need to install drivers for the USB connection to work properly. These drivers can either be obtained from the supplied drivers disc or downloaded from the support website (in the downloads section of www.hflaser.com). If you need download the drivers from our website, then please reading the following guidance: There are two optional USB port for the cutting plotter.
version number: 1.1.1.140508_PRO 4. If you are going to install the drivers from the disc insert it when advised by Windows. If you are going to use downloaded drivers, select “I don’t have the disc. Show me other options.” 5. Browse to the folder where the drivers are stored and click next. 6. When the wizard is complete, click the close button. 7. The Found New Hardware wizard should appear again. When it does, follow steps 2-6 again for the second driver.
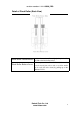
version number: 1.1.1.140508_PRO Installing the Pen Carriage Most new users will benefit from practice “cutting” with the supplied pen carriage until they are comfortable with normal operations of the cutter and cutting software. Your Pen Carriage should come assembled and appear as it does in this image. If it does not, please refer to the pen replacement section below for assembly instructions.
version number: 1.1.1.140508_PRO To Replace the pen or spring inside of the Pen Carriage: Unscrew the top cap from the Pen carriage. Remove the top cap, the pen and the spring. Replace the pen and/or spring as necessary. Slide the spring onto the pen from the top and insert it back into the pen carriage. Replace the carriage cap and screw into place. Once you are familiar with the cutter and its basic functions, install the blade carriage. Redsail Tech Co., Ltd www.hflaser.
version number: 1.1.1.140508_PRO Installing a New Blade Set Brass Ring on Blade Carriage to the fully down position Remove the protective cover from a new blade. Insert the blade into the top of the Blade carriage. Adjust the carriage cap until the blade is protruding approximately 1/64th of an Adjust the Brass Ring until it fits snug against the Cap. This will help keep the cap in place during operation inch. Loosen the locking knob on the carriage arm.
version number: 1.1.1.140508_PRO Replacing a Worn Blade Press up on the release button (located on the bottom of the blade carriage) to raise the blade and remove it. Follow the remaining steps from “Installing a New Blade” on the previous page. Redsail Tech Co., Ltd www.hflaser.
version number: 1.1.1.140508_PRO Preparing for Cutting If you are going to cut from a scrap or single sheet instead of a roll, then skip the next step on placing a vinyl roll. All other steps will be the same. Place the roll on the top of the stand rollers Redsail Tech Co., Ltd www.hflaser.
version number: 1.1.1.140508_PRO Release the Pinch Rollers by pulling up on the Pinch Roller Release Levers. Redsail Tech Co., Ltd www.hflaser.
version number: 1.1.1.140508_PRO Feed the vinyl underneath the pinch rollers (if working from a single sheet instead of a roll, the vinyl can also be feed from the front). Redsail Tech Co., Ltd www.hflaser.
version number: 1.1.1.140508_PRO Adjust the pinch rollers so there is one roller located on each side of the vinyl (one cutter with 3 or more rollers, one roller near the center). Avoid lowering a pinch roller to the gap between the two feed rollers. Leave a gap of between ½”-1 ½” from the edge of the roller and the edge of the vinyl on both sides. Engage the Pinch Rollers by pushing down on the Pinch Roller Release Levers. Redsail Tech Co., Ltd www.hflaser.
version number: 1.1.1.140508_PRO If the cutter is not already on, turn it on now Adjust the vinyl to the position where you want to make your cutting start by using the Up and Down Arrow Keys on the Control Panel. Redsail Tech Co., Ltd www.hflaser.
version number: 1.1.1.140508_PRO Adjust the carriage arm to the position where you want your cutting to start by using the Left and Right Arrow Keys. Now press the OK button to tell the cutter that this is the location where you would like the cut to begin. Then operating your cutting design in the software to output, then machine will start working. When choosing a starting location for your design, remember that the process will start in the bottom right area of the design.
version number: 1.1.1.140508_PRO Specifications Desktop Cutting Plotter Model RS360C RS450C RS500C Control system Risc micro-controller Drive type Stepper motor Media Size (mm) 360 450 500 Cutting size (mm) 260 350 400 Cutting speed 600mm/s Cutting force 50-500 g Lcd display English Resolution 1000 DPI Repeatability(mm) 0.
version number: 1.1.1.140508_PRO Large Format Plotter Model RS1600C RS1780C RS2000C Control system Risc micro-controller Drive type Stepper motor Media Size (mm) 1600 1780 2000 Cutting size (mm) 1500 1680 1900 Cutting speed 600mm/s Cutting force 50-500 g Lcd display English Resolution 1000 DPI Repeatability(mm) 0.01 Command HPGL Interface 232/USB Power 90~240V / 50~60Hz Warranty 12 Months Redsail Tech Co., Ltd www.hflaser.
version number: 1.1.1.140508_PRO Troubleshooting The cutter is unresponsive to communications from the computer and software. The cutter performs erratically during cuts, stops cutting before the cut is finished, or cuts lines that do not appear in the design. Communication issues can arise if the cutter was powered on while the software is trying to send data to the cutter. Exiting the cutter screen of software and returning to the main software screen may resolve this issue.
version number: 1.1.1.140508_PRO Vinyl not feeding straight and the rightmost Pinch Roller will not move. Cuts are jagged or inconsistent. Slashes are made across the vinyl from the blade movement during cutting. to serial connecter or a PCI card serial adapter for your computer. Sometimes, during shipping or movement of the machine, the right pinch roller will become stuck on a screw located on the back of the machine.
version number: 1.1.1.140508_PRO For your safety, proper use the product,be sure to read this manual carefully before operation, to be fully understood and save it for your later use. If you have any suggestions of our products or need our help, please call:0531-86516855/56/57 Special Note: The Company reserves the rights of changing the content and product specifications without prior notice. All the information to check carefully make sure accurate. Products are subject to change without notice.