
Instructions / Assembly
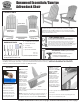

#5212 / 1015
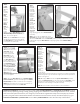
STEP 6.
With the
complet-
ed chair
body still
on its side,
locate the
circular
peg to-
ward the
outside
of the
Chair Seat
(FIGURE
5), then t
the cor-
respond-
ing peg
hole in the
Chair Arm
over the
peg, tapping gently with a Rubber Mallet, if
necessary.
STEP 7 Line up the top drilled hole in the
Chair Arm slat with the hole toward the right
side of the Chair Seat. Insert the Barrel Bolt (FIGURE 6), pushing it all the way into the
paired holes using the Allen Wrench, or tapping it gently with a Rubber Mallet, if
necessary.
STEP 4.
Fit Bolt
Fasten-
ers over
the
bottom
of each
Barrel
Bolt,
careful
to fol-
low the
instruc-
tions on
Using
Barrel
Bolts on
the other
side
of this
page.
Tighten using the Allen Wrench and a
Standard Phillips Head Screwdriver (FIG-
URE 4). Do not over-tighten.
STEP 5. Flip the Chair Seat onto its oppo-
site side and connect the other side of
the Chair Back to it, following STEPS 3-4,
to complete the chair body.
STEP 8 Line up the hole
at the top of the
Chair
Arm with the one in the
Chair Back slat fac-
ing you
(
see
FIGURE
6,
above right)
. Insert
Barrel Bolt into the
hole in the back of
the Chair Arm, using
the Allen Wrench to
push it all the way into
the Chair Back slat. Fit
the Bolt Fastener over
the end of the Barrel
Bolt, carefully following
the Using Barrel Bolts
instructions on the
other side of this page.
Tighten using the Allen
Wrench and a
Standard Phillips Head Screwdriver (FIGURE 7), careful
not to over-tighten.
STEP 9.
Using the Allen Wrench and a Standard Phillips
Head Screwdriver, go back and fully tighten the Barrel
Bolt Assembly from STEP 7, careful not to over-tighten.
STEP 10. Flip the chair body over onto its opposite side, re-
peating STEPS 6-9 with the second Chair Arm.
STEP 11.
Stand the
chair up,
facing
you. Fit the
tongue
piece of
one end
of the
Spreader
into the
groove on
the inside
of one
chair leg
(FIGURE
8). Do the
same
for the op-
posite side of
the Spreader and chair, though you may have to pull the second leg
backward gently to get the second tongue piece of the Spreader to
slide into the groove.
STEP 12. Using a Drill fitted with the Square-Head Drill Bit provided,
screw one Flathead Screw into the hole opposite the Spreader on the
outside of one chair leg (FIGURE 9). Repeat with the remaining Flat-
head Screw and other leg to complete assembly.
STEP 13. Have a seat in your new chair — you've earned it!
FIGURE 6
FIGURE 7
HOLE
HOLES
FIGURE 4
HOLE
FIGURE 5
FIGURE 8 FIGURE 9
PEG
PEG HOLE
TONGUE
GROOVE
RESIDENTIAL WARRANTY | This quality product includes a FULL LIFETIME WARRANTY for RESIDENTIAL CUSTOMERS. In the un-
likely event any splintering, rotting, cracking, peeling, chipping, insect infestation or other damage should ever occur, The Ham-
mock Source will replace this furniture, at no charge to you. Note that an original sales receipt must accompany any returned
product, along with a Return Authorization Number from Hammock Source customer service; call toll-free at (800) 643-3522.
CONTRACTOR WARRANTY | CONTRACTORS receive a FULL 7-YEAR WARRANTY. Follow the same steps outlined above.
FIGURE 7