
Instructions / Assembly

Steel Single Swing Stand
Congratulations on your purchase of this quality Hatteras Hammocks® product! QUESTIONS? Call our
customer-service line toll-free at (800) 643-3522.
Weight limit: 450 pounds
Your box should contain:
2 - arm poles
2 - base poles with arm
attachments
1 - base pole with no arm
attachments
1 - arcing two-armed top pole
1 - S-hook (pictured in FIGURE 5,
below right)
WARRANTY | Product guaranteed free of defects in workmanship and materials for up to one year from date of purchase. If an item is found to be
defective within that time, The HammockSource will replace it at no charge. Normal wear and tear, including prolonged exposure to snow, rain and heavy
humidity, is not covered, nor is mold, mildew or damage from improper storage, maintenance or installation. An original sales receipt must accompany any
returned product, along with a Return Authorization Number from HammockSource customer service; call toll-free at (800) 643-3522.
012011
Helpful for
assembly:
Rubber mallet
(not included)
Before beginning assembly,
check that you have all parts.
arm attachments
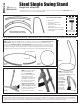
► ► ► This stand can be assembled by one person alone, but it’s much easier if you’ve got an extra set of arms for help!
STEP 1. Assemble the stand base first. Connect the ends of the two base poles with arm
attachments using the spring pins at the ends closest to the arm attachments. Next,
connect the base pole with no arm attachments to the partial circle you’ve just creat-
ed. Note that the pronounced curve of the base poles often makes it necessary to tap
the poles into place with a rubber mallet to lock their spring pins (do NOT use a metal-
headed hammer, which may damage the protective Cape Shield® Powder Coat).
STEP 2. Using the spring
pins, attach each of
the two arm poles to
their corresponding arm
attachments on the
completed circular base
(FIGURE 2). To complete
the stand, use the spring
pins to connect the
arcing two-armed top
pole to the two newly in-
stalled arm poles (FIGURE
3). Note that this last task
is much easier to com-
plete with two people.
connects here
FIGURE 1,
VIEW 1
FIGURE 1,
VIEW 2
FIGURE 2
FIGURE 3
STEP 3. With your stand as-
sembled (FIGURE 4), place
the included S-hook onto the
small metal
half-ring in
the center
of the arcing
two-armed
top pole
(FIGURE 5).
Your swing’s
chain will
hang from
the S-hook.
FIGURE 4
FIGURE 5