
Instructions / Assembly

19
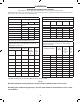
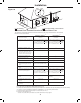
CONCENTRIC VENT TERMINAL INSTALLATION: PROCEDURE
Improper installation, adjustment, service, or maintenance can cause
property damage, personal injury, or death. Consult a qualified in-
staller, service agency, or the gas supplier for information or assistance.
This kit must be used only for terminating this water heater. Do not use
this termination kit for any other appliance. Using this kit on other ap-
pliances and/or water heaters can result in property damage, personal
injury, or death.
NOTICE: Concentric vent kit requires that the joints be cemented.
DO NOT operate this water heater with the rain cap removed or recircu-
lation of combustion products may occur. Water may also collect inside
larger combustion-air pipe and flow to the burner assembly. Failure to
follow this warning could result in product damage, or improper opera-
tion, personal injury or death.
DO NOT use field-supplied couplings to extend pipes. Airflow restric-
tion will occur and the water heater pressure switches may cause in-
termittent problems.
CAUTION
!
Installation
Installation:
1. Become familiar with concentric vent kit part. Refer to instructions inside concentric vent kit.
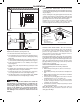
2. Determine the best location for the termination kit
3. Cut the recommended 5” diameter hole
4. Partially assemble vent kit by performing the following:
a. Cement concentric Y fitting to larger diameter pipe. (See Figure 13)..
b. Cement rain cap to smaller diameter pipe. (See Figure 14).
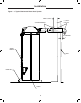
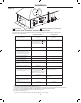
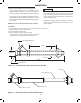
PVC Intake/Combustion Air
4" Nominal
31 7/8"
46 3/4"
PVC Vent/Exhaust
3" Nominal
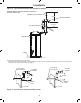
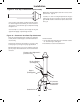
Concentric "Y" Fitting
4" Diameter Pipe
2 1/2" Diameter Pipe
Rain Cap
Figure 13. - Dimensional Layout of Concentric Vent Kit
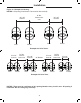
Figure 14. - Concentric Vent Kit Part Identification