
Installation Guide

TOLL FREE
1-866-577-8868
titanbuildingproducts.comtitanbuildingproducts.com
TOLL FREETOLL FREE
1-866-577-8868
titanbuildingproducts.
com
3
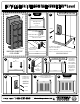
INSTALLATION
|
SHADOW RAIL CONNECTOR™ Level
START
FINISH
Press MALE Connector against post to
impress Cones and mark position.
Fasten to post with screws.
NOTE: Use 1" screw for lower hole if using Color Guard Post Anchor™.
REPEAT FOR OTHER POST.
Cut 2x4 RAILS 1-1/2" shorter to accommodate
RAIL Connector assemblies.
Fasten FEMALE
Connectors to ends of 2x4
rails with 2" screws.
Fasten 2 balusters
on BOTTOM RAIL to
determine desired
height of TOP RAIL.
Position TOP RAIL with
Connectors into place.
Squeeze the top of
posts slightly to leave
impressions from
gripping cones.
Slide
MALE connectors
into
FEMALE Connectors
of TOP RAIL.
Install remaining BALUSTERS to
BOTTOM RAIL. Slide TOP RAIL down into place
to lock up with MALE Connectors.
76 8
BOTTOM RAIL
TOP RAIL
4 5
Optional 2x4 CAP RAIL
#10x2"
#10x2"
#10x2"
#10x1"
4"
MAX
SHADOW RAIL CONNECTOR™
LEVEL ASSEMBLY
FEMALE MALE
Gripping Cone
1
2
BOTTOM RAIL
TOP RAIL
Mark length of TOP and
BOTTOM 2X4 rails.
TOP RAIL
BOTTOM RAIL
BOTTOM RAIL INSTALLATION
BOTTOM RAIL
Slide BOTTOM RAIL
Into
MALE Connectors.
TOP RAIL
BOTTOM RAIL
Fasten MALE Connector
to top area of wood
post using 2" screws.
REPEAT FOR
OTHER POST.
#10x2"
#10x2"
TOP RAIL INSTALLATION