
Installation Guide


4. Once the faucets and accessories are
installed, apply a thin, continuous bead
of silicone or acrylic sealant around the
underside of the sink rim.
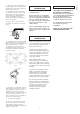
5. Carefully rotate the sink to correct
side up position. Rotate the sink clips
away from the sink edges making it
easier to place the sink down into the
cutout. Carefully place sink into
countertop. Position sink to properly
center in cutout hole.
6. Rotate ‘clips’ or ‘claws’ (factory
installed in the sink) under countertop.
(Fig.3)
Fig.3
7. Lightly tighten clips. Finally, securely
tighten all clips in the order as shown in
Fig.4. Tightening in this order keeps the
sink from twisting as it is secured.
The tightening is to be done with a
screwdriver by hand, not with an electric
screwdriver or drill with screwdriver
attachment. (Fig.5)
Fig.4
Fig.5
8. Clean up excess caulk that may have
squeezed out from below the rim of the
sink, following the instructions of the
manufacturer. If desired, a bead of
silicone can be put around the sink edge
to the countertop to ensure a water-
tight seal. Do not use the sink until the
silicone has completely dried.
9. The sink is now installed.
10. Continue to connect the faucet(s),
accessories, basket strainers and any
other plumbing fittings needed to
complete your installation,to supply and
drain lines for the sink.
PRODUCT CARE
INFORMATION
Please do not use your sink as a
chopping board.
Please avoid the use of dishpans
that fit into the sink, as dishpans
can become impregnated with grit
that can scratch the surface of
the sink. Using a wire basket will
help prevent scratches to the
sinks surfaces.
Please avoid dropping sharp and
heavy objects into the sink as the
objects can scratch or damage the
surface.
PRODUCT CLEANING
INFORMATION
The first action to maintain the
surface and appearance of your sink
is to thoroughly rinse with plenty of
water and dry the surface of the
fixture after each use.
A damp cloth or sponge with a
solution of dishwashing liquid will
remove everyday stains from your
sink. Rinse with plenty of water
and dry the surface of the fixture
after each cleaning.
More stubborn stains can be
removed by using a non-abrasive
cleaner on a damp cloth or sponge.
Rinse with plenty of water and dry
the surface of the fixture after each
cleaning.
If stains become ingrained in the
bowls, an overnight soak using
diluted bleach (10:1) will help
remove the stains. Rinse with
plenty of water and dry the surface
of the fixture after each cleaning.
Use of strong chemicals, abrasive
powders and steel wool pads will
degrade the surface, and make the
sink more susceptible to stains.
The warranty does not cover
damages caused by improper
cleaning methods.
THE TEMPLATE IS INTENDED TO
BE USED AS A GUIDE ONLY!
Manufacturer does not guarantee
or in any way warrant installation
due to the wide variance of
installation practices and other
c
onditions beyond our control.
You should inspect all products
for any defects prior to
i
nstallation.
REFER TO THE TEMPLATE FOR
UNDERMOUNTING GUIDE.
TOOLS AND MATERIALS
English
3.