
Instructions
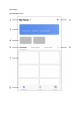
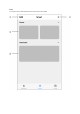
1. Tap ‘Edit’ to move or remove current scenes or automations:
changing the order is simply done by sliding vertically, deleting is done by sliding a specific scene or
automation to the left and tap “Delete”
2. Tap “+”on the upper right corner to add a new scene or automation, the options for each are
described below.
3. All created scenes are shown here and can be activated by simply tapping them.
A scene is a shortcut to do multiple preset things at once, you can set:
- Name (used on main screen as well as by voice assistants)
- Image (choose any of the preset images)
- Unlimited number of actions (including enabling or disabling an automation)
- Whether or not to show on first page
On the bottom right of each tile is a small button to edit this specific scene
4. All created automations are shown here
Automation is one or more actions triggered by one or more events Here you can set the following:
- Name (used on main screen as well as by voice assistants)
- Image (choose any of the preset images)
- Type of conditions (only applicable when combining multiple conditions as trigger)
o When ALL set conditions are met
o When ANY of the set conditions are met
- The actual condition which can be:
o Any notification from a sensor, detector or camera
o Any state of a product which is set manually or automatically
o A specific time of day (which can be repeated on selected days)
o The sunrise or sunset
o Weather conditions (these are approximates based on your set location)
- Each condition can simple be removed by sliding it to the left and tapping “Delete”
- Actions to be executed can be:
o Activating a scene
o A different automation (to enable or disable an existing automation)
o Switching a set product on/off
o Setting a lighting product to a certain mode, brightness or temperature