
Installation Guide

NICOR, Inc. 2200 Midtown Place NE, Albuquerque, NM 87107 P: 800.821.6283 F: 800.892.8393 www.nicorlighting.com September 6, 2018 9:52 AM WPC rev 1.0 Page 1 of 3
IMPORTANT SAFEGUARDS
When using electrical equipment, basic safety precautions should always be followed including the following:
READ AND FOLLOW ALL SAFETY INSTRUCTIONS.
Carefully unpack xture from packaging and inspect for
any damage caused in shipping.
Turn o power to appropriate circuit at the breaker
panel.
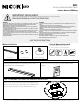
What’s In The Box
One (1) WPC Four (4) screws One (1) suction cup
Tools & Materials Needed
A screwdriver, drill, wire cutters, and four (4)
anchor bolts will be needed to install the WPC.
x4
GENERAL STEPS
WPC
INSTALLATION INSTRUCTIONS
Surface Mount LED Wrap
REVISIONS
REV.
DESCRIPTION
DATE
INITIALS
PROPRIETARY AND CONFIDENTIAL
2200 Midtown Pl NE Albuquerque, NM 87107
Office: 800.821.6283 - Fax: 800.892.8393
NICOR,Inc.
THE INFORMATION CONTAINED IN THIS
DRAWING IS THE SOLE PROPERTY OF
NICOR LIGHTING. ANY
REPRODUCTION IN PART OR AS A WHOLE
WITHOUT THE WRITTEN PERMISSION OF
NICOR LIGHTING IS PROHIBITED.
-
NC
DO NOT SCALE DRAWING
SUCTION CUP
SHEET 1 OF 1
JORGE
UNLESS OTHERWISE SPECIFIED:
SCALE: 1:1
WEIGHT:
REV
DWG. NO.
A
SIZE
TITLE:
NAME
DATE
DRAWN
-
FINISH
MATERIAL
DIMENSIONS ARE IN INCHES
TOLERANCES:
FRACTIONAL
ANGULAR: MACH
1
TWO PLACE DECIMAL
.03
THREE PLACE DECIMAL
.010
设 计
制图
校对
审核
签字
日期
产品名称
料号
材料
数量
单位
共 页
第 页
mm
尺寸分段
长度公差
尺寸分段
角度公差
>6-30
±0.2
±0.3
±0.5
±0.8
±1.2
±1°30′
±1°
±30′
±20′
±10′
>30-120
>120-400
>400-1000
>1000-2000
-10
>10-50
>50-120
>120-400
>400
未标注公差表
ETLWRAP05-4FT
设 计
制图
校对
审核
签字
日期
产品名称
料号
材料
数量
单位
共 页
第 页
mm
尺寸分段
长度公差
尺寸分段
角度公差
>6-30
±0.2
±0.3
±0.5
±0.8
±1.2
±1°30′
±1°
±30′
±20′
±10′
>30-120
>120-400
>400-1000
>1000-2000
-10
>10-50
>50-120
>120-400
>400
未标注公差表
ETLWRAP05-4FT
Remove lens from housing using provided suction cup.
Press suction cup to lens near either end of xture. Pull
suction cup to detach lens from luminaire housing.
STEP 1: PREPARE FIXTURE FOR SURFACE MOUNTING
Installation Instruction
If you have an interest in this product,please feel free to contact the email:info@evertielighting.com
If you have an interest in the other product,please visit the web www.designlights.org/qpl.
Search by Keyword : ever-tie
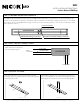
Surface Mounting
Remove the lens from the housing near one end of the housing by using the provided suction cup.Press the suction cup
Step 1:
to absorb one side of the lens, Pull the suction cup to detach the lens from the luminaire housing(Fig.1A detail)
Step 2:
Use the luminaire as a template by placing it on the junction box and penciling in the ceiling the four holes positions. Put
Step 3:
Use a screwdriver to punch out one of the knocked holes and pass the electrical cable out from the housing.
Install the lens starting at one end of housing. Insert lens slot onto edge of housing.Carefully squeeze the lens to engage
Step 4:
Turn on the luminaire.
Step 5:
Remove
Lens
Suction cup
a
Press
Housing
Lens
Housing
b
Pull
Remove lens
a
b
c
Press
Press
Press
Install lens
Place
Lens
Housing
Anchors
Mounting screws
Ceiling
Figure 1
Figure 2
Figure 1A
Figure 2A
Junction box
the luminaire aside and drill the four holes. Insert an anchoring bolt (not included) into each hole. Screw the four mounting
screws into each anchoring bolt,then connect the AC wires.(Fig.2)
opposite side with housing. Continue this action down length of lens until fully installed onto housing.(Fig.2A detail)
WARNING
To reduce the risk of death, personal injury or property damage from re, electric shock,
falling parts, cuts/abrasions, and other hazards read all warnings and instructions
included with and on the xture box and all xture labels.
Before installing, servicing, or performing routine maintenance upon this equipment,
follow these general precautions.
• Commercial installation, service and maintenance of luminaires should be performed
by a qualied licensed electrician.
For the installation: If you are unsure about the installation or maintenance of the lumi-
naires, consult a qualied licensed electrician and check your local electrical code.
• To prevent wiring damage or abrasion, do not expose wiring to edges of sheet metal or
other sharp objects.
• Do not make or alter any open holes in an enclosure of wiring or electrical components
during kit installation.
WARNING
• Turn o electrical power at fuse or circuit breaker box before wiring xture to the power
supply.
•Turn o the power when you perform any maintenance.
•Verify that supply voltage is correct by comparing it with the luminaire label information.
• All wiring connections should be capped with UL approved wire connectors.
CAUTION
• Avoid direct eye exposure to the light source while it is on.
•Account for small parts and destroy packing material, as these may be hazardous to children.
NOTICE:
•Risk of burn. Disconnect power and allow xture to cool before changing handing xture.
Green ground screw provided in proper location.Do not relocate.
Minimum 90° supply conductors.
NOTICE: Specications and dimensions subject to change without notice.
NOTICE: Suitable for Dry or Damp location.
SAVE THESE INSTRUCTIONS