
Use and Care Manual


15
ALIGNMENTS AND ADJUSTMENT, Continued
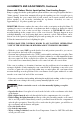
Keep appliance area clear and free from combustible materials,
gasoline, and other flammable vapors and liquids.
Do not obstruct the flow of air that is necessary for combustion and
ventilation.
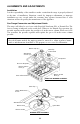
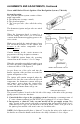
3. Top Burner Valves
Adjusted by the opening or tightening of the orifice hood which is located on the valve
where it attaches to the top burner. When set for LP gas the orifice hoods are screwed
snugly on the valves. To adjust for Natural Gas: (A) Unscrew the orifice hoods until the
proper flow of gas is obtained. (B) Adjust the air shutter, which is located on the throat
of each burner, to obtain the proper mixture of gas and air to create the proper sharp
blue flame without a red or yellow tip. The properly adjusted flame is approximately
3/4'' high and has three distinct cones; the kindling point, the dark blue center cone, and
the outer mantel.
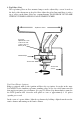
Note: "Full on" flame size illustrated.
The three position burner valve
flame height in the "Low" position
should be approximately 1/8'' high.
REMOVE SHIPPING SCREWS
FROM TOP BURNERS.
Standard Top Burner Valves
All top burner valves operate counterclockwise to open the valve and clockwise to close
the valve. To ignite the gas, depress and turn valve knob all the way to the left to obtain
"full on" position, where the gas ignites automatically from the pilot flame or electrode.
By turning the valve knob toward "off" position, valve can be adjusted to many different
heat settings which should be determined by the amount of food being cooked, the amount
of liquid, or the size utensil.
Three Position Top Burner Valves
The range may be equipped with optional three position top burners valves. The three
position burner valves have three distinct positions–Low, Medium and High. Adjust the
burners in the "High" position for the proper mixture of gas and air as described in "Top
Burner Valves." Then set the knob at the "Low" setting. Remove the knob to gain access
to the adjustment screw which is located in the valve stem.
Hold the valve stem and turn the adjustment screw until the proper flame of approximately
1/8'' is obtained. The adjustment of the "Low" position automatically adjusts the "Med"
position.
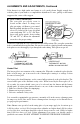
Top Burner Height
Make sure the top burners are properly positioned. The top of the burner head should be
level with the surface of the main top. To check, lay a straight edge such as a 12-inch ruler
across the burner bowl opening. The ruler should rest squarely on the top while in contact
with the burner head.
WARNING
!