
Warranty


- 9 -
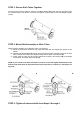
STEP 3: Secure Hitch Tubes Together
Once the Hitch tubes are attached, pass two Hex Bolts M8x75 (A) through the hitch-end (away from
the sweeper body) of the tubes to connect them together using two Nylon Lock Nuts M8 (G). Tighten
loosely.
STEP 4: Mount Hitch Assembly to Hitch Tubes
Attach the Hitch assembly in the following order: (see Figure A)
A) Mount the angled hitch bracket on top of the hitch tubes, with the straight hitch bracket on the
bottom.
B) Pass two Hex Bolts M8x55 (B) through the angled hitch bracket, premade notches in the hitch
tubes, straight hitch bracket, and tighten loosely with two Nylon Lock Nuts M8 (G).
C) Finally, pass the Hitch Pin (Y) through angled hitch bracket, Hitch Spacer (M), and straight
hitch bracket, and fasten with R Pin Ø3 (N)
NOTE: If your vehicle’s tow hitch is between 8” and 10”, mount the angled hitch bracket on the
bottom of the hitch tubes for best performance (See Figure B). For vehicles 11” and higher, see
Figure A.
STEP 5: Tighten all nuts and bolts from Steps 2 through 4.
A
B