DHP390 2.4GHz Digital Wireless Headphone User's Manual Please read before using this equipment.
INTRODUCTION This 2.4GHz Digital Wireless Headphone uses latest digital wireless technology that enables you to enjoy music and TV sound anywhere inside your home. Simply connect the transmitter to a desired audio source: DVD player, CD player, TV set, VCR or Hi-Fi system. Without complicated wiring and installation with your Audio/Video equipments and rear channel amplifier, the system enables you to enjoy thrilling, lifelike sound in minutes. FEATURES 1. 2. 3. 4. 5. 6. 7. 8. 9. 10. 11. 12. 2.
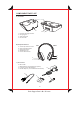
COMPONENT PART LIST A) Transmitter 2 1 1. 2. 3. 4. 4 Power & Charging indicator Charging pins Audio IN socket DC IN socket B) Headphone Receiver 5. 6. 7. 8. 9. 3 LEFT RIGHT Volume Up & Down Control Charging LED indicator Charging contacts ON/OFF Control Power LED indicator 6 9 8 5 7 C) Accessories 10. RCA cable 11. NiMh batteries for Headphone(3 pieces) 12. 3.5mm to 6.3mm adaptor plug 13.
INSTALLATION TRANSMITTER 1. Connect the supplied AC/DC power adaptor to an electrical wall outlet. 2. Plug the AC/DC power adaptor in the DC jack located on the rear of the transmitter. 3. The rear of the transmitter has one audio cord that can be connected to audio output jack of TV, VCR, Hi-Fi, CD/MP3/VCD/DVD players or to headphone/earphone jack with the connector provided. Plug the adaptor in the AC source and connect the audio plug to the audio source.
OPERATION TRANSMITTER Turn on the audio source (TV or audio component) to which the transmitter is connected with. The Charging / Power LED on the transmitter will start flashing in blue when it receives the audio signal. CHARGING / POWER LED HEADPHONE RECEIVER 1. Turn on the headphone by pressing the Power button. The POWER LED (Blue) will light up, the green LED will be flashing until signal link between transmitter and receiver is established. LEFT RIGHT POWER LED (Blue) SIGNAL LED (Green) 2. 3.
4. (Con'd) Charging the batteries a) Turn OFF the headphone first. b) Place the headphone on the transmitter's charging cradle. The charging process begins automatically, and the charging LED will light up in red when the charging contacts of transmitter and headphone are made successfully. When the charging process is completed, the charging LED will light up in green. c) With the smart speedy charging function, the headphone could be fully charged within 5 hours.
TROUBLE SHOOTING No Sound - Ensure the AC/DC adaptor is fully inserted into the AC outlet and the power connection input on the transmitter. Ensure the headphone is switch ON. Headphone battery charge level may be too low, recharge the batteries fully. Ensure the TV or the connected audio device is switched ON. The volume of headphone may be too low, adjust the volume to a moderate level. Distortion - Ensure the volume level of headphone is set to an approximate level.
FEDERAL COMMUNICATIONS COMMISSION (FCC) STATEMENT This equipment has been tested and found to comply with the limits for a class B digital device, pursuant to part 15 of the FCC Rules. These limits are designed to provide reasonable protection against harmful interference in a residential installation. This equipment generates, uses and can radiate radio frequency energy and, if not installed and used in accordance with the instructions, may cause harmful interference to radio communications.