HP5090A 900MHz WIRELESS HEADPHONE SYSTEM User Manual
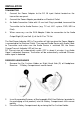
INTRODUCTION This 900MHz compact stereo headphones takes advantage of the very latest advances in wireless transmission technology so that you can listen to music or the sound freely around your house. All you have to do is connect the transmitter to any audio source: DVD player : CD player, MP3 player, iPod, TV set, Hi-Fi system or Radio. FEATURES 1. Auto Tuning system on Headphones Receiver 2. Phase Lock Loop (PLL) Transmission system 3. Automatic Battery Recharging 4. 900 MHz RF Technology 5.
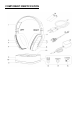
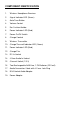
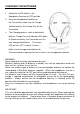
COMPONENT IDENTIFICATION
COMPONENT IDENTIFICATION 1. Wireless Headphone Receiver 2. Signal Indicator LED (Green) 3. Auto Tune Button 4. Volume Control 5. Ear Cushion Holder 6. Power Indicator LED (Red) 7. Power On/Off Switch 8. Charge Contact 9. Wireless Transmitter 10. Charge/Transmit Indicator LED (Green) 11. Power Indicator LED (Red) 12. Charge Pins 13. DC In Socket 14. 3.5mm Audio In Socket 15. Channel Switch (1/2/3) 16. Two Rechargeable AAA Size, 1.2V Batteries (550 mA) 17.
INSTALLATION TRANSMITTER 1. Connect the Power Adapter to the DC IN input Socket located on the transmitter rear panel. 2. Connect the Power Adapter provided to an Electrical Outlet. 3. An Audio Connection Cable with 3.5 mm Jack Plug is provided, to connect the Transmitter to the Audio Devices (e.g. TV set, Hi-Fi system, DVD, MP3 or iPod). 4. When necessary, use the RCA Adapter Cable for connection to the Audio Output Right (R) and Left (L) of the Hi-Fi or TV Set.
OPERATION 1. Switch on the Audio Source (TV set or audio component) that the Transmitter is connected to. 2. Select the On/Off Switch in the Headphone Receiver to ON position. 3. Adjust the Volume for desired sound level. 4. If a good reception is not obtained, press the "Auto Tune" button on the Headphone Receiver. The Signal Indicator LED will glow. NOTE: Make sure the batteries provided in the packing, is fully charged before first use.
CHARGING THE BATTERIES 1. Select the On/Off Switch in the Headphone Receiver to OFF position. 2. Place the Headphone Receiver on the Transmitter, make sure the Charge Contact touches the Charge Pins on the Transmitter. 3. The Charging process starts automatically with the Charge/Transmit Indicator LED glows in Green constantly; the Transmitter will not over-charge the batteries. The Green LED will turn OFF in about 14 hours.
TECHNICAL SPECIFICATIONS Transmission mode : UHF stereo Carrier frequency : Ch 1 : 912.98 – 912.02 MHz Ch 2 : 912.48 – 912.52 MHz Ch 3 : 912.98 – 913.02 MHz Operating voltage : Transmitter – 8V 200mA Receiver – 2.
TROUBLESHOOTING NO SOUND - Ensure that the mains adapter is pushed fully into the power outlet and that its cable is properly connected to the DC IN connector on the transmitter. - Ensure that the receiver headphones On/Off switch is switched to the On. - The headphones battery charge level may be too low. Recharge the batteries or replace them with fully charged batteries. - Ensure that your TV set, Hi-Fi system or audio component is switched ON and set to a channel that broadcasts an audio signal.