
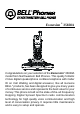
User's Manual

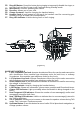

12. Ring Off Button: Press this button during ringing to temporarily disable the ringer, or
set both line1 and line2 ringer to off if pressed during Standby mode.
13. Microphone: Used for speaking with callers.
14. Receiver: Allows you to hear calls.
15. Charge Contacts: Used for charging the handset battery.
16. Headset Jack: A jack located on the top of the handset used for connecting your
headset to enjoy a hands-free communication.
17. Ring LED Indicator: It blinks during line1 or line2 ringing.
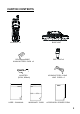
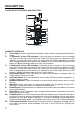
1 2 4 3 5 6 7 8
9 10 11 12 13 14 15 16 17 18 19 20 21 22
Bottom View Top View
(Figure 2)
BASE UNIT CONTROLS
1. L1/L2 Telephone Line Jack: Accepts 4conductors 2lines line cord to make connection
with 4conductors 2lines modular type telephone outlet for both lines, or ordinary
2conductors 1line modular type telephone outlet for line1 only.
2. L2 Telephone Line Jack: Accepts 2conductors 1lines line cord to make connection
with 2conductors 1lines modular type telephone outlet for line2.
3. 9VDC Adapter Jack: A jack located on the bottom of the base unit used for connecting
the adapter to the base unit.
4. Charge Terminals: Used for charging the handset battery.
5. LCD Display: Shows call information, phone status, prompts and Phonebook items.
6. Charge LED Indicator: Light up steadily when the handset is being charged on the
base.
7. Dual 7segment LED Indicator: Shows the number of new message(s) and/or total
message(s) stored for both lines.
8. New TAD Msg LED Indicator: It blinks to indicate there is new message(s) stored in
the TAD for both lines.
9. Vol.+/- Buttons: Allows you to increase or decrease the speaker volume during TAD
mode, Talk / Intercom / Conference mode.
10. Up/Down Button: Press this button for menu/ caller ID list/ phonebook navigation, or
change speaker volume.
8