R3 LONG RANGE Radar/Laser Detector User’s Manual © 2017 Uniden America Corporation Irving, Texas Issue 1, May 2017 Printed in Korea
CUSTOMER CARE At Uniden®, we care about you! If you need assistance, please do NOT return this product to your place of purchase. Save your receipt/proof of purchase for warranty. Quickly find answers to your questions by: 1. Reading your owner’s manual, included with this product. 2. Visiting our customer support website at www.uniden.com. Images in this manual may differ slightly from your actual product. DISCLAIMER: Radar detectors are illegal in some states.
CONTENTS CUSTOMER CARE........................................................................................................................................ 2 R3 OVERVIEW.................................................................................................5 FEATURES....................................................................................................................................................... 5 INSTALL AND TURN ON R3......................................................
UNIDEN LONG RANGE RADAR/LASER DETECTOR USER’S MANUAL R3 R3 OVERVIEW Uniden's R3 is a top of the line Radar Detector with a built-in GPS feature. With the R3, you can mark geographical points where you commonly encounter radar transmissions. These can be school zones, red-light cameras, and places where police frequently monitor traffic. You can mark these points so the detector will announce “User mark ahead” when you approach them.
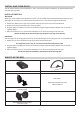
INSTALL AND TURN ON R3 You can mount the R3 on the windshield (1- and 2- cup suction brackets included) or on the dashboard (hook and loop tape included). INSTALL/POWER ON Windshield When you mount the R3 on the windshield, mount it in the middle of the windshield between the driver and passenger. Be sure there are no obstructions and that there is a clear view through the windshield. 1. Attach the rubber suction cups to the bracket and push the cups firmly onto the windshield. 2.
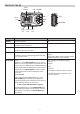
PARTS OF THE R3 Latch Release USB POWER VOL + Latch Slot CITY MENU VOL − MUTE/DIM Eagle Power Audio Eye Jack Jack KEY POWER VOL + VOL – MENU PRESS TO... Turn R3 on and off. • Turn volume up (7 levels: 0 - 6). • In Menus, go to next item. • Turn volume down (7 levels: 0 - 6). • In Menus, go to previous item. PRESS AND HOLD TO... NA NA When in Menu mode, exit the Menu system. When NOT in Menu mode, changes modes between Highway, City, and City 2.
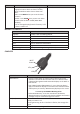
KEY MARK PRESS TO... User Mark. A User Mark is a manually tagged geographic location where an alarm is usually found. The R3 alerts when close to these User Marks. • Add - Press MARK when you are at the alarm location. • Delete - Press MARK when you are at an alarm location that has been marked (Mute Mem displays). An error message displays/sounds if memory is full or there is a GPS error. PRESS AND HOLD TO... Delete all User Marks.
LCD DISPLAY The LCD display on the front of the unit changes depending on what events are happening. If GPS = Off, the LCD's left display area shows Volt regardless of user settings. The following table provides examples of the most common displays: LCD EXAMPLES Scanning for Frequencies Displays to indicate end of a scan cycle. 42 Hwy MEANING Information displayed: • Speed (mph or kph) • Wave • Heart icon (end of search cycle) • Highway/City mph Frequency Found 12.8 Volt K 24.
Press MENU to access the Menu system. The screen displays the selection’s current status. For example, if you press MENU and the screen displays Voice: ON, you have the option of turning Voice to OFF. Use the following keys to navigate the menus: xx MENU: Change a menu item setting (press and hold to exit the Menu system). xx VOL + : Go to the next Menu item. xx VOL – : Go to the previous Menu item. Several menu items only display if GPS is set to ON. These entries are noted in the following table.
MENU ITEM Ka Filter WHAT IT DOES Filters noise from the Ka band to prevent false detections. TSF Traffic Sensor Filter. Prevents false alarms caused by traffic monitoring radar systems. K Narrow/Wide K Narrow scans for K radar guns used in the US only and reduces false alarms. Ka Narrow/Wide Ka Narrow scans for Ka radar guns used in the US only and reduces false alarms. Ka Narrow also provides a fast response to Ka POP radar guns. Ka Wide scans Super Wide Ka band.
MENU ITEM GMT (GPS on) DST (GPS on) BAT Warning BAT Saver (GPS on) Self Test Factory Reset? Delete All Mute? (GPS on) Delete All User (GPS on) Version DB Ver (GPS on) Exit WHAT IT DOES SETTINGS Sets time zone according to Greenwich Mean Time Most common time zone settings (GMT).
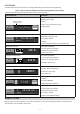
HOW DO I ...? Turn bands on and off Change Highway to City or City 2 and back Set a user mark TRY THIS... Press MENU and cycle through the menu options until the band you want to turn off displays. Press MENU again to change that band’s status. From the Menu system, press VOL + once. Press MENU to cycle through the options. When you find the option you want, leave the unit on that setting and press VOL + to move to the next menu option. See page 10 for detailed information.
xx Laser signal 13.5 Laser Volt xx X, K, Ka band signal Ka 12.8 Volt 33.800 GHz Signal strength indicator (1 - 5) xx User Limit Speed Alarm xx Vehicle Low Battery Voltage Warning, Vehicle Battery Saver Alarm Low Battery THREAT The R3 detects up to 4 radar band signals (threats) at a single time. The strongest rader signal is designated as the Priority signal, and its frequency displays on the LCD. The other signals (threats) are indicated in the left side of the display.
USER SPEED LIMIT When you set a speed limit thorough the menus, the R3 sends an alarm tone if your speed exceeds that speed limit setting. If that happens, the unit announces and displays over speed warnings. QUIET RIDE This function mutes X and K band radar alarms to zero volume when you drive under a speed limit set in this menu (up to 90 mph). Q-Ride flashes in green on the LCD. Ka and Laser bands are NOT muted. Mute Memory overrides Quiet Ride.
Ka Laser 33.400 - 36.000 GHz Operating Temp. 800 nm - 1100 nm Storage Temp. Detector Type: Radar Scanning Frequency Discriminator Laser Pulse Width Discriminator Alarm Beep (Detected Band and Signal Type strength) Operating Power Source USB Interface -4° to +185° F (Radar/Laser) -20° to +85° C (Radar/Laser) -22° to +203° F (Radar/Laser) -30° to +95° C (Radar/Laser) DC 11.0 to 16.0 V USB Specification 2.0/1.
PROCEDURE FOR OBTAINING PERFORMANCE OF WARRANTY: If, after following the instructions in this Operating Guide, you are certain that the Product is defective, pack the Product carefully (preferably in its original packaging). Include evidence of original purchase and a note describing the defect that has caused you to return it. The Product should be shipped freight prepaid, by traceable means, or delivered, to warrantor at: Uniden America Corporation C/O Saddle Creek 743 Henrietta Creek Rd.