
User`s guide


ScanControl
One Program, Multiple Scanners, Made in USA
Copyright 2009 – 3D Technologies Page 11 of 86
configuration session file for future use. If you change the port your radio is connected to
ScanControl will automatically re-configure itself the next time you start the program or
the next time you click on the “Connect Radio” button. Ports COM1 through COM9 are
supported.
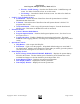
o Connect / Disconnect Radio Button – Click to attempt to connect to radio after
communications settings in radio are changed or when radio is switched to a different
type. Click to disconnect radio to change radios without having to exit and restart
ScanControl. Facilitates switching radios in mid session or disconnecting current radio in
order to operate on data files from different radio types.
o *Clear Radio Memory Button* – Click to erase radio memory. WARNING! This
function will completely erase all Channel and Talkgroup information in the radio.
This function should be used with caution and only when you want to wipe the radio
clean. This button is disabled if no radio is connected.
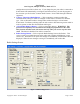
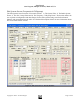
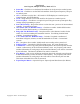
o Radio Settings Button - Click to open the Radio Settings Screen (See Below). This
screen is used to set global functions in the radio such as display backlighting, screen
contrast, etc. When the screen opens the settings are immediately read from the radio and
displayed. When the user changes a setting it is immediately sent to the radio.
Radio Settings Screen
Figure 7 - Radios Settings Screen