ARC8 for Uniden BCT8 Trunktracker User Manual Version 0.90 2004 BuTel software The Netherlands – all rights reserved www.butelsoftware.com ARC8 User Manual 0.
Contents: 1 Introduction and quick start reference 1.1 Software Installation 1.2 Enter registration information 1.3 Connecting the scanner to your PC 1.4 RS232 port setup 1.5 USB information 2 Using the memory channel editor 2.1 Reading data from the scanner 2.2 General hints and tips for using the editor 2.3 Programming conventional frequencies 2.4 Programming trunk frequencies 2.5 Sort data 2.6 Easy Fill 2.7 Using the clipboard 2.8 Copy/Move/Swap banks/channels 2.8.1 Copy/Move/Swap memory channels 2.8.
1: INTRODUCTION: ARC8 is a windows software package for easy programming and controlling the Uniden BCT8 scanner. System requirements: Windows 95/98/ME/XP/Win2000/NT minimum display resolution settings: VGA 800x600 SMALL Fonts Free serial port com1-com16 ARC8 is available in 1 version: ARC8basic: - Enhanced editor for memory channels, trunk id’s and search range data - Virtual Control screen, control your scanner from a PC. The PC displays a near 100% copy of the scanner display.
1.1 Software installation: The ARC8 is available as Internet download or on CD-ROM. Important: we advise our customers to uninstall previous versions before installing new versions. The uninstall process will not remove any data files created with the software. Win2000/XP users: You must be logged on as administrator to install and use ARC8. Internet download: The downloaded file contains all the necessary files for installation. Run the exe file and the installer will automatically start.
Enter registration: Start the software by selecting START _ PROGRAMS _ ARC8 _ ARC8 for Uniden BCCT8. After the start screen, select HELP _ REGISTER in the menu. Enter the name and key information: the name is case sensitive! No spaces are allowed. The key only contains numbers. The name may contain ‘0’ (=zero) or capital O. 1.3 Connect you scanner: The scanner must be connected to a free serial port. This is normally a 9-pin connector at the back of your PC.
1.4: Getting started: RS232 communication setup After installation of the software you must check and set the software settings for RS232 communication. Start the software and select: BCT8 _ RS232 communication setup from the menu. If you know the settings for the serial communications port and baud-rate you can manually set them. Select OK and the software will store your settings. The software remembers these settings.
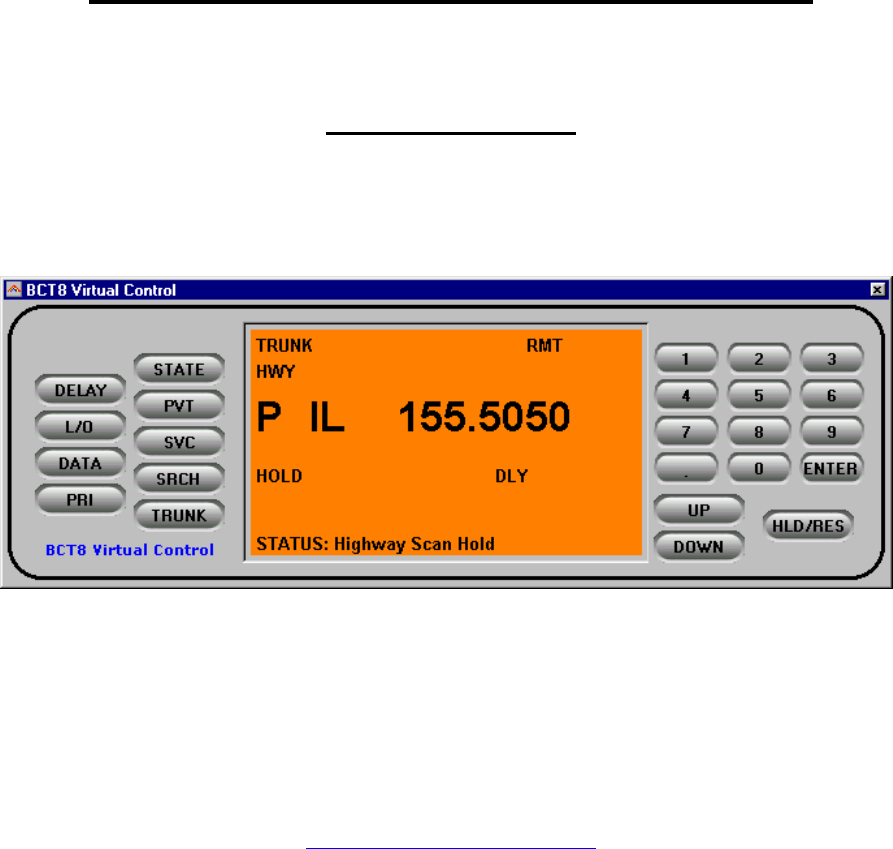
After setting up the serial communication you can check the connection. From the main menu select: BCT8 _ Virtual Control. After a few seconds the Virtual control panel should show the contents of the scanner display. Below is an example: 1.5: USB information Uniden scanners use a standard Rs232 port for computer programming and control. Uniden scanners do not have a USB port available. Therefor ARC8 is developed to support standard serial comports.
2: Using the memory channel editor: ARC8 includes the most versatile memory editor available on the market. Unlike other software packages you can use ARC8 without a scanner connected. This section describes most options available in the memory editor; in order to use the full power of the editor it is important that you read this section carefully. The editor does not require that a scanner is connected. The memory editor has a clear layout: The top section has a standard Windows MENU bar and a Toolbar.
2.1 Reading data from the scanner: After setting up the communication you can start to use the memory editor. Because there is probably already some data in your scanner it is a good start to first read the data from your scanner. From the main menu select: BCT8 _ Read Data from Scanner. Tip: you can also use the toolbar button or press F5. A new window is shown: First select whether you want to read data from all banks or a single bank. Next select what data you want to read.
All button: the All button will automatically select all the above options. After you made your selection, press ‘Read Data’. The software will start to read data from the scanner. Once reading data is complete the window is closed and data is transferred to the memory editor grid. DELAY: This parameters defines the delay the software uses during serial communication. You can adjust this delay to improve communication speed but using delays other then the default value may give communication errors.
2.3 Programming conventional frequencies: You can enter frequencies directly in the grid. In the grid there is no cursor shown. You can use BACKSPACE to make corrections in the grid. If you click on a cell the current data is copied to the editor bar, in the editor bar a cursor is shown (frequency and tag column only). When you enter a frequency and you press ENTER the other cells of that line are automatically programmed depending on your custom settings (default channel data).
- - Use internet/frequency lists to obtain the correct information about trunk system settings, trunk frequencies and trunk id’s. First setup the trunk system type (Select TRUNK _ SYSTEM SETTINGS) Second program the frequencies in the memory editor grid and make sure the trunk parameter for these channels are set to ON Now you can use trunk search mode to discover trunk id’s (refer to scanner manual) or you can program known id’s in your scanner by selecting TRUNK _ TRUNK ID’s.
2.6 EasyFill EasyFill is a simple but powerful option that lets you program data in a range of channels with only a few mouse clicks. Additionally you can use EasyFill for quickly program a range of frequencies in a memory bank so you can use a memory as a search bank. Select EasyFill from the Options menu or use the EasyFill toolbar button to display the EasyFill window: In the top frame the channel range is selected. DEFAULT will set the start and end channel of the selected bank.
Example: Frequency is set to 88.000 MHz, step is set to 50 kHz and channel range is 1-100. If you select APPLY the software will program 88.000 in channel 1, 88.050 in channel 2, 88.100 in channel 3 etc. Fill series: for the TAG option you can also set the fill series option. Fill series will search for a number in the tag and use that number to ‘calculate’ the tags in the selected channel range. Example: in the tag box the tag is set to ‘Police 1’. The channel range is set to 1-100.
2.7 Using the clipboard In the memory editor grid you can use the standard Windows clipboard options. In the toolbar shortcuts are available for cut, copy and paste options. You can also use the keyboard shortcuts CTRL C, CTRL X and CTRL V. Use these options to paste data from other applications like Excel. An additional clipboard option is available that will automatically select entire lines (Cut line, copy line and paste line).
2.8.1 Copy/Move/Swap Memory Channels: The ‘from’ and ‘to’ list boxes will automatically display the channel number, frequency and tag. Channels that are empty (no frequency programmed) are indicated as Empty. Current Bank: copy/move/swap channels in the active bank All Banks: copy/move/swap channels in all Banks 2.8.2 Copy/Move/Swap Memory Banks: Use this window to copy/move/swap entire memory banks. You can select the data that you want to copy/move/swap (frequencies, trunk id’s and trunk settings).
2.9 Fill Down / Fill Series The Fill down and fill series options are used to copy the same data into a range of channels. Fill series will auto calculate ascending numbers in text tags (see examples below) This example will show fill down: Channel 10 contains Trunk=OFF, Delay Time = 4 seconds and Record =ON We want to copy this data to channels 11-20; first you must highlight the channel range: Now select the FILL DOWN option: ARC8 User Manual 0.
The software will automatically fill the selected range, using the data at the top of the selected range. Fill Series: Fill series only works in the tag column. It will look for number information in the tag and auto increase the number in ascending channels. Example: Channel 10 contains the tag ‘UHF Channel 431’: Highlight the channels where you want to copy the data to: Now select the FILL SERIES option and ARC8 auto calculates the new tags: ARC8 User Manual 0.
2.10 Other Options: DUMMY BANK: The dummy bank is a virtual bank. You can use this bank for temporary storage of data. The data in the dummy bank is not send to your scanner nor stored in a file. You can also consider the dummy bank as a large clipboard. You can use the cut/copy/paste options to move data between the dummy and memory banks. The EASY TAG dropdown list: If this option is selected the memory editor will show a dropdown box while the Tag column is active.
2.11 Using Webcatcher for importing frequencies from internet website: ARC8 can very easily import frequencies from any website. • • • • • • • • Start the ARC8 software Open you internet browser and open a website displaying frequencies you want to import (example: http://www.trunktracker.
• ARC automatically removes duplicate frequencies: • For import into the memory table you must transfer the frequencies to the right list. Finally you select in what bank and at what channel you like to import the data. • • Press "EXPORT TO TABLE" button and frequencies are ready for upload! ARC8 User Manual 0.
• Webcatcher works with ANY website, the website shown above is only an example. Here is the result of WebCatcher (screenshot was taken from ARC250 software): ARC8 User Manual 0.
2.12 Priority Channels: You can set the priority channels, select BCT8 _ Priority Channels: Priority channels are stored in your mem file. You can directly read and send the priority channels, priority channels are also read/send when you use the read/send data window. ARC8 User Manual 0.
2.14 Set Active Banks: You can set the active banks for scan and search mode. Active bank settings are stored in a mem file. The active bank settings are send to the scanner when you upload data using the 'Send Data' window. ARC8 User Manual 0.
2.15: Uploading data into the scanner: From the main menu select: BCT8 _ Send Data to Scanner. Tip: you can also use the toolbar button or press F6. A new window is shown: First select whether you want to send data to all banks or a single bank. Next select what data you want to upload. For your convenience you do not need to send all data from the scanner. Example: if you want to change frequencies in bank 5, you only need to send the frequency data from bank 5.
2.16 Import/Export data: ARC8 can import data from various sources: - import using the clipboard: you can easily copy/paste data from Excel or other database software that supports the clipboard - import frequencies from text/html/csv files. Use the webcatcher option to import from these files.
3 TRUNK SYSTEM SETTINGS: From the menu select TRUNK _ SYSTEM SETTINGS. A new window is shown; in this window you will find tabs where you can set the trunk bank settings. Depending on the selected trunk type the trunk settings for that system are shown. For information about these parameters please refer to the scanner Operating Manual. General: IMPORTANT: before you program trunk id’s you must first setup the correct trunk type to avoid problems during data upload. 3.
3.2 MOTOROLA TYPE1: For a TYPE 1 system it is very important that the trunk system is setup correctly before any trunk id’s are uploaded to your scanner. Depending on the fleetmap settings the scanner may not accept some trunk id’s. ARC8 will always use a custom fleetmap even if you selected a predefined fleetmap. The correct settings for the custom plan are automatically programmed. So a predefined fleetmap will be programmed as a custom fleetmap due to limitations in the remote controls for BCT8.
3,4 MOTOROLA TYPE 2 – UHF: You must program at least one base configuration for a type 2 UHF system. See next page for more information about frequency/step/offset. 3.5 MOTOROLA TYPE 2 – VHF You must program at least one base configuration for a type 2 VHF system. See next page for more information about frequency/step/offset. ARC8 User Manual 0.
Explanation of base/step/offset parameters: For a type 2 VHF or type 2 UHF you must program base/step/offset parameters. For properly tracking a type 2 VHF/UHF system, the scanner needs channel number information. The tracking process is controlled by sending channel numbers instead of frequencies.
3.6 EDACS WIDE/NARROW: You can use either AFS or decimal trunk id format. ARC8 will accept both AFS and decimal trunk id’s in the trunk id editor. When you program EDACS frequencies, it is critical that you store each frequency in the correct location. This often is not the frequency order, so you must be sure you have the right sequence. It is normal that during Edacs trunk scanning or trunk searching the mode of the memory channels assigned to Edacs systems changes.
3.7 LT system: ARC8 User Manual 0.
4 TRUNK ID editor: Every bank can store a maximum of 50 trunk id’s (also known as talkgroups). You can also program a tag for every trunk id but this is only used by the ARC8 software. IMPORTANT: before you program trunk id’s you must set the correct trunk system type (select TRUNK _ SYSTEM SETTINGS. The trunk id editor will show the active trunk type, the software uses this information to check and correct new id’s that are entered.
CUT/COPY/PASTE: in the grid you can cut/copy/paste data. You can also use the CTRL C / X / V keyboard shortcuts or use right mouse click. DELETE: clear the selected cells in the grid. Align left / center: align the trunk tags in the grid. MOVE UP/DOWN: select a line in the grid, and then use the up/down buttons to move the data in the grid.
5 Software Settings 5.1 General: Reverse Channel Shift Option Buttons: In the memory editor grid two toolbar buttons are used to shift channels up/down. You can reverse the direction of these buttons. Load last used file: Automatically loads the last mem file during startup of the software. Hide leading zero’s: Hide leading zero’s in the memory editor grid. Save Window position: stores the size and position of the main editor screen.
5.2 Software settings: Tags Save memory banks tags: stores the tags of memory banks in mem files. Automatically clear bank tags: selecting FILE NEW clears the bank tags. If this option is not selected, ARC8 will show the most recent bank tags stored in your scanner. Software remembers last used bank tags: If this option is selected the software will store and remember the latest memory bank tags.
5.3 Software settings: Trunk Delete empty trunk id’s: select whether you want to clear trunk id’s. If this option is not selected the software will not delete any trunk id’s that are stored in your scanner. ARC8 User Manual 0.
5.4 Software settings: Virtual Control Always start with VC: after starting the software, virtual is automatically loaded. VC always on top: Puts the VC window on top. Store VC position: stores and remembers the virtual control window position. Do not close editor: while running VC you can still access the memory editor.
5.5 Software settings: Backup ARC8 can generate automatic backups of your work. Backups are stored in C:\PROGRAM FILES\ARC8\BACKUP or C:\PROGRAM FILES\ARC8PRO\BACKUP . The backup file contains time and date so you can easily find backup files. The backup process does not work while Virtual Control is active and during data read/send operation. You can set the interval in minutes.
6 Virtual Control ARC8 includes a virtual control option. 6.1 Virtual Control: Keyboard The keyboard tab gives you direct control over the BCT8. The display includes a status option where you can directly check the current status of you scanner. Some buttons support the right mouse button click: PRI: right click for setting a priority L/Oock Out: right click for clearing all lockout channels / frequencies / id's (depends on scanner status mode).
7 General information and troubleshooting 7.1 INI file settings: The setup.ini file contains some additional options you can set. You can open and edit setup.ini with notepad.
7.2 Troubleshooting communication problems In case of communication problems you can use the information in this section to troubleshoot communication problems. 7.2.1 Set/Check scanner communication settings: Switch on the scanner, press and hold the ‘.’ button (decimal button). The display shows the current communication speed/baudrate settings. The speed must be set to 4800, 9600 or 19200. Press the enter button to store the selection. We advise 19200 baudrate or higher for best performance .
7.2.3 Other serial drivers: If you also use the serial port for programming your PDA/PAL/POCKET PC or mobile phone (GSM), there may be resident software that constantly polls the serial ports. Disable any PDA/mobile phone programming software; they may interfere with the scanner serial communication. 7.2.4 Serial/USB devices: ARC8 does not support USB devices since the Uniden scanners only use RS232. Use a serial port connection using a PCMCI or PCI option card.
7.3 Support: The latest versions of ARC8 are available for download at www.butelsoftware.com In case of problems contact BuTel customer support at support@butel.nl , support is only available by e-mail, BuTel does not provide telephone support. ARC8 User Manual 0.
7.4 Revision history: ARC8 V1.00: - initial release July 2004 ARC8 User Manual 0.