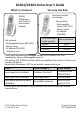
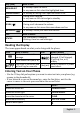
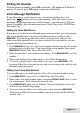
D1361/D1364 Series User's Guide What's in the box? You may also find: Accessory handset and charger D1361/ D1364 base with Caller ID and cordless handset Not pictured: xxRechargeable battery (BT-1021) xxBattery cover xxAC adapter (PS-0035) xxTelephone cord Not pictured: xxRechargeable battery (BT-1021) xxBattery cover xxAC adapter (PS-0035) If you purchased model number...
TABLE OF CONTENTS What’s in the manual? Getting Started ............................ 3 Installing Your Phone ................... 3 Charge the Battery.......................3 Connect the Telephone Cord.......3 Test the Connection.....................3 Changing from Tone to Pulse Dialing....................................3 Getting to Know Your Phone ....... 4 Base ............................................. 4 Handset . ...................................... 4 Reading the Display ....................
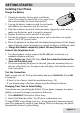
Getting Started Installing Your Phone Charge the Battery 1. Unpack the handset, battery pack, and battery cover. If you need to remove the cover, press in on the notch and slide the cover down and off. 2. Line up the battery connector with the jack inside the handset; the connector only fits one way. 3. Push the connector in until it clicks into place; tug gently on the wires to make sure the battery pack is securely connected. 4. Replace the battery cover and slide it into place. 5.
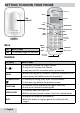
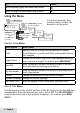
Getting to Know Your Phone Earpiece Status FIND HANDSET Display UP CLEAR PHONEBOOK/ LEFT TALK/ FLASH Key FinD What it does xxIn standby: page the handset. Handset Key (icon) CALLER ID/LEFT END DOWN Twelvekey dial pad CHARGING CONTACTS Base MENU/SELECT REDIAL/ PAUSE MUTE MESSAGES Microphone Charging contacts What it does xxIn standby: increase the ringer volume. xxDuring a call: increase the volume. Up ( ) xxIn any menu or list: move the cursor up one line.
Key (icon) Menu/select Caller ID/right End Down ( ) MESSAGES ( LED Status What it does xxIn standby: open the menu. xxIn any menu or list: select the highlighted item. xxIn standby or during a call: open the Caller ID list. xxDuring a call: hang up. xxIn any menu or list: exit and go to standby. xxIn standby: decrease the ringer volume. xxDuring a call: decrease the volume. xxIn any menu or list: move the cursor down one line. ) xxIn standby: access your voice mail service.
To... Press... switch between upper and lower case letters *. rotate through the punctuation and symbols 0. Using the Menu Press MENU/SELECT to open the menu. Handset Setup Date & Time Press PHONEBOOK to go back a screen OR press END to exit the menu. Press MENU/SELECT to choose the current option. xx If you don't press any keys for about thirty seconds, the handset exits the menu. Handset Setup T-coil Handset Setup Use UP and DOWN to Tones Setup rotate through the Ringer Handset options.
Global Setup Menu Menu Option Dial Mode Edit Voice Mail VMWI Reset What it does Choose tone or pulse dialing (see p. 3). Program your voice mail access number so you can get messages by pressing one button (see p. 9). Reset the Visual Message Waiting Indicator (see p. 9). Using Your Phone Basics To... make a call, dial the number, and answer a call hang up ignore a call (mute the ringer) mute the microphone during a call Press... Talk/flash. Talk/flash. End or put the handset in the cradle.
To... Press... add 1 at the front of CID number * before dialing for a toll call. add the area code store the current CID or redial entry to the phonebook edit the current phonebook entry delete the current entry close the list # before dialing. Menu/SELECT, then select Store Into PB. Proceed to edit the name and number. Menu/select, then select Edit. Menu/select, then select Delete (or Delete Entry). To confirm, select Yes. Phonebook/left.
Finding the Handset With the phone in standby, press Find on the base. The handset will beep for 1 minute. To cancel, press Find again or press any handset key. Voice Message Notification If you subscribe to a voice mail service, your phone displays the voice mail icon ( ) when you have a new message. After you listen to your messages, the message icon turns off. If it doesn’t, you can reset it: With the phone in standby, open the menu and select Global Setup; select VMWI Reset, then select Yes.
Troubleshooting Problems I can’t make or receive calls. The handset won’t ring. The handset is not working. The handset won’t display CID information. I hear a beeping during a call. There’s a lot of noise or static on the line Possible solutions xxCheck the telephone cord connection. xxDisconnect the base AC adapter. Wait a few minutes, then reconnect it. xxMake sure the base is plugged in. xxMake sure the ringer is turned on. xxCharge the battery for 15-20 hours. xxCheck the battery connection.
Adapter and Battery Information AC adapter Part number Input voltage Output voltage PS-0035 120V AC, 60 Hz 8V AC @ 300mA Battery pack (with normal use) Part number BT-1021 Capacity 300mAh, 2.4V DC Talk time about 7 hours Standby time about 6 days Battery life about 1 year xx Use only the supplied AC adapter. xx Use the proper adapter for the base. xx Do not place the unit in direct sunlight or subject it to high temperatures. xx Replace the battery when the talk or standby time becomes noticeably reduced.
compliant. See installation instructions for details. The REN is used to determine the number of devices that may be connected to a phone line. Excessive RENs on a phone line may result in devices not ringing in response to an incoming call. In most but not all areas, the sum of RENs should not exceed five (5.0). To be certain of the number of devices that may be connected to a line, as determined by the total RENs, contact the telephone provider.
xx Increase the separation between the equipment and receiver. xx Connect the equipment into an outlet on a circuit different from that to which the receiver is connected. xx Consult the dealer or an experienced radio/ TV technician for help. RF Exposure Information This product complies with FCC radiation exposure limits under the following conditions: xx The base must be placed to allow a minimum of 20 cm (8 inches) between the antenna and all persons during normal operation.
warranty at any time while this warranty is in effect, warrantor will either, at its option, repair or replace the defective unit and return it to you without charge for parts, service, or any other cost (except shipping and handling) incurred by warrantor or its representatives in connection with the performance of this warranty. Warrantor, at its option, may replace the unit with a new or refurbished unit.