D1760 Series User's Guide You will also find: What's in the box? Accessory handset and charger D1760 base with cordless handset Not pictured: • Rechargeable battery (BT-1021) • Battery cover • AC adapter (PS-0035) If you purchased model number: D1760 D1760-2 Not pictured: • Rechargeable battery (BT-1021) • AC adapter (PS-0035) • Telephone cord D1760-11 D1760-12 ... ...
What’s in the manual? Getting Started................................. 3 Installing Your Phone..................................3 Getting to Know Your Phone....................4 Using the Handset Menu...........................6 Using Your Phone.............................. 8 Using the Phonebook............................... 10 Using Special Features................... 11 Important Information................... 14 Solving Problems........................................14 Resetting Handsets.........
Getting Started Installing Your Phone Charge the Battery 1. Unpack all handsets, battery packs, and battery covers. If you need to remove a cover, press in on the notch and slide the cover down and off. 2. Line up the battery connector with the jack inside the handset; the connector only fits one way. 3. Push the connector in until it clicks into place; tug gently on the wires to make sure the battery is securely connected. 4. Replace the battery cover and slide it into place. 5.
Getting to Know Your Phone Parts of the Base Find Handset Charging Contacts Key (icon) What it does • In standby: page all handsets.
Key (icon) What it does • In standby or during a call: open the phonebook. Phonebook • In the menu: go back to the previous screen. ( ) • When entering text: move the cursor to the left. Speaker ( ) • Switch a normal call to the speakerphone (and back). Talk/flash Down ( ) Redial/pause Message/ mute ( ) Intercom/ clear Caller ID ( ) End Menu/select Up ( LED Status ) • • • • • • • • • • • • • In standby: start a telephone call (get a dial tone). During a call: switch to a waiting call.
Reading the Display The table shows the possible status icons & what they mean. Since the icons appear based on what the phone is doing, you won't see all the icons at the same time. Icon Status icons Current call info Time & date NEW CID record status What it means The signal from the base is 1) strong or 2) weak. The ringer is turned off and will not ring for new calls. The speakerphone is on. Privacy Mode is on: no other handset can join the call. T-coil mode is on (see p. 7).
Handset Setup Menu You can change these settings separately for each handset. Turn on T-coil mode to reduce noise on hearing aids equipped with a telecoil (T-coil) feature. T-coil mode T-coil shortens talk time, so keep your battery fully charged. Choose this handset's ring tone. As you highlight each ring tone, the phone plays a sample. When you hear Ringer Tones the tone you want, press Menu/select. Turn on personal ring so you can assign a special ring Personal Ring tone to people in your phonebook.
Entering Text on Your Phone • Use the 12-key dial pad anytime you want to enter text into your phone (a name in the phonebook, the handset banner, etc.). • If two letters in a row use the same key, enter the first letter; wait for the cursor to move to the next space and enter the second letter. To... Press... Phonebook. move the cursor left CID. move the cursor right Intercom/clear. erase the character at the cursor erase the entire entry and hold Intercom/clear. #.
Assigning a Speed Dial Number You can assign a speed dial number to a phonebook entry when you create that entry for the first time (or when you edit it). Press PHONEBOOK and select Create New. As you enter the phonebook number, one of the options you will see is to assign a speed dial number to that phonebook entry. You can assign up to 10 speed dials, 0 - 9. Finding a Lost Handset With the phone in standby, press Find HS on the base.
To… dial the highlighted number close the lists Press... Talk/flash or speaker. (If the number is a toll call but there is no 1 at the beginning, press * to add 1 before dialing.) Phonebook. For individual record options, highlight a number and press Menu/select: Delete Entry Erase the number from the list. Add the number to the phonebook. The handset prompts Store Into Pb you to edit the name and number and select a personal ring. Delete All (CID list only) Erase all numbers from the list.
Adding Phonebook Entries With the phone in standby, open the phonebook. Press Menu/select and select Create New. Enter a name, number, and then assign a speed dial number and a personal ring if desired. • Enter the phone number (up to 20 digits) exactly as you would dial it. • If you need the phone to wait before sending the next set of digits, press Redial/pause to insert a 2-second pause. You can insert multiple pauses, but each one counts as a digit (you’ll see P in the display).
• If a handset was ever registered to a base, you must reset it before it can register to a new base; see p. 16, or see the accessory handset manual. Conference Calling • When an outside call comes in, two handsets can join in a conference call with the outside caller. • To join a call that’s already in progress, just press Talk/flash or Speaker . • To leave the conference call, hang up normally; the other handset remains connected to the call. Call Transfer To... Press... Intercom/clear.
To... cancel a page answer a page end an intercom call Press... End. Intercom/clear or Talk/flash. End. Both handsets return to standby. Chain Dialing If you often have to enter a series of digits or a code number during a call, you can save that code number to a phonebook entry and use the phonebook to send the code number. 1. Enter the code number (up to 20 digits) into the phonebook just like a regular phonebook entry.
4. To access your provider’s voice mail service now, press Message/Mute . The system will dial the voice mail service and you can enter your security code manually when prompted. Editing Your Voice Mail Number You can add your voice mail security code to the voice mail number string. 1. Press Menu/SelecT, then scroll to Global Setup/Edit Voice Mail. 2. Enter your voice mail number again, then press Redial/Pause twice to enter 2 2-second pauses. Next, enter your security code. 3.
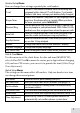
Audio issues Possible solutions • Check for interference from appliances (microwave ovens, TVs, etc.) or wireless devices (baby monitors, WiFi equipment, etc.). Move the handset or base away There’s a lot of from the interference source. noise or static on • If you use a telecoil hearing aid, turn on T-coil mode the line (see p. 7). • If you have any service that uses the phone line, add a DSL or telephone line filter (see below).
Resetting Handsets If you have trouble with a handset or if you want to replace one, clear the registration information from the base and the handset: 1. Press & hold END and # at the same time until you see the System Reset menu. 2. If you still have the base the handset is registered to, select Deregister HS, then select the handset you want to reset. If you don’t have that base anymore, select Base Unavailable. 3. To confirm, select Yes. The handset displays Handset not registered.
Warning! The cords on this product and/or accessories contain lead, a chemical known to the state of California to cause birth defects or other reproductive harm. Wash hands after handling. Uniden works to reduce lead content in our products & accessories. Compliance Information FCC Part 68 Information This equipment complies with Part 68 of the FCC rules and the requirements adopted by the ACTA.
able your alarm equipment. If you have questions about what will disable alarm equipment, contact your telephone company or a qualified installer. Any changes or modifications to this product not expressly approved by the manufacturer or other party responsible for compliance could void your authority to operate this product.
D1760 Handset 1. Install the battery. 2. Once Welcome, Please wait... disappears from the display, press and hold END, MENU, and * simultaneously. 3. After about 5 seconds, a confirmation tone sounds, indicating all functions except charging have been disabled. To return to normal operation, cycle the power for the base and remove and reinstall the handset battery Industry Canada (I.C.
handling) incurred by warrantor or its representatives in connection with the performance of this warranty. Warrantor, at its option, may replace the unit with a new or refurbished unit.