DECT 2005 Accessory handset for DECT 2015 Series DECT 2035 Series
Welcome Congratulations on your purchase of the Uniden DECT2005 accessory handset and charging cradle. You can place this fully featured cordless handset anywhere your home has AC power. Note: Illustrations in this manual are used for explanation purposes. Some illustrations may differ from the actual unit. Important! The DECT2005 accessory handset will not operate until it is registered to a Uniden main base.
Compatible Bases This handset is compatible with Uniden’s 1.8 GHz DECT Expandable phone system: the DECT2015 and DECT2035 series. Installing the Accessory Handset Checking the Package Contents Make sure your package contains the following items. If any items are missing or damaged, please contact your place of purchase immediately.
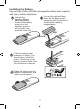
Installing the Battery Use only the Uniden BT-904 rechargeable battery pack supplied with your cordless telephone. Line up the red and black wires on the battery pack connector with the sticker in the handset’s battery compartment. Unpack the handset, battery pack and battery cover.(If the battery cover is on the handset, press in on the notch and slide the cover off.) RED BLACK Push the battery pack connector in firmly. (You should hear it click into place.
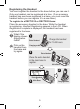
Charging the Accessory Handset The handset is powered by a rechargeable battery pack that automatically recharges when the handset is placed in the charging cradle. Use only the Uniden AAD-600S(M) AC adapter with the charging cradle. Connect the AC adapter to the DC IN 9V jack as shown. (It may already be connected.) Connect the AC adapter to a standard 240V AC wall outlet. Place the handset in the charging cradle with the display facing forward.
Registering the Handset You must register the handset to the base before you can use it. Only one handset can be registered at a time. (If an accessory handset has ever been registered to a base, you must reset the handset before you can register it to a new base.) To register to a DECT2015 or DECT2035 base: Place the accessory handset in the base. While the handset is registering, Handset Registering appears in the LCD. When Registration complete is displayed, the handset has been registered to the base.
Resetting the Handset If you want to register the handset to a different base or replace a handset with another one, you must first clear the registration information from the base and the handset. 111 Press and hold END and # for at least five seconds, until the SYSTEM RESET menu appears. 222 Select the Deregister HS submenu by pressing MENU/ SELECT. Which Handset? appears in the display. or to select the 333 Use handset ID to be de-registered from the list, and then press MENU/SELECT.
Resetting the Handset Without the Base If the original base this handset was registered to is not available for some reason (for example, it is lost or somehow incapacitated), you can still reset the handset and use it with another base. 111 Press and hold END and # for at least five seconds, until the SYSTEM RESET menu appears. to move the cursor to Base Unavailable and then 222 Press press MENU/SELECT. to move the cursor to the base which you want 333 Press to de-register from, and then press MENU/SELECT.
Using the Interface Parts of the Handset new message LED Earpiece Display (LCD) key (up) CLEAR/INT'COM key (clear/intercom) MENU/SELECT key key (caller ID/right) END key key (down) key (phonebook/left) TALK/FLASH key key (speaker) Twelve-key dial pad /TONE key REDIAL/PAUSE key Microphone # key PREMIUM DECT /MUTE key (messages/mute) Charging contacts 8
Reading the Display In standby Time Handset ID and banner Number of new Caller ID calls received During a call Call duration The ringer off icon indicates that the ringer is turned off. The voice mail icon appears when you have messages waiting in your voice mailbox. The privacy icon appears when the Privacy Mode is turned on. The speaker icon appears when the speaker phone is in use. The mute icon appears while the microphone is muted.
Using the Four-way Function Key Your handset has a four-way function key that allows you to move the cursor or pointer on the display and access the most commonly used features at the touch of a button. ••Press the left side of the key to open the phonebook. ••Press the right side of the key to open the Caller ID list. ••Press the top of the key to increase the ringer volume (while the phone is in standby) or Increase the volume speaker volume (while you are on a call).
••When [Aa] appears on the display, capital letters are displayed first, then lower case letters, and then the number on the key. ••When [aA] appears on the display, lower case letters are displayed first, then the number on the key, and then capital letters. ••When you input the first letter or a letter after a blank space, the default mode is [Aa]. From the next letter, the mode changes to [aA] automatically. ••You can switch back and forth the mode manually between [Aa] and [aA].
Using Your Accessory Handset Making and Receiving Calls With the earpiece Make a call 111 Pick up the handset from the cradle. 222 Dial the number. 333 Press TALK/FLASH. With the speaker phone 111 Pick up the handset from the cradle. 222 Dial the number. 333 Press . 111 Pick up the handset. (If AutoTalk is on, the phone answers when you pick up the handset from the cradle.) 111 Pick up the handset. Answer a call . 222 Press TALK/FLASH.
Using Caller ID and Call Waiting If you subscribe to Caller ID, you can store up to thirty Caller ID numbers in each handset. Caller ID records are stored from newest to oldest. Once your Caller ID list is full and you receive an incoming call, the oldest record will be automatically deleted to make room for the new record. To open the Caller ID list, press . The phone will show the latest records.
Using the Phonebook Your handset can store up to seventy names and numbers in your phonebook. When all the phonebook entries are full, you will hear a beep and Memory Full appears. You cannot store any additional names and numbers unless you delete some of the existing ones. to enter the phonebook. Once in the phonebook, you Press have the following options: to scroll through the phonebook Scroll through Press the entries alphabetically.
Redialing a Number To redial one of the last five numbers dialed on this handset, press REDIAL/PAUSE. This opens the redial list. Use and to find the number you want to dial, and press TALK/FLASH or in standby, or press MENU/SELECT during a call. Muting the Ringer (One Call Only) While the handset is ringing, press /MUTE or END to mute the ringer for this call. The phone will ring again on the next call. (The handset must be off the cradle to mute the ringer.
Using Hold, Conference, Transfer and Intercom Put a call on hold Press CLEAR/INT’COM. If you leave a caller on hold for more than five minutes, the call will be disconnected. To return to the party on hold, press TALK/FLASH or . Join a call already in progress To join a call already in progress, press TALK/FLASH or . You can hang up normally; the other station remains connected to the call. Transfer a call Press CLEAR/INT’COM; the call is placed on hold.
Accessing Your Answering System If your base has an answering system, you can use your handset to get your messages and change your answering system setup. The answering system plays your new messages (that you have not listened to yet) first. If you have no new messages, the system plays your old messages. You have the following options: Press /MUTE. The system announces the number of Playing new new and old messages, then plays the first new message messages followed by the day and time it was received.
Accessing Voicemail If your base doesn't have an answering system and you subscribe to a voice mail service, you can program your handset to automatically dial the access number. 1) Press MENU/SELECT. 2) Move the cursor to Handset Setup and press MENU/SELECT. 3) Move the cursor to Edit Voice Mail and press MENU/SELECT. 4) Enter your access number (up to twenty digits). If you need the phone to wait before sending the next digits, press REDIAL/PAUSE to insert a two-second pause.
Battery Replacement and Handling With normal usage, your battery should last about one year. If the talk time becomes short even after the battery is recharged, please replace the battery. You can purchase a replacement battery by contacting Uniden. See inside the back cover page for contact information. Warning: To avoid the risk of personal injury or property damage from fire or electrical shock, use only the BT-904 battery pack. Caution: -- This equipment contains a rechargeable Nickel-Cadmium battery.
Memo 20
Memo 21
One Year Limited Warranty UNIDEN DECT 2005 IMPORTANT Evidence of the original purchase is required for warranty service. Warrantor: Uniden Australia Pty Limited ABN 58 001 865 498 Uniden New Zealand Limited Elements of Warranty: Uniden warrants to the original retail owner for the duration of this warranty its DECT 2005 (hereinafter referred to as the Product), to be free from defects in materials and craftsmanship with only the limitations or exclusions set out below.
© 2008 Uniden Australia Pty Limited/Uniden New Zealand Limited Printed in China UUZZ01663BZ(0)