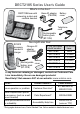
DECT2185 Series User's Guide What's in the box? DECT2185 base with answering system and cordless handset Base AC adapter (PS-0034) Battery cover Telephone cord Rechargeable battery pack (BT-1016) DCX210 accessory handset & charger You might also find: Charger AC adapter (PS-0035) Battery Rechargeable cover battery pack (BT-1016) If you purchased You should model number: have: DECT2185 None DECT2185-2 1 of each DECT2185-3 2 of each DECT2185-4 3 of each DECT2185-5 4 of each DECT2185-6 5 of each If any
What's in the manual? Installing Your Phone....................... 1 Charge the Battery.......................... 1 Connect the Telephone Cord......... 2 Getting to Know Your Phone.......... 3 Parts of the Base............................. 3 Parts of the Handset........................ 5 Reading the Displays ..................... 6 Using the Menus............................... 7 Using the Base Menu...................... 7 Using the Handset Menus.............. 8 Entering Text on Your Phone.........
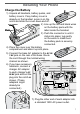
Installing Your Phone Charge the Battery 1) Unpack all handsets, battery packs, and battery covers. If any battery cover is already on the handset, press in on the notch and slide the cover down and off. 2) Line up the red and black wires on the battery pack with the Black label inside the handset. Red 3) Push the connector in until it clicks into place; tug gently on the wires to make sure the battery pack is securely connected. 4) Place the cover over the battery compartment and slide it up into place.
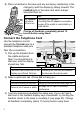
8) Place a handset in the base and any accessory handset(s) in the charger(s) with the display(s) facing forward. The charge light on the base and each charger should all turn on. If... Try... the charge - reseating the handset. light does - checking the AC adapter connection. not turn on - seeing if the outlet is controlled by a wall switch. Charge all handsets completely (about 15 hours) before using them.
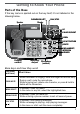
Getting to Know Your Phone Parts of the Base If the key name is spelled out on the key itself, it's not labeled in the drawing below. PHONEBOOK/LEFT PLAY/STOP Display Speaker UP CALLER ID/RIGHT DOWN DO NOT DISTURB DELETE FIND HANDSET/ INTERCOM SPEAKER Charging contacts Twelve-key dial pad Microphone (on back) Base keys and how they work Key name (and icon) What it does clear/mute - While this station is ringing: mute the ringer for this call only. - During a call: mute the microphone.
Key name (and icon) What it does Phonebook/ left ( / ) - In standby or during a call: open the phonebook. - In any menu or list: go up one level. (If you are already at the top level, the phone exits the menu and returns to the previous operation.) - During text entry: move the cursor to the left. - While playing messages: for the first 2 seconds, go to the previous message; after that: go to the start of this message. Caller ID/ right ( / ) - In standby or during a call: open the Caller ID list.
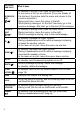
Parts of the Handset If the key name is spelled out on the key itself, it's not labeled in the drawing to the right. CLEAR/ INTERCOM PHONEBOOK/ LEFT SPEAKER UP CALLER ID/ RIGHT DOWN Twelvekey dial pad REDIAL/ PAUSE Handset keys and how they work Key name (and icon) MESSAGES/ MUTE Charging contacts Microphone What it does - In standby: increase the ringer volume. - During a call: increase the call volume. - In the menu or any list: move the cursor up one line.
Key name (and icon) Speaker ( What it does ) - Switch a normal call to the speakerphone (& back). Redial/pause - In standby: open the redial list. ( ) - While entering a phone number: insert a 2-second pause. Block messages/ mute ( ) - While the phone is ringing: add the incoming Caller ID information to the call block list (block the call). - In standby: access your answering system. - During a call: mute the microphone. - While the phone is ringing: mute the ringer for this call only.
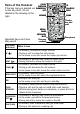
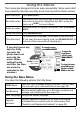
Using the Menus The menus are designed to be as easy as possible. Some users don't even need the manual once they know how to perform these actions: Open the menu Press Menu/select. The arrow cursor on the left side of the line shows which Move the cursor menu item is currently highlighted. Use Up to move the cursor up & Down to move it down. Move the cursor to highlight the option, then press Menu/ Select an option select . Go up one screen Press Phonebook/left.
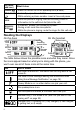
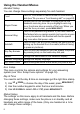
Using the Handset Menus Handset Setup You can change these settings separately for each handset. Turn on T-coil mode to reduce noise on some hearing aids (see "Do you use a T-coil hearing aid?" on page 24). Choose one of four melodies or three tones for the handset's main ring tone. As you highlight each ring Ringer Tones tone, the phone plays a sample of the tone. When you hear the tone you want, press Menu/select. Turn on the personal ring feature.
Enter your area code so the phone hides the area code on incoming local calls (see "Using Seven-digit Dialing" on page 12). Change the way your phone communicates with the telephone Dial Mode network (see "Changing from Tone to Pulse Dialing" on page 25). Set Line Do not change this setting unless instructed to by customer Mode service. Area Code Call Blocking This menu lets you block unwanted calls from up to 20 phone numbers and manage your call block list (see page 14).
To Follow these steps Erase one letter Move the cursor to the letter you want to erase and press Clear (Clear/intercom on the handset; Clear/ mute on the base). Erase the entire entry Press & hold Clear. Enter punctuation or a Press 0 to rotate through the available symbols. symbol Using Your Phone From a handset From the base speakerphone speakerphone To... From a handset make a call: Dial the number, then Press Talk/flash. Press Speaker. Press Speaker. answer a call Press Talk/flash.
Change the ringer volume earpiece volume speaker volume When the phone is in standby you are on a normal call you use the speakerphone for a call or getting messages On the base select Off, Low, Medium, or High NA choose one of 10 volume levels On a handset select Off, Low, Medium, or High choose one of 6 volume levels choose one of 6 volume levels Using the Redial List The phone saves the last 5 numbers you dial on each station.
3) On the handset, press Talk/flash or Speaker to dial the number; on the base, press Speaker. (You can also press Talk/flash or Speaker before you open the CID list. Find the number you want to dial, then press Menu/select.) Caller ID menu options Open the CID list with the phone in standby. Find the number you want and press Menu/select. Choose one of these CID menu options: Delete Entry Erase this Caller ID number. Add this number to this station's phonebook.
Using the Phonebook Each station can store up to 70 entries in its phonebook. Open/close the phonebook Press Phonebook. Scroll through the entries Press Down to scroll through the phonebook from A to Z or Up to scroll from Z to A. Jump to entries that start with a certain letter Press the number key corresponding to the letter you want to jump to. Dial an entry 1. Find the entry you want to dial. 2. On the handset, press Talk/flash or Speaker; on the base, press Speaker.
Enter the code number (up to 20 digits) into the phonebook just like a regular phonebook entry. Be sure to enter the code number into the phonebook exactly as you would enter it during a call. When you hear the prompt that tells you to enter the number, open the phonebook and find the entry that contains your code number. Press Menu/select to transmit the code. Or, if you change your mind, use Phonebook/left to close the phonebook.
call and add this number to the call block list, press Block. When the phone asks you to confirm, press Menu/select or Block. Blocking an incoming call from an "Unknown" or "Private" number is the same as selecting Unknown Number or Private Number from the Call Blocking menu. Call Blocking menu options With the phone in standby, open the menu and select Call Blocking. Choose one of these options: View Number See the numbers on your call block list. (Handset only) Add an entry to your call block list.
Using Multi-station Features The expandable base and the cordless handset give you some useful multi-station features. (A station can be any handset or the base.) Expanding Your Phone Your base supports a total of six cordless handsets: the one that came with the base and up to five DCX210 accessory handsets. Your base might be compatible with other Uniden accessory handsets: please visit our website for a list of compatible handsets.
Using Call Transfer To... transfer a call cancel a transfer From the base From a handset 1. Press Find handset/intercom to 1. Press Clear/intercom to put the call on hold. put the call on hold. 2. Select the station you want to transfer the call to, or select All to page all the stations at the same time. When the other station accepts the call, you'll be disconnected, but you can join the call again. Press Speaker to return to the call. Press Talk/flash to return to the call. 1.
Using the Answering System Setting Up Your Answering System You can set up your answering system from any handset. To... Follow these steps Your greeting can be between 2 seconds and 30 seconds long. If you don't record an outgoing message, the system uses a pre-recorded greeting: Hello, no one is available to take your call. Please leave a message after the tone. 1. Press Messages/mute to access the answering system.
Set the amount of time callers have to leave a message, either 1 minute or 4 minutes. Choose Announce Only if you don't want the system to let callers to leave a message. Have the system beep every 15 seconds when you have a new message; the beeping stops when you listen to all Message Alert your new messages. (To mute the alert without listening to your messages, press any key on the base.) Ans. Language Change the language of the system's voice prompts.
How to operate your answering system From a handset (remote operation) To... From the base play new messages Press Play/stop Press Messages/mute. The system announces the number of new & old messages, then plays the first new message followed by the day & time it was received. Then the system plays the new messages in the order they were received. restart the Press Phonebook/left. current message Press 1 or select 1:Repeat.
If you mute the call screen, the system continues taking the message: it just stops playing through the speaker. Only one handset at a time can screen calls. If another handset is screening the call, the handset beeps and returns to standby. Using the System While You're Away from Home You can also operate your answering system from any touch-tone phone. Before you can use this feature, you have to program a security code.
Solving Problems If you have any trouble with your phone, try these simple steps first. If you still have a question, call our Customer Care Line listed on the front cover. If… No stations can make or receive calls. One handset can’t make or receive calls. A station can make calls, but it won’t ring. A handset's display won't turn on. A handset is not working. A handset says Unavailable. No stations will display any Caller ID information. I can't dial from the Caller ID list.
If… Try… - Making sure the answering system is turned on. The answering system - Making sure the base AC adapter is plugged into a does not work. continuous wall outlet (i.e., not controlled by a wall switch). - Making sure the Record Time is not set to The answering Announce Only. system won't record messages. - Deleting messages (the memory may be full). A handset can't access - Making sure no other handset is using the system. the answering system. - Making sure the phone is in standby.
N��������������������������� oise or Static On The Line Do you use a T-Coil hearing aid? If you have a hearing aid Interference is the most common equipped with a telecoil (T-coil) cause of noise or static on a feature, the interaction between cordless phone. Here are some the hearing aid & digital cordless common sources of interference: phones can cause noise in the electrical appliances, especially handset.
this problem. The technician who installed your DSL service might have left some filters for you; if not, call your DSL provider or look in any electronics store. Plug the DSL filter into the telephone wall jack and plug your phone’s base into the filter. Make a test call to make sure the noise is gone. Changing from Tone to Pulse Dialing Your phone can communicate with the telephone network in two different ways: tone dialing or pulse dialing. These days, most telephone companies use tone dialing.
Registering a handset 1) On the base, open the menu and select Register Handset. The display should say Handset Registering. 2) On the handset you want to register, press and hold # until the handset display says Handset Registering (about 2 seconds). 3) In about 30 seconds, the handset display should say Registration Complete. Press Talk/flash and make sure you get a dial tone. If... Try...
Important Information Terms Used In This Guide Accessory handset An extra handset that can register to and be used with an expandable phone base. All accessory handsets must be registered to a base before you can use them. Base The main part of the phone. It connects to your phone line and lets you make and receive calls. Most bases also have a cradle to store a handset. CIDCW (CID on Call Waiting.) A service that shows CID for calls that come in during another call.
Nickel is a chemical known to state of California to cause cancer. not short-circuit the battery. Do not charge the rechargeable battery pack used in this equipment with in any charger other than the one designed to charge this battery pack as specified in the owner's manual. Using another charger may damage the battery pack or cause the battery pack to explode. Do Rechargeable Batteries Must Be Recycled or Disposed of Properly.
NOTICE: According to telephone company reports, AC electrical surges, typically resulting from lightning strikes, are very destructive to telephone equipment connected to AC power sources. To minimize damage from these types of surges, a surge arrestor is recommended. FCC Part 15 information This device complies with part 15 of the FCC rules.
One-year Limited Warranty Important: Evidence of original purchase is required for warranty service. WARRANTOR: UNIDEN AMERICA CORPORATION ("Uniden") ELEMENTS OF WARRANTY: Uniden warrants, for one year, to the original retail owner, this Uniden Product to be free from defects in materials & craftsmanship with only the limitations or exclusions set out below. WARRANTY DURATION: This warranty to the original user shall terminate & be of no further effect 12 months after the date of original retail sale.