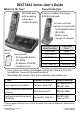
DECT3181 Series User's Guide You will also find: What's in the box? DECT3181 base with answering system and cordless handset Battery cover Not pictured: - Rechargeable battery (BT-1018) - AC adapter (PS-0034) - Telephone cord Accessory handset and charger (DCX310 displayed) For each accessory handset (not pictured): - Rechargeable battery (BT-1018) - Battery cover - Charger AC adapter If you purchased You should model number: have: DECT3181 None DECT3181-2 1 Accessory HS DECT3181-3 2 Accessory HS :
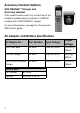
Accessory Handset Options MULTIRANGE™ Charger and Accessory Handset If the model number ends in R, at least one of the handsets included with your phone is a DRX312 handset with a MULTIRANGE™ charger. For more information, see page 8 or the separate DRX312 user guide. AC Adapter and Battery Specification Output Voltage AC Adapter for - Part Number Input Voltage DECT3181 Base PS-0034 120V AC, 60 Hz 7.
What’s in the manual? Using Multi-Handset Accessory Handset Features.................................. 23 Options...................................... 2 Using Special Features............... 26 AC Adapter and Battery Specification.............................. 2 Using the Answering System...... 27 Answering System Options Important Safety Instructions!...... 3 (Ans. Setup)............................ 27 Getting Started............................. 4 Accessing the Answering Installing Your Phone...........
Do not use the telephone to report a gas leak in the vicinity of the leak. Use only the power cord and batteries indicated in this manual. Do not dispose of batteries in a fire. They may explode. Check with local codes for possible special disposal instructions. Do not place the handset in any charging cradle without the battery installed and the battery cover securely in place.
adapter for the charger. See the separate DRX312 or DWX317 user guide that was packaged with your phone. 6. Plug the other end of each adapter into a standard 120V AC power outlet. 7. Place one handset in the base and the other(s) in the charger(s) with the display(s) facing forward. The display on the handset should light up; if it doesn’t, reseat the handset or try plugging the AC adapter into a different outlet. Charge all handsets completely (about 15 hours) before using them.
If you are not certain of the profiles supported by your Bluetooth phone or if you have difficulty pairing your phone to the DECT3181, see the manual that came with your phone. With the CellLink feature, you can essentially treat your cellular phone as a second line. You can use the DECT3181 handset to make and receive calls on your cellular phone number, put cellular calls on hold, and transfer calls to other handsets. See page 18 for more information.
Most cellular phones automatically transfer the audio to a Bluetooth device as soon as it pairs; if yours does not, look in your cellular phone’s Bluetooth setup for a “transfer audio” or “send audio to device” option. To test the connection 1. Pick up the handset from the cradle. 2. Dial the number you want to call, then press CellLink on the handset. You may not hear a dial tone or ringing, but the handset display says Talk. 3. Make sure the call connects and you can hear clearly.
Setting Up MULTIRANGETM Chargers If the model number ends in an R, at least one of the chargers included with your phone is a MULTIRANGE charger. The MULTIRANGETM charger extends the range of your base in all directions, including up and down. Each handset will automatically connect to the charger or the base, depending on which signal is stronger. If your phone includes a MULTIRANGE charger, you will have a separate manual discussing the charger in detail, including how it works, how to reset it, etc.
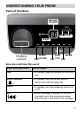
Understanding Your Phone Parts of the Base MESSAGE COUNTER DOWN UP ON/OFF Charging contacts FIND DO NOT DISTURB REV PLAY/ STOP DELETE FWD Base keys and how they work Key name (and icon) What it does FIND - In standby: page all handsets to find a lost one. DO NOT DISTURB - In standby: turn the Do Not Disturb feature on or off (see page 26). ( ) - In standby: turn the answering system on or off.
Key name (and icon) What it does PLAY/STOP - In standby: start playing messages. - While a message is playing: stop playing messages. - While the phone is ringing: mute the ringer for this call only. ( ) FWD ( ) DELETE ( ) DOWN (–) Up (+) 10 - While a message is playing: skip to the next message. - While a message is playing: delete this message. - In standby: delete all messages. - While Bluetooth phone is ringing: reject the call. - In standby: decrease the ringer volume.
Parts of the Handset Visual ringer Earpiece Display MENU/ SELECT CLEAR/ INTERCOM PHONEBOOK/ LEFT TALK/ FLASH UP CELL LINK CID/RIGHT END Twelvekey dial pad DOWN MESSAGES/ MUTE REDIAL/ PAUSE SPEAKER Microphone Charging contacts Handset keys and how they work Key name (and icon) What it does Up ( ) CID/right ( ) - In standby: increase the ringer volume. - During a call: increase the call volume. - In the menu or any list: move the cursor up one line.
Key name (and icon) Down ( ) Menu/select End ( ) Clear/intercom Phonebook/left ( Talk/flash ( ) Speaker ( ) 12 ) What it does - In standby: decrease the ringer volume. - During a call: decrease the call volume. - In the menu or any list: move the cursor down one line. - In standby: open the menu. - In the menu or any list: select the highlighted item. - During a call: hang up. - In the menu or any list: exit and go to standby. - In standby: page another handset using the intercom.
Key name (and icon) Redial/pause ( CellLink ( What it does ) ) Messages/mute ( ) - In standby: open the redial list. - While entering a phone number: insert a 2-second pause. - In standby: start a telephone call using your paired Bluetooth phone. - While the Bluetooth phone is ringing: answer the incoming call. - During a CellLink call: switch to a waiting call. - In standby: access your answering system. - During a call: mute the microphone.
Icon What it means T-coil mode is on (see page 36). The battery is 1) empty, 2) getting low, 3) half charged, or 4) fully charged. The signal from the base is 1) weak, 2) low, 3) strong, or 4) very strong. [Aa] The handset enters capital letters first (see page 17). [aA] The handset enters lower-case letters first (see page 17). At least 1 cellular phone is paired to the DECT3181. Using the Menus To open the menu, press MENU/SELECT. The cursor shows the highlighted option.
If you open the menu during a call, use Phonebook/left to back out of the menu without hanging up. If you don't press any keys for 30 seconds, the handset exits the menu. The Bluetooth menu You can pair up to 4 cellular devices to the DECT3181. Setting What it does Add Cellular The base goes into pairing mode. The handset displays a prompt to pair the cellular. Follow the cellular’s procedures to pair the device with the DECT3181. Paired Device A list of paired devices displays. Select a device.
The Day and Time menu If you subscribe to Caller ID, the phone automatically sets the day and time when it receives Caller ID information from your phone company. If you want to set the clock manually, just open the menu and select Day and Time. The phone prompts you to select the day, enter the time, and select AM/PM. (When prompted for the time, use the number keypad to enter 2 digits for the hour and 2 digits for the minutes, e.g., 0530 for 5:30.
The Ans. Setup menu This menu controls the options and settings for your answering system (see page 27). The Global Setup menu The settings on this menu affect all handsets and the base. Before changing these settings, make sure the phone is in standby and all handsets are within range of the base. (Only one handset at a time can change these settings.) Setting What it does Dial Mode Set Line Mode VMWI Reset Change the way your phone communicates with the land line telephone network (see page 36).
Using Your Phone You can control the features in this section through the handset. Learning the Basics To... From the land line From the cell phone make a call: Dial the number, then Press Talk/flash or answer a call hang up mute the microphone during a call put a call on hold return to a call on hold switch from one line to the other (automatic hold) Speaker. Press CellLink.* Press Talk/flash or Press CellLink. Speaker. Press End or put the handset in the cradle. Press Messages/mute.
Change the volume Speaker and earpiece volume Ringer volume - You can change the volume of the speaker on the base and each cordless handset separately. - You can change the volume of the earpiece on each handset; this does not affect the handset’s speaker volume. - Anytime you are listening to a speaker or earpiece, press Up to increase the volume and Down to decrease it. - You can change volume of the ringer on the base and each handset separately.
line and your cellular phones. Contact your telephone provider(s) for more information. On CellLink calls, you might see the name of your cellular phone in place of the caller’s name. Caller ID List Redial List - The phone saves the information for the last 30 received calls to the CID list. Land line calls and CellLink calls are saved to the same CID list. The CID list is shared by all cordless handsets. New records have an asterisk next to the received time.
† If you have two or more cellular phones paired, the phone prompts you to choose one. Select the phone you want and press MENU/SELECT. To select a number, highlight the number and press Menu/select. The phone gives you the following options: Option What it does... Delete Entry Erase the number from the list. Add the number to the phonebook. The handset prompts Store Into you to edit the name and number and select a personal Pb ring. (Caller ID list only.) Erase all numbers from the list.
Each time you download the phonebook from a paired cellular phone, the DECT3181 overwrites any previous copy of that phonebook in its directory. The phone automatically cancels the download if it receives an incoming call or someone tries to make an outgoing call. While a phonebook is downloading, do not try to use either the cellular phone or the DECT3181. If the download is interrupted or canceled, the DECT3181 reverts to the original copy of the downloaded phonebook in its directory.
To... Follow these steps... edit an entry (Home phonebook only) Find the entry you want to edit. Press Menu/Select and select Edit. The handset prompts you to edit the name and number and select a personal ring. delete an entry (Home phonebook only) Find the entry you want to delete. Press Menu/select and select Delete. When the handset prompts you to confirm, select Yes. Phonebook menu options With the phone in standby, open the directory and select the phonebook you want to use.
Expanding your phone Your base supports a total of 12 cordless handsets: the one that came with the base and up to 11 DCX310, DRX312, or DWX317 accessory handsets. Your base might be compatible with other Uniden accessory handsets: please visit our website for a list of compatible handsets. Accessory handsets must be registered to the base before you can use them. Handsets that aren't registered display a Handset not registered message.
Call transfer To… transfer a call cancel a transfer and leave the call on hold return to the call answer a call transfer page On the land line Using CellLink Press Clear/intercom, then select the handset you want to transfer the call to (select All to page all the handsets). When the other handset accepts the call, you’ll be disconnected. Press End. Press Talk/flash. Press CellLink. 1. Press Clear/intercom. You can speak to the transferring handset. 2. To speak to the outside caller, press Talk/flash.
To... Follow these steps... answer an outside call during an intercom call Press Talk/flash or CellLink (depending on which line is ringing). The phone automatically disconnects the intercom call and connects you to the outside line. Using Special Features Do Not Disturb (DND) The Do Not Disturb feature (DND) turns off the ringers on the base and all handsets at the same time.
When you have new messages, the voice message icon ( ) appears in the display, and the light at the top of the handset blinks. The voice message icon should disappear after you listen to all your new messages. If it doesn’t, you can reset it manually: With the phone in standby, open the menu and select Global Setup. Select VMWI Reset, then select Yes. Using the Answering System The answering system works with land line calls only.
Setting What it does... Call Screen Ans. On/off Turn on the call screen feature so you can hear callers as they leave messages on the base speaker (see page 30). Turn your answering system on or off. (To turn your system on or off from the base, just press On/off.) Accessing the Answering System You can access your system from a handset whenever the phone is in standby. Press MESSAGES/ MUTE to start remote operation mode.
Personalizing Your Greeting Your greeting can be between 2 seconds and 30 seconds long. If you don’t record an outgoing message, the system uses a pre-recorded greeting: Hello, no one is available to take your call. Please leave a message after the tone. Record your personal outgoing message or greeting 1. Access the system from any handset. Wait until the system finishes its announcements, or press 5 (Stop) to skip them. 2. Press 8 (RecNewGreeting). 3.
To… replay an earlier message From the base From a handset (remote operation) Within the first 2 seconds of a message, press Rev. select 1:Repeat. restart the current message Wait at least 5 seconds Wait at least 4 seconds after the message after the message starts, starts, then select 1: then press Rev. Repeat. skip a message Press FWD. Select 3: Skip. delete a message While the message is playing, press Delete. While the message is playing, select 4:Delete.
To... mute the call screen without answering From the base From a handset Press End or return the handset to the cradle. If you mute the call screen, the system continues taking the message: it just stops playing through the speaker. Press Play/stop. Using the System While You’re Away from Home You can also use your answering system from any touch-tone phone. Before you can use this feature, you must program a security code. Programming a security code 1.
01 02 03 04 Repeat message Play message Skip message Delete message 05 06 09 10 Stop playback Turn on Turn off Hear prompts If you don’t press any keys for 15 seconds, the phone will hang up and return to standby. Important Information Solving Problems If you have any trouble with your phone, try these simple steps first. If you need help, call our Customer Care Line listed on the front cover. If… Try… - Checking the telephone cord connection (for land line calls).
If… Try… No handsets display Caller ID information. Caller ID displays briefly and then clears. I can’t transfer calls. - Letting calls ring twice before answering. - Making sure your Caller ID service is active. Two handsets can’t talk to the caller. - You may have to change the line mode. Contact customer service. Resetting all handsets. - Making sure no handset is in Privacy Mode. - Making sure the call was on the land line (conference calling is not available for CellLink calls).
If… The DECT3181 won’t pair with my phone. The DECT3181 paired with my phone, but I can’t hear anything through the handset. Try… - Making sure your phone is in pairing mode. - Check your phone’s manual for instructions on Bluetooth device pairing. - Making sure your phone supports the Bluetooth hands-free profile. - Making sure your phone is in range of the base - If DECT3181 appears in your cellular phone’s paired device list, remove it and try pairing again.
Noise or static on the line Interference is the most common cause of noise or static on a cordless phone.
Plug the DSL filter into the telephone wall jack and plug your phone’s base into the filter. Make a test call to make sure the noise is gone. Do you use a T-Coil hearing aid? - If you have a hearing aid equipped with a telecoil (T-coil) feature, the interaction between the hearing aid and digital cordless phones can cause noise in the handset. If you have a T-coil hearing aid and you have problems with noise on the line, try turning on T-coil mode. Open the menu. Select Handset Setup, then select T-coil.
dialing. If your phone company uses pulse dialing, you will need to change your phone’s dial mode. 1. From a handset, open the menu and select Global Setup. 2. Select Dial Mode, then select Pulse. The phone sounds a confirmation tone. If you use pulse dialing and you need to send DTMF tones during a call (if you’re using an automated response system, for example), press to temporarily switch to tone dialing. When the call ends, the phone automatically returns to pulse dialing mode.
Does the handset fit in the base cradle? Yes No Place the handset in the base. The display should say Handset Registering. 1. With the phone in standby, press and hold Find on the base for about 5 seconds. 2. On the handset you want to register, press and hold # until the display says Handset Registering (about 2 seconds). In about 30 seconds, the handset display should say Registration Complete. Press TALK/FLASH and make sure you get a dial tone. If... Try...
With normal use, the battery should last about one year. Replace the battery when the talk time becomes short even when the battery is charged. To buy a replacement battery, call the Parts Department listed on the front cover. Rechargeable Nickel-Metal-Hydride Battery Warning This equipment contains a rechargeable Nickel-Metal-Hydride battery. Nickel is a chemical known to the state of California to cause cancer. Do not short-circuit the battery.
designed to be connected to a compatible modular jack that is also compliant. See installation instructions for details. The REN is used to determine the number of devices that may be connected to a phone line. Excessive RENs on a phone line may result in devices not ringing in response to an incoming call. In most but not all areas, the sum of RENs should not exceed five (5.0).
NOTICE: According to telephone company reports, AC electrical surges, typically resulting from lightning strikes, are very destructive to telephone equipment connected to AC power sources. To minimize damage from these types of surges, a surge arrestor is recommended. FCC Part 15 information This device complies with part 15 of the FCC rules.
lines.) Third party accessories (unless approved by the manufacturer) should be avoided as these might not comply with FCC RF exposure guidelines. Industry Canada (I.C.) Notice Terminal equipment NOTICE: This equipment meets the applicable �������������������������� Industry Canada Terminal Equipment Technical Specifications. This is confirmed by the registration number.
Uniden service center for a defect or malfunction covered by this warranty, (E) used in any conjunction with equipment or parts or as part of any system not manufactured by Uniden, or (F) installed or programmed by anyone other than as detailed by the owner's manual for this product.
• Uniden® is a registered trademark of Uniden America Corporation. • The pictures in this manual are for example only. Your phone may not look exactly like the pictures. May be covered under one or more of the following U.S.