OWNER’S MANUAL SPREAD SPE CTRUM Digital Spread Spectrum provides the longest range, the clearest sound and the best privacy.
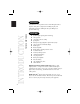
CONTROLS AND FUNCTIONS
CONTENTS Controls and Functions . . . .Inside Front Cover Introduction to Your New Phone . . . . . . . . . . .2 Introductionxx Features . . . . . . . . . . . . . . . . . . . . . . . . . . . . . . . . . . . . . . . . . . .2 Included in Your Package . . . . . . . . . . . . . . . . . . . . . . . . . . . .3 CONTENTS OF YOUR OWNERS MANUAL Fold out the front cover of this owner’s manual to use the handy CONTROLS AND FUNCTIONS page for reference. Installing and Adjusting Your Phone . . . . . . . .
WELCOME INTRODUCTION TO YOUR NEW PHONE Congratulations on your purchase of the Uniden EXS 9965 cordless telephone. This phone is designed for reliability, long life, and outstanding performance utilizing the latest 900 MHz Spread Spectrum Technology.
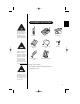
INCLUDED IN YOUR PACKAGE To get the most from your phone, please read this owner’s manual thoroughly. Be sure to complete and mail the product registration form. If any of these items are missing or damaged, contact the Uniden Parts Department at (800) 5543988. Hours are from 8:30 a.m. to 5:00 p.m. Central Time, Monday through Friday. We can also be reached on the web at www.uniden.com.
SELECTING A LOCATION Before choosing a location for your new phone, read the INSTALLATION CONSIDERATIONS included in the PRECAUTIONS AND IMPORTANT SAFETY INSTRUCTIONS brochure. Here are some important guidelines you should consider: INSTALLING AND ADJUSTING YOUR PHONE The location should be close to both a phone jack and a continuous power outlet. (A continuous power outlet is an AC outlet which does not have a switch to interrupt its power.
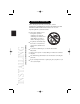
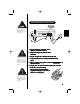
DESK/TABLETOP INSTALLATION Before using your phone, charge the NickelCadmium battery pack for 15-20 hours. 1. Plug the AC adapter cord into the 10V DC input jack on the back of the base. 2. Wrap the AC adapter cord around the strain relief notch. Place the power cord so that it does not create a trip hazard or where it could become chafed and create a fire or electrical hazard. 3. Plug the AC adapter into a standard 120V AC wall outlet. 4.
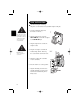
WALL INSTALLATION Standard wall plate mounting This phone can be mounted on any standard telephone wall plate. 1 Snap the wall mount adapter into the notches on the base. Place the power cord so that it does not create a trip hazard or where it could become chafed and create a fire or electrical hazard. 2. Plug the telephone line cord to the TEL LINE 1/2 jack and the AC adapter to the DC IN 10V jack. 3. Plug the telephone line cord into the telephone outlet.
8. On the base unit, pull the handset retainer out of the slot. Rotate it clockwise 180 degrees. Before you plug the other end of the telephone cor into the modular jack on the wall, charge the battery (See CHARGING THE BATTERY PACK, page 10). 9. Flip the retainer from front to back. Slide it back into the slot so that the lip of the retainer is up and the is down. The retainer holds the handset in place.
t Direct wall plate mounting If you don't have a standard wall plate, you can mount your phone directly to the wall. Before doing this, consider the following: l Avoid electrical cables, pipes, or other items behind the mounting location, that could cause a hazard when inserting screws into the wall. l Try to mount your phone within 10-15 feet of a working phone jack to avoid excessive cord lengths. l Make sure the wall material is capable of supporting the weight of the base and handset.
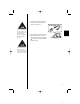
INSTALLING THE HANDSET BATTERY PACK 1. Press the battery cover release. Slide cover off. Use only Uniden Battery (model BT-999) supplied with your phone. 2. Install the nickel-cadmium battery with the label down. 3. Slide the battery cover forward until it snaps into place.
exs9660 Reference Guide.qxd 9/7/99 1:08 PM Page 11 CHARGING THE BATTERY PACK Initial battery charging Before connecting your phone for the first time, charge the rechargeable battery pack for 15-20 hours without interruption. 1. Place the handset on the base. 2. Make sure that status LED lights. If the LED doesn’t light, be sure the AC adapter is plugged in and the handset makes good contact with the base charging contacts.
Low battery indicator When the battery pack is very low and needs to be charged, the phone is programmed to eliminate some functions to save power. If the phone is not in use, flashes. If the phone is in use, flashes and the handset beeps. CLEANING THE BATTERY CONTACTS To maintain a good charge, clean all charging contacts on the handset and base about once a month. Use a pencil eraser or other contact cleaner. DO NOT use liquids or solvents; you may damage your phone.
ADJUSTING THE VOLUME CONTROLS Handset ringer volume Remove the handset from the base. or key on the handset Press the vol to set the handset ringer volume. There are two ringer volume settings; high and low. To select the high volume setting, press vol . The following screen displays: To select the low volume setting, press vol . The following screen displays: Handset ringer switch This switch turns the handset ringer on or off.
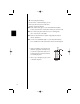
exs9660 Reference Guide.qxd 9/7/99 1:08 PM Page 14 INSTALLING THE BELTCLIP t To attach the beltclip If you have wall mounted the base, you must remove the beltclip to charge the handset with facing forward. Insert the beltclip into the holes on each side of the handset. Press down until it clicks. t To remove the beltclip Pull both sides of the beltclip to release the tabs from the holes.
exs9660 Reference Guide.qxd 9/7/99 1:08 PM Page 15 HEADSET INSTALLATION Use only the Uniden HS910 headset specifically designed for Spread Spectrum phones. You may hear a buzz or hum on other headsets. Your phone may be used with an optional headset, the Uniden HS910. To use this feature, simply plug the headset plug into the headset jack. Your phone is ready for hands-free conversation. If you are using an optional headset, you must still use the handset keypad for phone operations.
MAKING AND RECEIVING CALLS Basic 2-line operation Handset On Base Handset Off Base Base Only Fold out the front cover of this owner’s manual to use the CONTROLS AND FUNCTIONS diagram for reference. To answer a call USING YOUR NEW PHONE To make a call To hang up Pick up handset. (AutoTalk) 1. Pickup handset. 2. Press line 1 or line 2. 3. Listen for dial tone. 4. Dial number. or 1. Pickup handset. 2. Dial number. 3. Press line 1 or line 2. Press line 1 or line 2. 1. Press line 1 or line 2. 2.
You must have a 2-line subscription from your phone company to use the 2-line features. When you have connected power and a telephone line to your EXS 9965, the phone is in “Standby mode,” ready to receive and make calls. For clarity, the instructions in this Owner’s Manual designates line 1 unless the procedure requires using line 2. The same instructions apply to line 2. ANSWERING A CALL FROM THE BASE 1. The base rings. The corresponding line 1 LED on the base flashes. 2.
ANSWERING A CALL FROM THE HANDSET 1. The handset rings and the following screen appears: AutoTalk automatically connect the line when you pick up the handset from the base. AutoStandby automatically hangs up when you place the handset on the base. There is no need to press line 1 or line 2 to hang up. 2. Press line 1 to answer your call. (Call) Line 1 3. When you finish the call press line 1 on the handset, or return the handset to the base. MAKING A CALL FROM THE BASE 1. Press line 1. 2.
Dialing - from standby mode 1. Pick up the handset. 2. Dial the number on the keypad, or use one of the memory features. (See USING MEMORY DIALING, page 33). 3. Press line 1. 4. When you finish the call, press line 1, or return the handset to the base. USING THE TONE FEATURE The tone feature applies only when the base is set to pulse. If you are dialing in the pulse mode and need to enter tone digits, press tone then enter the digits.
USING REDIAL The handset and the base have independent redial memories. Use the redial/p key to recall the last 3 numbers dialed from the handset or the last number dialed when using the base. The redial number can be up to 32 digits long. To redial from the handset: Press redial/p repeatedly to display the number you want to dial, then press line 1. If you press line 1 before redial/p, only the last number dialed can be accessed for redial. To redial from the base: Press line 1, then press redial/p.
USING THE MUTE FEATURE You can mute your conversation from the base. This prevents the party you are speaking to from hearing what you, or someone else in the room, is saying. For example, to use this privacy feature while using line 1. 1. Press mute. The line 1 LED flashes red. You can hear the party on line 1, but they cannot hear you. 2. When you are ready to continue your conversation with the party on line 1, press mute or line 1 again. The line 1 LED changes to green.
2-LINE OPERATION The handset and the base can be used on separate telephone lines at the same time. For example, if the handset is on a call with line 1, you can make, or receive calls, at the base on line 2. The line 1 LED on the base blinks green to indicate line 1 is In Use at the handset. When line 1 is In Use at the base the LCD screen displays the following: (Base) Line 1 Extension In Use The Extension In Use feature prevents you from accidentally interrupting a call.
3-WAY CONFERENCING This feature lets you add a third party to your conversation from either the handset or the base. The Flash feature does not function when the phone is in Conference mode. For example, to add a party to the current call on line 1 at the base: 1. Press hold to place the caller on hold. The line 1 LED turns from green to red. 2. Press line 2. 3. Dial the number of the person you want to add to the conversation.
4-WAY CONFERENCING A fourth person, at either the handset or the base, may be added to a conference call. For example, to add a fourth party at the handset to an ongoing conference call at the base: 1. Press hold. The line 1 and line 2 LEDs turn red. 2. Press on the base to contact the handset. 3. Press on the handset to answer the page. 4. Press conference at the base to bring the party at the handset in on the call. line 1 and line 2 LEDs turn green. The following screen appears on the handset.
USING YOUR EXS 9965 INTERCOM From the Base to the Handset 1. Press on the base. The handset beeps. (If no answer, press again to disconnect.) When a call is on hold at the handset, and the base is paged, the base will ring even when the RING VOL switch is set to OFF. on the handset. 2. Press Speak into the mouthpiece to answer the page. To hang up at the base: Press To hang up at the handset: Press .
TRANSFERRING A CALL From Handset to Base 1. To transfer a call on line 1 from the handset to the base, press hold. The line 1 LED turns red. 2. On the handset, press The status LED flashes on the base. The following screen appears: Paging Base (Hold) Line 1 3. Answer at the base by pressing . You may then announce the call with the intercom. 4. On the base, press line 1 to talk.
3. Answer at the handset by pressing . You may then announce the call with the intercom. 4. On the handset, press line 1 to talk. If no one is available to take the call at the handset, return to the caller by pressing line 1 or on the base to take a message or complete the call. TRAVELING OUT-OF-RANGE As you begin to move too far from the base, you first hear a clicking sound. As you travel further, the noise increases. If you travel out-ofrange, your call terminates.
STORING A PHONE NUMBER IN MEMORY Your EXS 9965 stores up to 30 name/numbers in the handset plus 10 numbers in the base. Memory locations are shared by both lines. On the Handset Whenever you are using a menu screen, you must press a key within 20 seconds or the phone will return to standby. 1. Remove the handset from the base. 2. Press and hold mem for two seconds. The following screen appears: Memory Store 01 02 3.
7. Enter the phone number with the number keypad (direct entry). Use the key to position the cursor to right. When entering numbers, you may press redial/p to enter a pause in the dialing sequence. The display shows a P. The pause feature is useful for long distance calling, credit card dialing, or any other dialing sequence requiring a pause between digits. 8. When you have finished entering a name/number, press select. The handset beeps and displays a confirmation screen. 9.
EDITING A PHONE NUMBER IN MEMORY To edit a number you have stored in the handset: 1. Remove the handset from the base. 2. Press and hold mem for two seconds. The display shows the Memory Store screen and any saved name/numbers. Memory Store 01>JOHN SMITH 02 UNIDEN 3. Use the s and t keys or enter a two-digit number (01-30) to select the memory location you would like to edit. 4. Press select. The display shows the memory location you have selected.
Press to erase up unwanted characters. Press and hold entire name. to clear the 7. Press select. The following screen appears: Whenever you are using a menu screen, you must press a key within 20 seconds or the phone will return to standby. A cursor flashes indicating that the display is ready for the number to be edited. Store Number 8175551 8. Enter the phone number with the number keypad. Press to remove an unwanted number. Press and hold to clear the entire number. 9. Press select.
ERASING A NUMBER FROM MEMORY After erasing a number, you may add a new address to memory. From the Handset 1. Remove the handset from the base. 2. Press and hold mem for two seconds. The handset shows the Memory Store screen with saved name/ numbers displayed. Memory Store 01>JOHN SMITH 02 UNIDEN 3. Use the and keys, or number keypad, to select the memory location you would like to delete. Use the and keys to display either the name or the number stored in the location. 4. Press select.
9. The display then returns to the Memory Store screen. You may select another number to delete (return to step 3) or you may press mem to return to standby. From the Base 1. Press memory. The status LED blinks. 2. Press memory a second time. Enter the memory location (0-9) of the number you wish to delete. The status LED stops flashing. A confirmation beep indicates the number has been erased.
USING MEMORY DIALING Follow the steps below to dial a number using a programmed memory location. Standby mode Dialing from the Handset 1. Press mem . The handset displays your programmed memory locations. 01 02 JOHN SMITH 03>UNIDEN 2. Use the and keys to select the memory location you would like to dial. Or, you may enter a two-digit memory location number (01-30). Use the and keys to display either the name or the number stored in the location.
Talk mode Dialing from the Handset 1. Press line 1. 2. Press mem. Using the keypad, enter a two digit memory location number (01-30). The number dials. Dialing from the Base 1. Press line 1. The line 1 LED lights. 2. Press memory. Using the keypad, enter the memory location number (0-9). The number dials.
YOUR NEW PHONE TROUBLESHOOTING QUICK REFERENCE CHART If your phone is not performing to your expectations, please try these simple steps before calling Uniden customer service at (800) 297-1023. PROBLEM SUGGESTION The status LED won’t come on when the handset is placed in the base. Make sure the AC adapter is plugged into the base and wall outlet. Make sure the handset is properly seated in the base. Make sure the charging contacts on the handset and base are clean.
SPECIFICATIONS YOUR NEW PHONE GENERAL 36 The EXS 9965 complies with FCC Parts 15 and 68. Frequency control: PLL Modulation: Direct Sequence Spread Spectrum; DBPSK Operating temperature: 0º to +50º C (+32º F to +122º F) BASE UNIT Frequency: Power requirements: Size: Weight: 904.2 to 925.8 MHz (20 channels) 10V 500 mA (from AC adapter) 8-49/64 in. (W) x 6-57/64 in. (D) x 2-37/64 in. (H) (222.5 mm (W) x 175 mm (D) x 65.3 mm (H) ) Approx. 23.6 oz. (Approx.
At Uniden, we’ll take care of you! If you need any assistance with this product, please call our Customer Hotline at 1-800-297-1023 PLEASE DO NOT RETURN THIS PRODUCT TO THE PLACE OF PURCHASE. Our Uniden representatives will be happy to help you with any matters regarding the operation of this unit, available accessories, or any other related matters. Hours M-F 7:00 a.m. to 7:00 p.m.
FOR PURCHASING A UNIDEN PHONE THANK YOU Covered by one or more of the following patents: 4,511,761 5,426,690 5,650,790 5,717,312 4,523,058 5,434,905 5,660,269 5,754,407 4,595,795 5,491,745 5,661,780 5,768,345 4,797,916 5,533,010 5,663,981 5,787,356 Ó 1999 Uniden America Corporation All rights reserved.