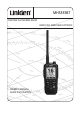
MHS335BT FLOATING VHF MARINE RADIO RADIO VHF MARITIME FLOTTANTE OWNER’S MANUAL GUIDE D’UTILISATION
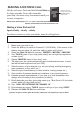
MAKING A DISTRESS CALL Lift the red cover. Press and hold the DISTRESS key for three seconds. Your radio transmits your ship’s location every few minutes until you receive a response. Lift the red cover and press the white DISTRESS button underneath. NOTE: If the radio displays Enter User MMSI, cancel the automatic distress call and make a normal voice distress call. Making a Voice Distress Call Speak slowly - clearly - calmly. For future reference, write your ship’s name & call sign here: 1. 2. 3. 4.
FAIRE UN APPEL DE DÉTRESSE Soulevez le couvercle noir. Maintenez DISTRESS enfoncé pendant trois secondes. Votre radio transmettra l’emplacement de votre bateau toutes les quelques minutes jusqu’à ce que vous receviez une réponse. Soulevez le couvercle et appuyez sur le bouton DISTRESS blanc en dessous. Remarque : Si la radio affiche Enter User MMSI, annulez l’appel de détresse automatique et effectuez un appel de détresse vocal normal. Faire un appel de détresse Parlez lentement – clairement – calmement.
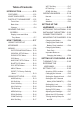
Table of Contents INTRODUCTION........................E-3 FEATURES.................................E-3 WHAT'S INCLUDED...................E-4 PARTS OF THE MHS335BT.......E-5 WPT Soft Key.......................... E-17 BT Soft Key.............................. E-17 SPKR Soft Key........................ E-18 OPERATION MODES...............E-18 Normal..................................... E-19 Scan......................................... E-20 Front View.................................. E-5 Weather..........
OPERATING THE RADIO ........E-27 Making or Returning a Call...... E-36 Making a Transmission............ E-27 TEST CALLS.............................E-36 Changing the Transmission Level............... E-28 Saving the Channel into Memory................................. E-28 Using the LED Light................. E-28 Making Test Calls (Test) .......... E-36 Receiving Test Call Setup........ E-36 POSITION REQUEST AND REPLY............................E-37 Enabling Automatic Position Reply.................
REGULATIONS AND SAFETY WARNINGS...........................E-51 Maritime Radio Services Operation.................................E-51 Basic Radio Guidelines.............E-51 RBRC Information..................E-53 COMPLIANCE.........................E-53 Three-Year Limited Warranty...............................
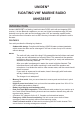
UNIDEN® FLOATING VHF MARINE RADIO MHS335BT INTRODUCTION Uniden's MHS335BT is a floating, hand-held class D DSC radio with an integrated GPS receiver. It is also Bluetooth capable so you can use Uniden's smartphone app (iOS and Android) to set up the radio and text message other VHF text message capable radios. You can enter other information such as DSC directory information and update the radio's firmware. FEATURES Your radio provides the following key features: xx Submersible design.
xx xx xx xx xx xx xx xx xx xx xx National Oceanic and Atmospheric Administration (NOAA) Weather Channel watch. Sounds a warning tone when a hazard alert is issued. LCD and key backlight/Flashlight/SOS Strobe. Pressing the Light/Lock ( /LOCK) key initiates various light options (see page E-5). Key Lock. Locks keys to prevent accidentally changing channels or entering data. Selectable Backlight Timer. Lets you select the length of time the backlight will be on. DSC.
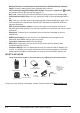
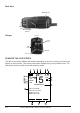
PARTS OF THE MHS335BT Front View Microphone Ext. Speaker/ Mic jack DISTRESS Screen Function VOL/ SQ Keys 16/P Speaker Antenna LED Power Monitor Pushto-Talk Menu CLR Light/Lock Direction Arrows Note: Thermal sensor on back. Key Press to... N/A N/A Quickly open and close MON squelch (single press/release). Activate function assigned to that key. Function displays on Soft Function Keys (3) screen above key. See page E-13. MENU Open the menus. Move up, down, left, or right ◄/▲/►/▼ on a screen.
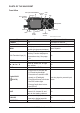
Back View Wrist strap slot Battery latch Battery charging contacts Battery Charger Belt clip Screw hole Charging contacts NMEA contacts CHARGE LED Screw holes READING THE IDLE SCREEN The Idle screen shows different information depending on what you are doing. Not all icons display on every screen. This dummy Idle screen displays many of the possible icons. The table below shows possible icons and what they mean.
Display Icons and What They Mean Number Icon What it means 1 2 Battery level INT Channel mode (USA, INTL, or CAN) 3 4 Displays when mail is available. ALT Weather Alert Flashes when satellite acquired. Does not display if no satellite acquired. 5 6 Displays when Bluetooth is turned on. 7 1W, 2.5W, or Power output. 6W 8 TX or RX Indicates Transmitting (TX) or Receiving (RX). 9 Various Text Channel Name 10 Soft Key #3 Name of soft key (see page E-13).
xx xx Soft Keys - The soft keys relate to the three keys on the bottom of the screen. Many of these keys can access functions that are set up through the menus (see page E-13). Pop-Up Keyboard - Some of the menus and soft keys require alphanumeric input. The radio brings up a keyboard for this. You can change the keyboard from alphanumeric characters to special characters. USING THE POP-UP KEYBOARD When you need to enter text, a digital keyboard pops up.
xx RESET (see page E-13 for details) Use the UP ( ▲) and DOWN ( ▼ ) keys to find a menu category. Choose the SELECT soft key to select and go to that menu. DISTRESS MESSAGE GENERAL SETUP RADIO SETUP GPS WAYPOINT SETUP BLUETOOTH SETUP DSC SETUP ABOUT RESET BACK Select MENU DESCRIPTION REF. PAGE DISTRESS MESSAGE Types of distress messages such as flooding, capsizing, and man overboard. Page E-10 GENERAL SETUP Basic radio configuration such as backlight, key beep, and reset to factory defaults.
DISTRESS MESSAGE Menu Select a distress message type to transmit when you use the DISTRESS key on the side of the radio. See page E-33 for information on how to send a distress message. MENU ITEM DESCRIPTION Undesignated Send this type when you, your crew, and/or your ship are in clear danger and there is no time to search for a more inclusive designation to use. Fire, Explosion Send this type if there has been an explosion or a fire on the ship and you are in immediate danger.
MENU ITEM DESCRIPTION SOS Strobe The LED on the front of the radio acts as a strobe light. Set water activation and timeout duration here. Inactivity Timer Set how long the radio remains inactive before it times out. Key Assignment Reassign soft key functions to different keys. Reset Radio to Factory Return your radio to the factory defaults. You will lose all programming. RADIO SETUP Menu Use the RADIO SETUP menu to fine tune how the radio will operate.
GPS Menu The GPS section on page E-38 provides an overview of the GPS menu options and how they work. WAYPOINT SETUP Menu Waypoints (also called landmarks) mark specific points in traveling between two locations. They serve as directional indicators. For example, once you reach a specific waypoint, you need to adjust your course to reach the next waypoint (and as you continue, your destination). See page E-17 for details on setting up waypoints.
MENU ITEM DESCRIPTION Wait to Pos Fix Set how long the radio takes to acknowledge a POS fix. Auto Polling Time Set how long the radio takes between polling activities. Auto Pos Polling Automatically requests positon information from up to 7 individuals. DSC Alarm Setup Turn DSC alarms on and off. ABOUT Menu This menu displays the current software version for the radio, GPS, and Bluetooth.
2. Select BACK to return to the previous mode and keep the current MOB information. 3. Select DEL to delete the current MOB information and return to the previous mode. 4. Select NAV to activate the COMPASS screen. Navigate to your destination WX Soft Key Select the WX soft key to display the last WX channel accessed (WX changes to CH). The screen displays the latitude, longitude, and time. Press ▲ and ▼ to scroll through weather channels. Select CH to return to the last marine channel.
Call Menu Option Setup Operation TEST CALL Enter individual ships through MENU/DSC SETUP/Individual Directory. Select the CALL soft key and select TEST CALL. The list of the ships entered previously displays. Enter individual ships through MENU/DSC SETUP/Individual Directory. Select the CALL soft key and select POSITION REQUEST. The list of the ships entered previously displays. Enter individual ships through MENU/DSC SETUP/Individual Directory. Select the CALL soft key and select POSITION SEND.
Call Menu Option Setup Operation AUTO POLLING Enter individual ships through MENU/DSC SETUP/Individual Directory. Select the CALL soft key and select Auto Polling. The screen displays Activate and Selected ID. Set the amount of time between polling requests through MENU/DSC SETUP/ Auto Polling Time. Choose SELECTed ID to choose an individual ship to poll. The Polling List screen displays. Choose SELECT. The Individual ships entered into the Individual Directory displays. Select a ship.
SETUP 1. Select MENU/RADIO SETUP/Priority Channel. Select a DSC channel for priority channel. (Default = 16) 2. Select MENU/RADIO SETUP/2nd Priority Channel. Select another DSC channel for the 2nd Priority Channel. (Default = 9) 3. Select MENU/RADIO SETUP/Scan Type. Options are Priority (scans both priority channels and channels saved to memory) or Memory (scans only channels saved in memory). OPERATION 1. Select SCAN soft key. 2. Radio scans channels according to Main menu setup.
NEW MESSAGE TO: _ 1 A K U 2 B L V 3 4 5 6 C D E F M N O P W X Y Z space BACK 2. CONFIRM 7 8 G H Q R abc del 9 0 I J S T @&? Enter SELECT Enter your text message, selecting SELECT after each letter. Select NEXT, and then SEND. Select EXIT to return to the previous mode. VIEW MESSAGING Select Rx Message or Tx Message from the BT soft key menu. A list of MMSI numbers representing calls displays. Select a message and choose SELECT. BLUETOOTH ON/OFF Select Bluetooth Set from the BT soft key menu.
Mode What it does Use it when you want to... To turn it on/off Weather Monitors the selected NOAA weather channel. Hear the current or forecasted weather. Press MENU. Go to RADIO SETUP/Weather Radio. In addition to the three operation modes, your radio provides three different watch modes which you can activate during any operation mode. In the watch modes, the radio briefly checks for activity on a specific channel, then returns to its previous operation.
NORMAL MODE WITH WEATHER ALERT Monitoring Channel 25 If you activate Weather Alert (MENU/ RADIO SETUP/WX Alert) while operating in Normal mode, the radio checks the most recently used weather channel every seven seconds. If it detects a weather or other hazard alert, it will switch to that weather channel. (If you are actively transmitting, the radio waits until you finish your transmission before checking the weather channel.
When it detects a signal, the radio stays on the channel until you press the Channel Up button or the signal stops. 08 10 11 12 13 Resume scan 15 14 17 The radio scans about 5 channels in 0.5 seconds. USING THE RADIO IN SCAN MODE xx xx xx xx xx xx xx To activate Scan mode, set the radio to either Priority Scan or Memory in MENU/ RADIO SETUP/Scan Type. If you select Memory, the radio scans channels saved in memory. If you select Priority, go to MENU/RADIO SETUP and set the priority channel.
(default = channels 16 and 9) every two seconds, then goes on to scan the next channel in memory. With Dual Watch turned on, the radio only checks the priority channel: Memory Channel Scan 08 10 11 12 13 14 Every 2 seconds, the radio checks channels 16 & 9, then scans the next channel. 16 09 Triple 15 17 20 24 25 Watch on Press MENU/RADIO SETUP/Dual/Tri Watch menu or TRI soft key again to cancel Triple Watch mode. Select Dual from MENU/RADIO SETUP/Dual/Tri Watch to set up Dual watch.
the weather channel and mutes the speaker. If the radio detects an alert, it sounds an alert tone and turns the speaker back on. This mode is very useful when you are anchoring for the night but want to keep informed of hazards.
MOUNTING THE CHARGER Connect power to the charger before mounting the charger into position. You can mount the charger on any flat surface. 1. Use the two holes at the base of the charger as a template to mark the drill holes. 2. Using a 1/8-inch (or 3 mm) drill bit, drill two holes 1/2 inch (13mm) deep. 3. Use the provided screws to attach the charger to the surface. NOTE: The charger must be mounted at least 2 feet (24 inches) from the compass to prevent magnetic interference with either device.
SETTING UP YOUR RADIO TURNING IT ON Press the POWER key for at least two seconds until the UNIDEN splash screen displays. Release the POWER key. Press and hold it to turn the unit off. ENTERING THE USER MMSI When you power up your radio for the first time, it displays MMSI Not Entered and then displays a Marine mode screen. User MMSI numbers are unique and cannot be entered more than once. See Page E-29 for general information about MMSI numbers and how to get your specific User MMSI number and enter it.
STRONG SIG. MEDIUM SIG. WEAK SIG. OPEN NOTE: Setting the squelch level too high may prevent you from hearing weaker transmissions. If you are having difficulty hearing a transmission, try setting the squelch level lower. Setting the UIC Channel Mode (USA/CAN/INTL) You can select marine channels for the USA, Canada, or International waters. 1. Press MENU, then select RADIO SETUP/Channel Mode. The CHANNEL MODE screen displays. 2. Select USA, CAN, or INTL and select the SELECT soft key.
1. Press MENU then select RADIO SETUP/Weather Radio/S.A.M.E FIPS Code. 2. Select Add. The Add FIPS Code screen displays. 3. Enter the FIPS codes for your area (find them on the websites mentioned previously) and select STORE. The S.A.M.E.FIPS Code screen displays again. Edit and delete FIPS codes in a similar manner. Adjusting the Backlight The backlight LCD function can be set to automatically dim after a set time. 1. Press MENU then select GENERAL SETUP/Backlight. The Backlight menu displays. 2.
Changing the Transmission Level In most situations, 1W transmission power is all you need. If you find yourself far away from other ships and have trouble getting a response, you may need to increase the transmission power. To increase the transmission power in increments: 1. Select the channel you want to transmit on. 2. Select the HILO soft key to change the TX output power from 1W to 6W to 2.5W, then back again to 1W. 3. 1W, 6W, or 2.5W displays.
If the other station accepts your call, both radios automatically switch to the requested voice channel so you can talk to the other station. DSC provides a system for automated distress calls. At the touch of a key, the radio can transmit your MMSI number, the nature of your distress, and your current position based on data from your GPS receiver. The radio repeats the distress call every few minutes until it receives an acknowledgement.
3. A pop-up keyboard displays (see page E-8). Use the directional arrows to navigate through the keyboard. Choose SELECT after each letter. When the name is complete, select FINISH. The INDIVIDUAL DIRECTORY screen displays again. Select MMSI and choose SELECT. 4. Use ▲ and ▼ to enter the MMSI number. Choose SELECT after each character. When the ninth digit is correct, select FINISH. 5. The radio displays the new MMSI number and name and asks you to confirm.
3. The group's name and MMSI number display. Select which item you want to edit and choose SELECT. 4. Either a popup keyboard displays to edit the group name or the MMSI number displays. When you've finished editing, save your edits. DELETE 1. Press MENU then select DSC SETUP/Group Directory/DELETE. The GROUP DIRECTORY screen displays a list of all the groups entered into the directory. 2. Select a group name and choose SELECT. 3. The group entry is deleted.
the area of the possible danger. All ships call All ships call Group call Individual call Calling a single station (Individual Call) To call a single station with DSC, follow these steps: 1. Scroll thorugh soft keys to select CALL soft key. CALL menu displays. 2. The radio displays the ships listed in your Individual Directory (see page E-29). Select the ship you want to call and choose SELECT. 3. The radio displays the ship you selected to transmit to and the transmission channel. Select SEND.
to. After selecting SEND, the radio switches to channel 70 to transmit the call request and the screen displays a random countdown clock as it waits for an acknowledgement. 5. After the countdown clock ends, you can either resend the group call, go back to the Idle screen, or let the radio generate another countdown clock. 6. After the radio receives an acknowledgement, it automatically switches to the designated response channel.
Canceling an automatic distress call While the radio is waiting for a response, it gives you the option of canceling the call. To cancel the distress call, select the CANCEL soft key. A confirmation screen displays; select the YES soft key. Resending an automatic distress call Select the RESEND soft key. Receiving an automatic distress call acknowledgement Once you receive an acknowledgement that the distress call was received, you must manually mute the acknowledgement alarm. Select the MUTE soft key.
Answer a DSC Call 1. After you silence the alarm and the soft keys change. select the PAUSE then CONT soft keys. The INDIVIDUAL RECEIVE screen displays. 2. This screen displays a channel option. Select the ABLE soft key to propose a different channel or UNABLE to send an Unable to Comply message and return to the Idle screen. 3. After selecting ABLE, the SELECT CHANNEL screen displays a list of available channels. Scroll to one and choose SELECT. 4. The INDIVIDUAL RECEIVE screen displays.
DSC Call Type Receive Log Information Test MMSI (or name), category code. Test Acknowledge MMSI (or name), category code. Pos Reply MMSI (or name), position, time, category code. Pos Request MMSI (or name), category code. Pos Send MMSI (or name), position, time, category code. 5. From the log menu, select EXIT to close the RECEIVE LOG screen and return to the previous mode. Making or Returning a Call 1. From the CALL soft key, select DSC LOG. 2.
POSITION REQUEST AND REPLY Enabling Automatic Position Reply If you want the radio to automatically transmit your current position whenever it receives a position request, you can enable automatic position reply. Most boaters activate automatic position reply for safety reasons or because they subscribe to a marine towing service. Sometimes—for example, in some competitive situations--you may not want other ships to get your position without your manual confirmation. 1.
1. Go to DSC Setup/Auto Pos Polling and select Auto Pos Request (to request positions from other individuals) or Auto Pos Report (to report your position to other individuals.) 2. Go to DSC Setup/Auto Polling Time and select how often the radio requests or reports the information. 30 sec 1 min 2 min 3 min 5 min Select the CALL soft key and select Auto Polling. Choose Selected ID. A blank list for your selected contacts displays. xx xx xx xx xx 3. 4. Select an blank row.
MENU OPTION DESCRIPTION Battery Save Select what percentage of your battery power should be saved. -- Auto (Default - the radio decides how to reserve power (for example, mimimize background tasks/checks) -- 40% -- 50% -- 70% -- 90% Time Offset Select length of time (in half-hour increments) to offset the time set on the radio.
DATA RMC GLL GGA GSV GSA Speed O X X X X Course O X X X X Date O X X X X X = Data Not Provided O = Data Provided Chartplotter Connection Connect to Chartplotter If you have difficulty getting your chartplotter to receive data from your radio, check the chartplotter's configuration. It should be set to the following parameters: Baud rate 4800 bps Data bits 8 Parity None Stop bits 1 Data amplitude Over 3.
3. A popup keyboard displays. Enter a new name. When you have entered the name, select FINISH. 4. The channel list displays again with the new name. 5. When you are satisfied with the channel list, select BACK to return to the Idle screen. UNIDEN MARINE APP Uniden's Marine Radio app lets you configure your MHS335BT and send text messages from your mobile device. The app is available for iOS and Android. Go to the Apple App store, Google Play, or Amazon to download this free app.
Problem I can transmit, but no one can hear me. I’m not getting hazard alerts. Things to Try Check your UIC channel settings: does the area you are in use different channel assignments? Make sure Weather Alert Watch is turned on. The channel number on the display will flash if the radio is The display flashes, and I in a Watch mode or in Scan mode. Try turning off scanning, don’t know why. Weather Alert Watch, Triple Watch, or Dual Watch beginning on Page E-20. Scan won’t start.
Size (with antenna and belt clip) 11.791 (H) x 2.562 (W) x 2.173 (D) inch 299.5 (H) x 65.1 (W) x 55.2 (D) mm Weight (without battery, antenna, 6.673 oz (189.2g) and belt clip) Weight (with battery, antenna, and belt clip) 10.945 oz (310.3g) Battery Weight 3.135 oz (88.9g) Antenna Weight 0.686 oz (19.46g) Belt Clip Weight 0.449 oz (12.75g) Transmitter Frequency Range 156~158 MHz Frequency Stability ±2.5 PPM max Power Output 1W, 2.
Channel name/description Used for NON-COMMERCIAL (recreational or voluntary ships only) messages about the needs of the ship, including fishing reports, rendezvous, scheduling repairs and berthing information COMMERCIAL (working ships only) messages about the needs of the ship or the business the ship is engaged in PUBLIC CORRESPONDENCE/ MARINE OPERATOR calls to the marine operator at a public coast station. Marine operators can connect you to the telephone network so you can make and receive calls.
Ch No. USA INT 04A 05 CAN TX RX x 156.200 156.200 156.250 160.850 Public Correspondence (Marine Operator). Ship Movement, Port Operations x 156.250 156.250 Port Operations, Ship Movement, VTS in some areas x 156.300 156.300 Inter-ship safety 156.350 160.950 Public Correspondence (Marine Operator) x 05A x 06 x 07 x x Channel Type/Name Canadian Coast Guard: West Coast Commercial Fishing: East Coast 7A x x 156.350 156.350 Commercial 08 x x x 156.400 156.
Ch No. USA 20A 21 21A INT x x 21B 22 22A x x RX Channel Type/Name 157.000 157.000 Port Operation 157.050 161.650 Port Operations 157.050 157.050 Coast Guard Only x INHIBIT 161.650 Canadian CG Continuous Marine Broadcast (CMB) Service 157.100 161.700 Port Operations, Ship Movement x 157.100 157.100 US and Canadian Coast Guard Liaison and Airtime Safety Information Broadcasts Announced on Channel 16 x 157.150 161.750 Public Correspondence (Marine Operator) 157.150 157.
Ch No. USA INT 62A 63 63A x x 64A 65 RX Channel Type/Name 156.125 156.125 Canadian Coast Guard 156.175 160.775 Public Correspondence (Marine Operator) x 156.175 156.175 VTS, Port Operations x 156.225 160.825 Public Correspondence (Marine Operator) x 156.225 156.225 Canada: Commercial Fishing Only 156.275 160.875 Public Correspondence (Marine Operator) 156.275 156.275 156.325 160.925 156.325 156.
Ch No. USA INT 79 x 79A x 80 80A Channel Type/Name 161.575 Port Operations 156.9750 156.975 Commercial, Inter-Ship 157.025 161.625 Port Operationsx 157.025 157.025 Commercial, Inter-Ship 157.075 161.675 Port Operations 157.075 157.075 Government, Canadian Coast Guard 157.125 161.725 Port Operations 157.125 157.125 Government, Canadian Coast Guard 157.175 161.775 Port Operations x 157.175 157.175 Coast Guard x INHIBIT 161.
Ch No. RX Freq Name on display WX04 162.4250 162.425 MHz WX05 162.4500 162.450 MHz WX06 162.5000 162.500 MHz WX07 162.5250 162.525 MHz WX08 161.6500 161.650 MHz WX09 161.7750 161.775 MHz WX10 163.2750 163.275 MHz EMERGENCY ALERT (SAME) SYSTEM Types of Events xx xx xx xx A WARNING is an event that alone poses a significant threat to public safety and/or property, probability of occurrence and location is high, and the onset time is relatively short.
E-50 Event SAME Code Type Hurricane Statement HLS Statement Severe Thunderstorm Watch SVA Watch Severe Thunderstorm Warning SVR Warning Severe Weather Statement SVS Statement Special Marine Warning SMW Warning Special Weather Statement SPS Statement Tornado Watch TOA Watch Tornado Warning TOR Warning Tropical Storm Watch TRA Watch Tropical Storm Warning TRW Warning Tsunami Watch TSA Watch Tsunami Warning TSW Warning Winter Storm Watch WSA Watch Winter Storm Warning
Event SAME Code Type Required Monthly Test RMT Test Required Weekly Test RWT Test No Response Event Code TXB Transmitter Backup On TXF Transmitter Carrier On TXO Transmitter Carrier On TXP Transmitter Primary On REGULATIONS AND SAFETY WARNINGS WARNING! Read this information before using the radio. MARITIME RADIO SERVICES OPERATION Warning! This transmitter will operate on channels/frequencies that have restricted use in the United States.
Transmitter Frequency Range: 156.025-157.425 MHz This device complies with Part 15 of the FCC Rules. Operation is subject to the condition that this device does not cause harmful interference. Unauthorized changes or modifications to this equipment may void compliance with the FCC Rules. Any change or modification must be approved in writing by Uniden. Changes or modifications not approved by Uniden could void the user’s authority to operate the equipment.
RBRC INFORMATION As part of our commitment to protect the environment and conserve natural resources, Uniden voluntarily participates in an RBRC® industry program to collect and recycle used Li-Ion batteries within the US. Please call 1-800-8-BATTERY for information on Li-Ion battery recycling in your area. (RBRC® is a registered trademark of the Rechargeable Battery Recycling Corporation.
operation of the device. Cet appareil est conforme aux normes CNR d’Industrie Canada destinés aux appareils radio exempts de licence. Son fonctionnement est soumis aux deux conditions suivantes : 1) Cet appareil ne doit pas causer d’interférences nuisibles et; 2) Il doit pouvoir accepter les interférences, incluant celles pouvant nuire à son fonctionnement normal. In order to comply with FCC/ISED RF Exposure requirements, this device must be installed to provide at least 7.9 in.
describing the defect that has caused you to return it. The Product should be shipped freight prepaid, by traceable means, or delivered, to warrantor at: Uniden America Corporation C/O Saddle Creek 743 Henrietta Creek Rd.
QUESTIONS? Visit our website at www.uniden.com or call 1-800-297-1023. QUESTIONS? Contactez-nous au www.uniden.com ou appelez 1-800-297-1023.