TRUNK TRACKER III 500-Channel Trunk Tracking Scanner UBC780XLT
Introduction The UBC780XLT is a state-of-the-art radio with TrunkTracking™ and automatic scanning capabilities. It can store frequencies such as police, fire/emergency, marine, railroad, air, amateur, and other communications into 10 banks of 50 channels each.
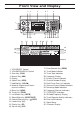
Front View and Display 3 4 5 6 7 8 1 2 U SVC 9 10 21 22 11 12 13 14 15 16 17 23 24 25 26 27 28 29 18 19 30 31 20 32 1. 2. 3. 4. 5. 6. 7. 8. 9. 10. 11. 12. 13. 14. 15. 16.
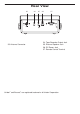
Rear View 33 33. Antenna Connector 34 35 36 34. 35. 36. 37. 37 Tape Recorder Output Jack External Speaker Jack DC Power Jack Remote Control Terminal Uniden® and Bearcat® are registered trademarks of Uniden Corporation.
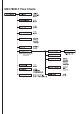
UBC780XLT Flow Charts NOTE: SMART SCAN NOT APPLICABLE IN AUSTRALIA
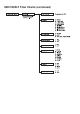
UBC780XLT Flow Charts (continued)
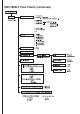
UBC780XLT Flow Charts (continued)
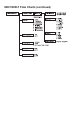
UBC780XLT Flow Charts (continued)
Contents Introduction . . . . . . . . . . . . . . . . . . . . . . . . . . . . . . . . . . . . . . . . . . . . . . . . . . . . . . . . .inside front cover Terminology . . . . . . . . . . . . . . . . . . . . . . . . . . . . . . . . . . . . . . . . . . . . . . . . . . . . . . . . . . . . . . . . . . . . .1 What is Scanning? . . . . . . . . . . . . . . . . . . . . . . . . . . . . . . . . . . . . . . . . . . . . . . . . . . . . . . . . . . . . . .1 What is Searching? . . . . . . . . . . . . . . . . . . . . . . .
Selecting Trunking Programming Menu Mode . . . . . . . . . . . . . . . . . . . . . . . . . . . . . . . . . . . . . . . . .34 Selecting Trunking System Type . . . . . . . . . . . . . . . . . . . . . . . . . . . . . . . . . . . . . . . . . . . . . . . . . . .34 Setting the Squelch . . . . . . . . . . . . . . . . . . . . . . . . . . . . . . . . . . . . . . . . . . . . . . . . . . . . . . . . . . . .35 Receiving Trunked Systems . . . . . . . . . . . . . . . . . . . . . . . . . . . . . . . . . . . . . . . . . .
Terminology What is Scanning? Unlike standard AM or FM radio stations, most two-way communications do not transmit continuously. The UBC780XLT scans the channels you program until it finds an active frequency. Scanning stops on an active frequency and remains on that channel as long as the transmission continues. When the transmission ends, the scanning cycle resumes until another transmission is received. What is Searching? The UBC780XLT can search each of its 24 bands to find active frequencies.
TrunkTrack™ changes this! Not only does your new UBC780XLT scan channels like a conventional scanner, it actually follows the users of a trunked radio system. Once you know a talkgroups ID, you won’t miss any of the action. If you're a new scanner enthusiast, you may want to read the first part of this manual and use your scanner in conventional mode before you begin trunk tracking. Understanding scanning fundamentals and its terminology will make trunk tracking much easier.
Feature Highlights • Trunk Tracking – Follows VHF High Band, UHF, 800MHz trunked public and government service systems just as if conventional two-way communications were used. • Multi-Track – Track more than one trunking system at a time. Scan conventional and trunked systems at the same time. • 500 Channels – Program one frequency into each channel. You must have at least one channel programmed to use the Scan mode. • 24 Bands, 10 Banks – Includes 24 bands, with Aircraft and 800 MHz.
Included with Your Scanner Package If any of these items are missing or damaged, immediately contact your place of purchase.
Setup Connecting an Antenna You must install an antenna before you can operate the scanner. You have been provided a standard telescopic antenna that works well with this scanner, but you may want to purchases another type to increase the range. To connect the telescopic antenna, simply connect it to the BNC type ANT. connector on the rear of the scanner. You can purchase a variety of scanner antennas for both mobile and base station available at a local electronics store.
Typical Mounting Methods The UBC780XLT can be conveniently mounted on a table, bulkhead, overhead, or any other desired location (refer to figure below for typical mounting methods). Caution: Make sure there are no hidden electrical wires or other items behind the desired location before proceeding. Check that free access for mounting and cabling is available.
Applying Power for Vehicle Installation You can power your scanner using either the supplied DC power cord or your vehicle’s cigarette lighter socket using DC cigarette lighter power cord. Caution: You must use a power source that supplies 13.8 V DC and delivers at least 700 mA. Your standard 12V car battery should be sufficient. The cord connector’s centre tip must be set to positive and its plug must fit the scanner’s DC 13.8 V jack. The supplied DC power cord meets these specifications.
Desktop Installation You can place this scanner on a desk, shelf, or table to use it as a base station. 1. Flip up the feet for desk installation. 2. Extend the antenna to full vertical position. Adjust the angle for best reception. Applying Power Using Standard AC Power To power the scanner from an AC outlet, use the provided AC adaptor with a 5.5 mm outer diameter/2.1mm inner diameter tip. Caution: You must use only the AC adaptor provided as power source that supplies 13.
Connecting an Earphone For private listening, you can connect an earphone (not supplied) with a 3.5 mm plug to the EXT. SP. jack on the back of the scanner. Be very careful as damage to your hearing can result if the VOLUME control is not set to the lowest level first. See below for “Listening Safely” instructions. (Your local electronics store should carry a wide selection of earphones.) Once the earphone is connected, it will automatically disconnects the internal speaker.
Basic Operation Turn the Scanner On Turn the VOLUME control clockwise out of the detent position. The scanner automatically starts scanning. Since there are no frequencies programmed in your scanner initially, you may not receive any signals. Once you set the squelch and program some frequencies, you will be hearing conversations regularly. Setting the Squelch To set the squelch, you must be in the Manual mode, and you should not be receiving a signal on your scanner. 1.
Understanding the Menu System It is very important for you to understand the Menu screen. To navigate through the Menu screen is really quite simple. Many of the features of this scanner, can only be accessed by the menu screens. There are several ways to get through the screens. First of all, press MENU to get started. Any time you want to exit this mode or simply quit from where you are, repeatedly press MENU until the scanner returns to the original state.
Menu Description and Numeric Keypad Equivalents Below are the menu screens and a brief description or purpose of the feature. 1:SYSTEM DATA 1:DIMMER Allows you to change the brightness of the display. 2:SCREEN MASK Screen Mask allows you to limit what appears on the display to the alpha tags that you have set for a channel along with a few function icons. Screen Mask removes the frequency, receiving mode, tone data, signal strength bars, and the trunking repeater activity indicators.
3. Tone Search - In this mode, as soon as the scanner stops on any (non-trunked) channel, the scanner will begin to search for any subaudible tone that is being used on a transmitted frequency. The scanner will check each CTCSS tone sequentially and it will find DCS tones instantly. 0:BANK TAG Allows you to set an alphanumeric text tag for individual banks in the scanner (1-10).(The “0” key represents Bank number 10.
The RF Attenuation feature works in all modes and attenuates (reduces) the incoming signal strength to prevent stronger signals from overloading the scanner. 6:STEPS Your UBC780XLT is programmed with default step sizes for each frequency range (see Introduction page). Steps are important if you are interested in using the VFO to tune off-frequency from a frequency programmed into memory or if you wish to program a frequency that the default step size will not accept.
5:PROGRAM ID You can program IDs into Scan List memory either during Trunk Scan or Search without going into the Menu. However, you can also use the Menu to program IDs. This is particularly helpful when you are not near the trunked system you wish to later monitor. You can set it up and have it ready to go at some later time.
10:EDACS ID FORM (EDCS) You can change to display the talkgroups in decimal mode, but this mode does not provide you with nearly the flexibility that you get with AFS. The UBC780XLT defaults to show the talkgroup number in AFS mode (Agency-Fleet-Subfleet). For details on AFS see pages 46. 11:END CODE (MOTOROLA) When this function is disabled, the radio looks for squelch before returning to the control channel instead of waiting for the disconnect tone.
received during your search. You can also lockout a particular CTCSS or DCS tone. You may wish to do this if you want to search a range but not hear transmissions on any frequency that have particular subaudible tone. Note: Through the System Menu you can set the radio to operate in Tone Search mode during Search as well. In this mode, the radio will automatically determine the active subaudible tone on any frequency received during the Search.
Programming Before the UBC780XLT can begin conventional scanning, you must program a frequency into at least one channel. Repeat this procedure for each channel you want to program. Storing Frequencies into Channels 1. Select desired frequency. Here is a list of sample frequencies you can try: 156.800 Marine Calling channel 468.400 Police Channel 476.425 UHF CB 2. Press MAN. 3. Select a channel. a. Enter the channel number. b. Then press MAN. 4. Enter the frequency. a. Enter the frequency number. b.
Duplicate Frequency Alert If you enter a frequency which has been stored in another channel, you will hear a beep and the other channel displays WARNING. Press to clear and start again. ––– OR ––– Press E again to store the frequency in both channels. Storing Text Tags You can customise your scanner by storing text tags for easy identification of banks, channel transmissions, trunking talkgroup IDs, etc. The text tags can be set at the menu mode. (Refer to Understanding Menu System on page 11.
Beep Alert The scanner can alert you with three rapid beeps at the beginning of a transmission on an assigned frequency. Assigning the beep alert to a channel This alert can be set on/off to every channel (or to every ID memory for Trunking mode). 1. Press MENU. 2. Press ▲ or ▼ to select CH DATA and then press E. 3. Select the channel number to be tagged using ▲ or ▼ and then press E. (You can also enter the channel number in using the keypad or VFO control and then press E.) 4.
Scanning 1. After programming frequencies, simply press SCAN to begin scanning. 2. The bank indicators selected for scanning appear in the display, and the bank being currently monitored flashes. You can deselect banks from active scanning by pressing their number on your keypad. The indicator for each deselected bank turns off, and the banks channels are not scanned. Note: One Bank must always be active. You cannot deactivate all ten banks at the same time.
Still another method of direct access to a specific channel: 1 Press MAN. 2 Press ▲ or ▼ to select the channel. (or press and hold ▲ or ▼ to scroll more quickly.) Lastly to step up through the channels one at a time, repeatedly press MAN. RF Attenuation Feature The UBC780XLT comes with an RF Attenuation feature. If you're near an unusually strong signal source, the signal may overload the scanner. The scanner may stop repeatedly on that signal and miss other transmissions.
5. Press ▲ or ▼ to select one of the delay periods provided and then press E. DLY appears on the display unless no delay has been set. 6. For Search mode, select SEARCH EVENT - DELAY, then set the delay period. Note: The delay periods are as follows: • • • • • • • • None: Delay feature off 1 sec.: Delays for 1 sec. before re-scanning 2 sec.: Delays for 2 sec. before re-scanning 4 sec.: Delays for 4 sec. before re-scanning Infinite: Stays on until SCAN is pressed -2 sec.: Stays for 2 sec.
3. The scanner immediately resumes scanning because the locked out channel is no longer in the scanning sequence. Lockout Tips • Write down your locked-out channels and put in a convenient place in case you need to restore them. Restoring a Locked-out Channel 1. Press MAN. 2. Select a locked out channel. a. Enter the channel number. b. Then press MAN again. 3. Press L/O to unlock the channel. The L/ O icon goes out.
Changing the Priority Channel You cannot eliminate the Priority Channel, but you can change it to any one of the 50 available channels in each bank. 1. Press MAN. 2. To select a new Priority Channel: a. Enter the channel number. b. Then press MAN again. MUTE 3. Press and hold PRI for two seconds to designate this channel as your new Priority Channel. Two beeps indicate that the Priority channel has been changed. The P icon appears in the display.
Searching Setting a Search Range Note: First you must set the search ranges through the menu screen prior to any searching. The UBC780XLT can search up to 10 separate frequency ranges to help you discover new stations in your area. To set a search range, enter into the menu mode. 1. Press MENU. 2. Press ▲ or ▼ to select SEARCH EVENT and then press E. 3. Press ▲ or ▼ to select SEARCH BANK and then press E. 4. Press ▲ or ▼ to select the desired bank number and then press E. 5.
3: MODE for the receiver mode choices and then press E. Select 4: ALPHA TAG to enter an alpha tag using the VFO control. press E. Select Search Hold Feature 1. Press HOLD/▲ at anytime to stop the search. 2. Press HOLD/▲ to move to the next higher frequency. ––– OR ––– Press LIMIT/▼ to move down to the previous frequency. 3. Press SRCH to resume searching. Data Skip A scanner will normally stop on any transmission it receives.
Storing Search Frequencies You can quickly store any frequency you find during Search. Caution: You must select the channel in which you will store the frequency before entering the search mode. Otherwise, you may erase a stored frequency that you want to keep. 1. During search, press HOLD/▲ when the scanner stops at the frequency you want to store. 2. Press E to store the frequency in the channel you selected.
Squelch (SQ) Mode The scanner can be set to the following SQ modes. • Carrier SQ mode (default setting) The scanner will stop on any transmission or squelch opening, regardless of whether any sub-audible tone has been programmed for the channel or search range. • Tone SQ mode The scanner will stop on any active frequency for which either no sub-audible tone has been programmed or for which the user-programmed sub-audible tone is also active.
• For example, the scanner shows the following displays • Tone SQ on, CTCSS 123.0 Hz set Tone SQ on, DCS 325 set Tone SQ on, No CTCSS & DCS set Tone Search, CTCSS 67.0 Hz detected Tone Search, DCS 023 detected Tone Search, no signal present If the delay feature (-2 sec/-5 sec/-10 sec) has been set while in Tone search mode, it resumes scanning according to the delay setting. Additional Menu Options for Searching Each of these additional menu options apply to all banks with search ranges entered.
ADDENDUM SHEET Service Search The Service Search feature allows you to toggle through the following five preprogrammed services. The frequencies selected for these services are the most commonly used around the Australia. • • • • • 1: 2: 3: 4: 5: POLICE RAILROAD AIR MARINE UHF CB 1. Press SVC the display indicates as illustrated. 2. After a 3 second delay, searching begins for the first preprogrammed service – Police (initial setting). 1:POLICE 2:RAILROAD 3.
Trunked Systems Your UBC780XLT is designed to track three major types of trunked radio systems. These systems are described here. ❖MOTOROLA - Including Type I, Type II, Hybrid, SMARTNET, and Privacy Plus. Motorola systems are widely used by public safety and business users. Most are on the 800 MHz band, and recent systems are appearing on other bands. ❖EDACS - Including "Wideband" 9600 baud, and "Narrowband" 4800 baud systems.
Programming and Receiving Trunked Systems Programming Trunking Frequencies The first step in tracking a trunked system is storing the frequencies in one of the 10 available banks in your scanner. Remember that you can only store one trunking system in each bank. Important: If you are programming an EDACS or LTR trunked system, you must enter the frequencies in a specific order. Check the frequency guide included with the scanner for the frequencies in your area. 1. Press MENU. 2.
☞ Important! 7. Press TRUNK for 2 seconds. A tone sounds, and E, M, or L icon appears on the display according to the system selected. Note: • To clear a mistake while entering the frequency, press (decimal key) repeatedly until the display is cleared. • If you enter a frequency which is out of the system’s trunking range, a distinctive beep sounds and ERROR appears on the display. • Repeat Step 7 for every trunk frequency entered.
Setting the Squelch For trunked reception, a good setting for the SQUELCH control is in the centre of the range with the red marker pointing up. See the illustration. If set too high (CCW) in some cases it could prevent your scanner from locking to the control channel reliably. If set too low (CW) it will slightly delay finding the control channel. The best setting is the same as for conventional reception, and is not critical.
The bottom line of the display indicates the Bank and the type of trunked system you are monitoring. You can change this to display a bank tag by using the System Menu. Regardless of the system, you won't know exactly who you are receiving until you listen for a while. Of course, figuring out who each ID represents is half the fun of TrunkTracking. Later, when you learn more about a system, you will want to store lists of talkgroups.
Restoring Locked-out IDs To unlock a single ID, follow these steps: 1. Press MENU. 2. Select TRUNK DATA - BANK NO. - L/O ID REVIEW using ▲, ▼ or VFO and pressing E, SELECT or VFO. 3. Select the locked out ID you want to unlock using ▲ or ▼. 4. Press L/O. The ID is unlocked and the next locked ID displays. To unlock all locked out IDs in a bank at once: 1. Press E instead of L/O in step 4 above. 2. To exit from this mode, press MENU repeatedly.
Scan Lists Each bank of your UBC780XLT can be a trunk tracking bank and it can be a conventional scanning bank. When you designate a bank as a trunking bank, your scanner sets up 10 Scan Lists, which are simply lists used to store your favourite IDs. Each list can contain up to 10 IDs, so you can store a total of 100 IDs for each trunk tracking bank. (1000 if you use all banks as trunking banks!) Scan Lists help you organise the trunking system users into categories.
To enter an EDACS® ID: a. Enter ID you want to store. Use the for the “dash”. b. Press E. Hint: Remember that Uniden's AFS format allows you to enter full or partial EDACS IDs for powerful flexibility in all modes. Be sure to read the section "EDACS Reception" on page 49 to learn how this works. Note: The UBC780XLT defaults to “AFS” talkgroup displays for EDACS® only. ––– OR ––– To enter a LTR ID: a. Enter Area code and then press . b. Enter Home Repeater number and then press c.
ID Scan Mode 1. Press SCAN to begin scanning the lists you have programmed. If you haven't programmed any IDs, for a few seconds. ERROR appears 2. To remove a Scan List from active scanning, press the number of the Scan List on your keypad. The Scan List indicator turns off, and the IDs in that list are not scanned. Note: One Scan List must always be active. If you try and deactivate all the Scan Lists, Scan List 1 will automatically be active. 3.
Setting Priority in Trunking Mode You can set priority in your trunking lists, just as you do in your conventional ones. You can set the priority by pressing and holding PRI for 2 seconds. After you’ve set up your Scan List, press PRI to activate it. It’s very similar to conventional priority although there is no “interrupt” during the transmissions. Priorities are checked in between transmissions.
I-Call (Motorola/EDACS) I-Calls are direct unit-to-unit transmissions that are not heard by other system users. Your UBC780XLT can receive these transmissions. How you receive I-Calls depends on whether you are in Search or Scan mode. During I-Call reception the display will show the Unit ID number of either the transmitting or receiving mobile unit, not a talkgroup. Unit IDs will display differently according to the type of trunked system, and will replace the 'n's shown here.
I-CALLS IN SCAN AND MANUAL MODE You can store I-Call IDs in scanlists, just like talkgroup IDs, for use by ID Scan and Manual modes. To program a specific I-Call Unit ID into a scanlist: EDACS or Motorola Type 1 Enter followed by the Unit ID digits, then E. Motorola Type 2 Enter 7 followed by the Unit ID digits, then E. HINT - There is a special code to let you receive all I-Call IDs with a single scanlist entry. Simply enter , 0, E.
TRUNK SEARCH: This mode works similarly to TRUNK SCAN. If the scanner finds any (non-locked-out) ID when it checks the control channel, you will hear it. You will then hear any replies that follow within two seconds (or whatever delay you may have set). After that the scanner will move on and not continuously search the system for additional IDs (on busy systems you would never leave the system if this were the case).
EDACS® Reception EDACS® Tracking TrunkTracker III now allows tracking of EDACS® trunked systems. Until now these widely used systems have been almost impossible to monitor with a conventional scanner. With your TrunkTracker III listening to EDACS(s) is remarkably easy, and perhaps even easier than conventional scanning. EDACS systems use 'Transmission Trunking', which means that each transmission is assigned a new frequency.
An EDACS® Trunked system This chart shows how talkgroups are organised within an EDACS system at the AGENCY level. The individual talkgroups cannot be shown at this scale because there are over 2000. However the chart can show the 16 Agencies in this example. The system is logical and easy to understand. EDACS systems are typically arranged in an outline structure. The system users are given blocks of talkgroups. Sizes vary but most large cities and other agencies have blocks of 128 channels.
Special EDACS® Features AFS Partial Entry Feature AFS is Uniden's method of encoding EDACS talkgroups. AFS stands for 'Agency-Fleet-Subfleet'. AFS talkgroups are used in all EDACS reception -- in ID SEARCH, ID LOCKOUT and ID SCAN scanlists. The powerful AFS Partial Entry feature designed into the UBC780XLT lets you use either a complete talkgroup code, or just the most significant part. This feature lets you expand or narrow searching and scanning to one of 4 levels.
LTR® Reception LTR® Tracking LTR® (Logic Trunked Radio) systems are trunking systems used primarily by business or private communications service providers, such as taxicabs, delivery trucks, and repair services. These systems encode all trunking information as digital subaudible data that accompanies each transmission. Users on an LTR system are assigned to specific talkgroups, which are identified by the radio as six digit numbers.
Motorola Reception Motorola Tracking There are really two types of Motorola trunking systems. These are usually referred to as Type I and Type II systems. Type I only occurs on some 800 MHz systems. All VHF, UHF and 900 MHz trunking systems use Type II. One important distinction between these two systems is the amount of data transmitted by each radio when its push-to-talk button (PTT) is pressed.
Fleet Map Programming If you have programmed a trunk tracking bank for Motorola type and press TRUNK to start Multi-Track, you will see user IDs display on your screen. Since the UBC780XLT defaults to Type II systems, all the IDs will appear as numbers. However, if you notice a mix of odd and even user IDs, for example 6477, 2560, 6481, 6144, 1167, etc., then you are probably monitoring either a Type I or Hybrid systems. You may also notice that you are missing responses when you hold on an active ID.
3. Select the size code for the first block using ▲, ▼, or VFO. 4. Press E, SELECT, or VFO. The next available block displays. 5. Repeat step 3 and 4 until you have selected a size code for each block. For details about each size code, see Fleet Map Size Codes in the Appendix. Programming a Hybrid System A Hybrid system is simply a Type I system with some blocks designated as Type II blocks. To program a Hybrid system, follow the steps listed in Programming a Fleet Map in the previous section.
7. Enter a new offset channel with the keypad. Note: You can only input within a range of 380-759. 8. Press E. The display changes for entering the next base frequency. 9. To exit from this mode, press MENU repeatedly. Note: • If the system is not tracking properly, you may need to try a new base frequency or offset channel or you may be missing frequencies from the system. • You can set up to three base, spacing and offsets for Motorola VHF/UHF trunked systems. 10.
Control Channel Only Mode When this function is activated, trunking is performed using control channel data only. Voice channel (also known as "working channel") frequencies do not have to be programmed into memory. When using this feature, the scanner will display "CC" and channel activity indicator bars will not operate. This feature only applies to Motorola 800 MHz and 900 MHz systems. To turn this function on, choose Motorola Type-2 800 MHz or 900 MHz or TYPE 1 by selecting TRUNK DATA - BANK NO.
Disconnect Tone Detect Option (End Code) When this function is disabled, the radio looks for squelch before returning to the control channel instead of waiting for the disconnect tone. Only in rare instances will you need to adjust the default settings. The condition to return to control channels depends on whether the signal is present or not. To set this function on/off, enter TRUNK DATA - BANK NO. - END CODE.
Remote Interface You can communicate and program your UBC780XLT in numerous ways with peripheral devices using the Remote Interface Cable port. This radio offers the following modes: ❖REMOTE (PC Control) MODE Program and control your scanner remotely from a PC using third party software (see the flyer included in the box). ❖CLONE MODE Clone all the frequencies, trunking talkgroups, and fleet maps programmed into your scanner to another UBC780XLT scanner.
For information on purchasing third party software to program and control your UBC780XLT, see the flyer included in the box with this radio. PC Control Parameter For your information: Transfer speed : 2400/4800/9600/19200 bps (adjustable) Start/Stop : 1 bit, 1 bit Data Length : 8 bit Parity bit : None Code : ASCII code Flow Control : None Return Code : Carriage Return only Change Transfer Speed To change transfer speed, enter into the menu mode. 1. Press MENU. 2.
You can clone all of the programming of one UBC780XLT into another, including frequencies, talkgroup IDs, alpha tags, delay settings, etc. After connecting the two scanners, turn the radios on. Prepare each scanner for clone mode as follows. 1. Press MENU. 2. Select SYSTEM DATA - CLONE using ▲, ▼ or VFO and pressing E, SELECT or VFO. 3. Determine the scanner that has the frequency data that you want to transfer. This one must be set up as the “Master Unit”, and the other must be set as the “Slave Unit”. 4.
Additional Features The following additional features are designed for you to customise your scanner. Once these features have been turned on or off, they will remain as they are set until you reset them, even if you turn the scanner off and then on again. Dimmer To change brightness of the display: 1. Press MENU. 2. Press E to select SYSTEM DATA. 3. Press E to select DIMMER. 4. Select one from High-Medium-Off using ▲ or ▼ and then press E.
Reverse Mode This key will allow the user to observe the reverse frequency of the repeater. While pressing /RVRS, the standard pair frequency will be displayed. For a list of the standard pair frequencies, refer to the table “Reverse List” in the Appendix. If the frequency that you have chosen does not have an offset frequency, the second line will indicate the error and display NO REVERSE. This feature does not work in the SVC Search mode.
Care and Maintenance General Use • Turn the scanner off before disconnecting the power. • Always write down the programmed frequencies in the event of memory loss. • If memory is lost, simply reprogram each channel. The display shows 000.0000 in all channels when there has been a memory loss. • Always press each button firmly until you hear the entry tone for that key entry, unless you have turned off the KEY BEEP in the menu system.
Troubleshooting If your UBC780XLT is not performing properly, try the following steps. Problem Suggestion Scanner won’t work. 1. Check the connections at both ends of the AC Adaptor. 2. Turn on the wall switch of your room. You could be using an outlet controlled by the wall switch. 3. Move the AC Adaptor to another wall outlet. Improper reception. 1. Check the antenna connection or move and reposition the antenna. 2. Move the scanner. 3.
Problem Scanner won’t track. Suggestion 1. May not be a system which can be tracked by your scanner. Make sure you press and hold TRUNK for 2 seconds to enter into trunk mode. 2. Missing the data frequency. 3. Change to a Type 1 Scanner setup. Review Fleet Map Programming on page 50. Scanner won’t stop during Scan List mode. 2. The IDs you have stored are not active. 1. No IDs have been programmed. Scanner will not acquire data channel. 1. Adjust the squelch for trunking mode. See page 39. 2.
Specifications UBC780XLT is certified in accordance with AS/NZS 1053. Channel: 500 Banks: 10 (50 channels each) Service Bands: 5 preprogrammed search bands Frequency Range: Operating Temperature: 25.0000 to 27.9950 MHz 28.0000 to 69.9900 MHz 70.0000 to 87.9875 MHz 88.0000 to 107.9000 MHz 108.0000 to 136.9875 MHz 137.0000 to 147.9950 MHz 148.0000 to 173.9875 MHz 174.0000 to 224.9000 MHz 225.0000 to 399.9500 MHz 400.0000 to 512.0000 MHz 806.0000 to 956.0000 MHz 1240.0000 to 1300.
Glossary of Terms Glossary of terms Alpha tag - This term refers to an alphanumeric text tag that you can enter to describe the individual frequencies that you have programmed. Rather than having to associate a specific frequency to the individuals that are using it, you can enter the actual name of the group. This will eliminate the need for memorising the group’s frequency. Attenuator - This scanner comes with a feature to attenuate or reduce the signal strength.
Enter Lock - This is the term used for locking the keypad. This prevents accidental re-programming of channels and talkgroups entered into memory. The default setting is off. When ENTER LOCK is enabled, the following functions will be disable: • Enter or modify the Channel frequency • Enter or modify the Tone information • Enter or modify the Trunking ID. ( this can be modified through the menu screen.
Appendix Preset Fleet Maps Preset Map 1 Block 0 1 2 3 4 5 6 7 Preset Map 2 Size Code S11 S11 S11 S11 S11 S11 S11 S11 Preset Map 3 Block 0 1 2 3 4 5 6 7 Block 0 1 2 3 4 5 6 7 Size Code S12 -S4 S4 S4 S4 S4 S4 Preset Map 6 Size Code S4 S4 S12 -S4 S4 S4 S4 Preset Map 7 Block 0 1 2 3 4 5 6 7 Size Code S4 S4 S4 S4 S4 S4 S4 S4 Preset Map 4 Size Code S4 S4 S4 S4 S4 S4 S12 -- Preset Map 5 Block 0 1 2 3 4 5 6 7 Block 0 1 2 3 4 5 6 7 Block 0 1 2 3 4 5 6 7 Size Code S3 S10 S4 S4 S12 -S12 -- Preset Map 8 Si
Preset Map 9 Block 0 1 2 3 4 5 6 7 Preset Map 10 Size Code S4 S4 S0 S0 S0 S0 S0 S0 Preset Map 11 Block 0 1 2 3 4 5 6 7 Size Code S4 S0 S0 S0 S0 S0 S0 S0 Preset Map 13 Block 0 1 2 3 4 5 6 7 Size Code S3 S3 S11 S4 S4 S0 S0 S0 Preset Map 15 Block 0 1 2 3 4 5 6 7 Size Code S4 S4 S4 S11 S11 S0 S12 -- Block 0 1 2 3 4 5 6 7 Size Code S0 S0 S0 S0 S0 S0 S4 S4 Preset Map 12 Block 0 1 2 3 4 5 6 7 Size Code S0 S0 S0 S0 S0 S0 S0 S4 Preset Map 14 Block 0 1 2 3 4 5 6 7 Size Code S4 S3 S10 S4 S4 S4 S12 -- Pre
User Defined Fleet Maps Type I Programming Information When a Type I system is designed, the address information for all the IDs is divided into 8 equal sized blocks, numbered 07. When you program your scanner to track a Type I system, you must select a size code for each of these blocks. When you have assigned a size code to all 8 blocks, you'll have defined the Fleet Map for the system you're tracking. Each size code determines the number of Fleets, Subfleets, and IDs each block will have.
Fleet Map Size Codes Size Fleets Subfleets IDs Blocks Used 0 Reserves block for Type II IDs + 1 128 4 16 1 2 16 8 64 1 3 8 8 128 1 4 1 16 512 1 5 64 4 32 1 6 32 8 32 1 7 32 4 64 1 8 16 4 128 1 9 8 4 256 1 10 4 8 256 1 11 2 16 256 1 12 1 16 1024 2 13 1 16 2048 4 14 1 16 4096 8 Size Code Restrictions If you select size code 12, 13, or 14, there are some restrictions as to which blocks can be used for these codes.
AUSTRALIAN REVERSE FREQUENCY LIST Lower 31.0000 33.0000 35.0000 37.0000 44.0000 42.0000 53.5000 52.5000 70.2500 72.7500 77.5000 80.0000 85.0000 82.5000 146.6250 146.0250 147.0250 147.6250 149.2500 153.8500 150.0000 154.6000 162.0500 157.4500 165.2000 Upper 32.0000 34.0000 36.0000 38.0000 45.0000 43.0000 53.9750 52.9750 72.3000 74.8000 79.8125 82.3125 87.2000 84.7000 147.0000 146.4000 147.3500 147.9500 149.7625 154.3625 151.4000 156.0000 165.2000 160.6000 168.
CTCSS Frequency List (Hz) DCS Tone Code 71
Memo 72
Memo 73
Memo 74
UBC780XLT SHORTCUTS If you need any assistance with this product, please check out our website at www.uniden.com.au and www.uniden.co.nz. A Uniden representative will be happy to help you with any matters regarding the operation of this unit, available accessories, or any other related matters.
UBC780XLT Flow Charts NOTE: SMART SCAN NOT APPLICABLE IN AUSTRALIA
UBC780XLT Flow Charts (continued)
UBC780XLT SHORTCUTS This shortcut card is designed to assist you in getting through the menu screens using the direct entry mode for commonly used features. Please read the manual thoroughly before using this card. Be sure to back out of the menu screen after each shortcut by repeatedly pressing MENU.
One Year Limited Warranty Important: Evidence of original purchase is required for warranty service. Warrantor: Uniden Australia Pty Limited ACN 001 865 498 Uniden New Zealand Limited ELEMENT OF WARRANTY: Uniden warrants to the original retail owner for the duration of this warranty, its UBC780XLT (herein after referred to as the Product), to be free from defects in materials and craftsmanship with only the limitations or exclusions set out below.
© 2001 Uniden Australia Pty. Ltd. Uniden New Zealand Ltd. All rights reserved. Printed in the Philippines.