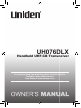
UH076DLX Handheld UHF-CB Transceiver For more exciting new products please visit our website: Australia: www.uniden.com.au New Zealand: www.uniden.co.
Warning WATERPROOF: JIS7 Uniden’s UH076DLX radio is designed to meet the water proofing standard of JIS7. This Means: Being defined as having no ingress of water when immersed at 1 metre for 30 minutes. The UH076DLX will only meet this rating if fully assembled and all rubber seals and bungs are well maintained and correctly fitted. This means that the speaker microphone bung is inserted, and the battery pack and antenna are attached and securely fastened.
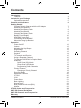
Contents Introduction Features Included in your Package Optional Accessories Controls and Indicators Getting Started Connect Drop-in Charger with the AC Adaptor Attaching the Antenna Attaching the Battery Pack Attaching the Beltclip Charging the Battery Pack Battery Level Display SPKR/MIC Jack Cap Connecting the SPKR/MIC Mount the Hang Up Bracket Operation Power On/Off Volume Adjusting the Key Beeps Roger Beep Selecting Channel Squelch To Transmit and Receive Using a Repeater Channel To Operate UH076DLX in
Introduction The UH076DLX is a JIS7 Waterproof, portable two-way UHF-CB radio. It is compact, rugged and fits easily in your hand. This hand held UHF-CB radio will give you consistent, outstanding performance in virtually all conditions and situations. To ensure that you get the most from the UH076DLX features, please read this operating guide carefully before using the unit.
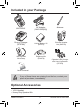
Included in your Package UH076DLX AC Adaptor (AAD-008S(M)) Drop-in Charger (DT078A) Lithium Battery X2 (BP079) Belt Clip and Wrist Strap Earphone Mic (EM-078) X 6DL UH7 Antenna External Speaker Mic (SM-078) Cigarette Lead Charger with Hang Up Bracket (CK 078) Owner’s Manual NOTE If any of these items are missing from the box, contact your place of purchase, immediately.
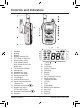
Controls and Indicators 1/5w 1 2 3 4 5 6 7 8 9 10 11 12 13 14 15 16 17 18 19 Antenna Beltclip Battery Battery Release Clip PTT (Push to Talk) Key Memory Key (mem) Scan Button (scan)/ Busy Channel Lock-Out Mode (bcl) TX Power/Lock Button Microphone Speaker MIC Jack ON/OFF VOL Knob Squelch Knob (SQ) LCD Display Monitor Button (mon) Open Scan/Group Scan (os/gs)/VOX Channel Up Button ( ) Duplex Key (dup)/ CTCSS Key (ctcss) Channel Down Button ( ) Speaker UNIDEN UH076DLX A B C D E F G H I J K L M N O P 6 T
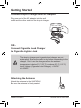
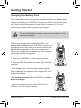
Getting Started Connect Drop-in Charger with AC Adaptor Plug one end of the AC adaptor into the wall outlet and the other end into the drop-in charger. OR... Connect Cigarette Lead Charger to Cigarette Lighter Jack NOTE The drop-in charger and cigarette lead charger are not water proof. Ensure the radio is dry before connecting to the charger. Don’t use the chargers when the ambient temperature is below 0º C (32º F) or above 45º C (113º F) Input Voltage (Cigarette Lead Charger): +12VDC to+24VDC.
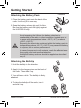
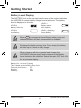
Getting Started Attaching the Battery Pack Contacts 1. Place the battery pack onto the back of the radio. It will only fit in one way. 2. Snap the battery release clip until it clicks. Be sure the battery pack fits tightly against the UH076DLX body. CAUTION Avoid exposing the Lithium Ion battery, attached or unattached to the radio, in direct sunshine, heated cars, or in areas with temperatures below –20°C (–4°F) or above +60°C (+140°F).
Getting Started Charging the Battery Pack Your radio is powered by a specially designed Lithium Ion battery pack. • Before operating the UH076DLX, charge the Lithium Ion battery pack for 5 hours without interruption in the drop-in charger or 3.5 hours without interruption in the cigarette lead charger. NOTE For the initial battery charge, make sure the radio is off for optimum charging.
Getting Started Battery Level Display The BATTERY icon in the top right hand corner of the screen indicates the UH076DLX current battery voltage level at all times. The battery level is displayed in 4 levels. LEVEL 4 Battery 100% full LEVEL 3 Battery approx. 40% capacity LEVEL 2 Low Battery LEVEL 1 (flashing) Empty Battery NOTE NOTE NOTE When PTT is pressed at Level Empty, battery icon and channel number will flash, transmission is disabled. Recharge the battery at any time.
Getting Started SPKR/MIC Jack Cap Make sure the SPKR/MIC jack cap is firmly pushed in to maintain submersible rating. Connecting the SPKR/MIC Release the SPKR/MIC jack cap to plug in the SPKR/MIC. Secure the SPKR/MIC plug by tightening the plug collar clockwise. Mount the Hang-Up Bracket Use the radio Hang-up Bracket when charging the UH076DLX with the Cigarette Lead Charger in a vehicle. The radio Hang-up Bracket comes in two parts.
Operation • See the Controls and Indicators page at the back of this operating guide for button and key operations. Power On/Off To turn the unit ON, rotate the [ON/OFF VOL] clockwise. A channel number and battery level should appear on the display. UH076DLX To turn the unit OFF, rotate the [ON/OFF VOL] knob counter-clockwise. The display will disappear. Volume Rotate the [ON/OFF VOL] knob clockwise or counter-clockwise to adjust speaker volume to desired listening level.
Operation Roger Beep Roger Beep is a BEEP that is sent to notify the end of transmission (both PTT and VOX transmission.) Roger Beep can be heard through the speaker when Key Beep is on. Roger Beep is transmitted even if key beep is turned off. However Roger Beep will not be heard from the speaker. To turn ON Roger Beep: Press and hold radio. while turning on the To turn OFF Roger Beep: Press and hold radio. while turning on the Selecting Channel Press NOTE NOTE or to select the desired channel.
Operation Squelch The squelch is used to eliminate any annoying background noise when there areSQUELCH no signals present. The squelch is used to eliminate any annoying background noise when there are no signals present. NOTE Make sure to first select a channel not in use before setting the squelch intoyour UH076DLX Make sure first select a channelUHF-CB not in use radio. before setting the squelch in your UH076SX UHF-CB radio. of squelch as a gate. Turn [SQ]fully fully Think of Think squelch as a gate.
Operation To Transmit and Receive The UH076DLX uses the UHF-CB Channels. For your reference a list of the available channels and corresponding frequencies is printed on p.24 - p.25. 1. The maximum RF transmit power of UH076DLX is 5 Watts. To switch to low power, press appears on the LCD. 1/5w . LOW To switch back to higher power, press 1/5w again. LOW indicator disappears from the LCD. 2. Before you transmit, listen for activity on the selected channel. 3.
Operation Using a Repeater Channel UHF-CB Repeaters are used to retransmit or relay your signal. Repeaters will extend the range of your radio and overcome the shielding effect caused by solid obstructions. In normal Simplex operation, your radio transmits on one particular frequency and receives on that same frequency. If there is a barrier (i.e. a Tall Building) that partially blocks your transmitted signal, the possibility of the other radio receiving the signal is very slim.
Operation To Operate UH076DLX in Duplex Mode Only channels 01 - 08 and 41 - 48 are available for Duplex. Eg. CH01 is being used in your area for repeater use. Press dup momentarily. The DUP icon appears. dup again to deactivate the duplex operation. Press UH076DLX will return to simplex operation. NOTE Check with your local retailer for available repeaters. Scanning The UH076DLX has two types of scanning; Open Scanning (OS) and Group Scanning (GS).
Operation NOTE If SCAN is deactivated while in an active channel, the UH076DLX will stay on that active channel. If no other channels are active, the UH076DLX will reinstate the starting channel. Group Scan (GS) Mode Allows you to monitor a Priority Channel while scanning. To use GS Mode Scanning, press the the display. os/gs key. GS icon appears on GS Scanning checks the Priority channel activity regularly.
Operation Programming Scan Channels 1. Select which Scanning Mode you wish to use OS or GS Mode. NOTE OS is indicated by the absence of the GS icon. 2. Select the channel you want to store by pressing or . mem for 1.5 secs. to store. MEM icon appears and 3. Press and hold two short tone beeps are heard. 4. To remove the channels from Memory, press and hold mem for 1.5 secs. once more. Two short tone beeps are heard and the MEM icon disappears.
Operation Advanced Features CTCSS (Continuous Tone Coded Squelch System) CTCSS is a feature that allows a group to talk to each other without hearing other users on the same channel. Programming CTCSS Code 1. Select a desired channel to be used with CTCSS. 2. Press and hold or 3. Press 4. Press NOTE ctcss ctcss for 1.5 secs. CTCSS icon blinks. to select the desired CTCSS code. to save the selected code. CTCSS icon stops blinking. The UH076DLX will return to standby mode after 10 secs.
Operation NOTE VOX feature will not work without the VOX Headset Microphone. The built in mic of UH076DLX is temporarily disabled when VOX feature is working, however accidental pressing of PTT will cause the unit to transmit briefly. To activate VOX 1. Press and hold vox for 1.5 secs. VOX icon blinks. or within 10 secs to select the desired 2. Press either VOX sensitivity level (9 with the lowest sensitivity to 1 with the highest sensitivity). 3. Press vox to save the selected level.
Operation secs after the last key is pressed. Keypad Lock To prevent accidental entries, you can lock the keypad. Press and hold the icon appears. lock button until it beeps to activate Key Lock. To unlock the keypad, press and hold the disappears. NOTE lock button again. icon When the Key Lock is active, a warning beep will be heard if you attempt to press keys. (except for the PTT button). Busy Channel Lock-out (BCL) This feature prevents accidental transmission on a busy channel.
CTCSS Codes and Frequencies Code No. Frequency (Hz) Code No. Frequency (Hz) “oF’ OFF 20 131.8 1 67.0 21 136.5 2 71.9 22 141.3 3 74.4 23 146.2 4 77.0 24 151.4 5 79.7 25 156.7 6 82.5 26 162.2 7 85.4 27 167.9 8 88.5 28 173.8 9 91.5 29 179.9 10 94.8 30 186.2 11 97.4 31 192.8 12 100.0 32 203.5 13 103.5 33 210.7 14 107.2 34 218.1 15 110.9 35 225.7 16 114.8 36 223.6 17 118.8 37 241.8 18 123.0 38 250.3 19 127.
UHF-CB Channel Guidelines NOTE Always listen on a channel (or observe the receive signal level meter) to ensure it is not already being used before transmitting. Channels 5 and 35 are used for emergency channels. CTCSS will not operate on these channels. Please follow these guidelines for channel use in Australia: • Channels 05 and 35 are Emergency Channels. • Channel 11 is a Calling Channel.
UHF-CB Channels and Frequencies CH No. Simplex Mode Transmit / Receive Frequency (MHz) Duplex Mode Transmit Frequency (MHz) CH No. Simplex Mode Transmit / Receive Frequency (MHz) 1 476.425 477.175 (CH31) 21 476.925 2 476.450 477.200 (CH32) 22 476.950 (RX only) 3 476.475 477.225 (CH33) 23 476.975 (RX only) 4 476.500 477.250 (CH34) 24 477.000 5 476.525 477.275 (CH35) 25 477.025 6 476.550 477.300 (CH36) 26 477.050 7 476.575 477.325 (CH37) 27 477.075 8 476.600 477.
UHF-CB Channels and Frequencies CH No. Simplex Mode Transmit / Receive Frequency (MHz) Duplex Mode Transmit Frequency (MHz) CH No. Simplex Mode Transmit / Receive Frequency (MHz) 41 476.4375 477.1875 (CH 71) 61 476.9375 (RX only) 42 476.4625 477.2125 (CH 72) 62 476.9625 (RX only) 43 476.4875 477.2375 (CH 73) 63 476.9875 (RX only) 44 476.5125 477.2625 (CH 74) 64 477.0125 45 476.5375 477.2875 (CH 75) 65 477.0375 46 476.5625 477.3125 (CH 76) 66 477.0625 47 476.5875 477.
Warranty UNIDEN UH076DLX UHF CB Transceiver IMPORTANT: Satisfactory evidence of the original purchase is required for warranty service Please refer to our Uniden website for any details or warranty durations offered in addition to those contained below. Warrantor: The warrantor is either Uniden Australia Pty Limited ABN 58 001 865 498 (“Uniden Aust”) or Uniden New Zealand Limited (“Uniden NZ”) as the case may be.
Warranty User-generated Data: This warranty does not cover any claimed loss of or damage to user-generated data (including but without limitation phone numbers, addresses and images) that may be stored on your Product. Statement of Remedy: If the Product is found not to conform to this warranty as stated above, the Warrantor, at its discretion, will either repair the defect or replace the Product without any charge for parts or service.
THANK YOU FOR BUYING A UNIDEN PRODUCT. © 2014 Uniden Australia Pty Limited. Uniden New Zealand Ltd. Printed in Vietnam.