UH8080NB Remote Speaker MIC UHF CB Transceiver For more exciting new products please visit our website: Australia: www.uniden.com.au New Zealand: www.uniden.co.
Contents Introduction Controls & Connectors Indicators Included with your UH8080NB Transceiver Connecting the Microphone Mounting the MIC Hanger Operation Turning on the Power Setting the Auto Squelch Selecting a Channel Channel Banks - Using the POLICE button Programming the Instant Priority Channel Recalling the Instant Channel Transmitting CTCSS (Continuous Tone Coded Squelch System) DCS (Digital Coded Squelch) Call Tone Function (Wake Up Tones) DUAL Watch U
Contents Selective Calling Programming the Selcall ID for your UH8080NB Storing Selcall IDs of other users to the ID Memory Tone Calling (Making a Selcall Call) Receiver Quiet (TSQ) Mode To Activate/Deavtivate Tone Squelch (TSQ) on a Channel Receiving a Selcall Scanning Tone Squlched Channels Group Calling Selcall ID Format Selcall Settings Tone Period Lead-in Delay Lead-in Delay Programming Lead-in Tone Alarm mode Call Alarm Continue Mode
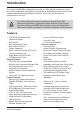
Introduction The Uniden UH8080NB is designed to provide you with years of trouble free service. Its rugged components and materials are capable of withstanding harsh environments. Please read this Operating Manual carefully to ensure you gain the optimum performance of the unit.
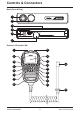
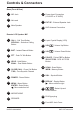
Controls & Connectors Base (Front & Rear) 1 2 3 4 EXT.SP. 5 ANT. DC 13.8V DC 27.
Controls & Connectors Base (Front & Rear) 1 MIC Jack 2 Not used 3 Main Speaker 4 Power Input Connection (13.8VDC or 27.
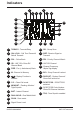
Indicators 2 1 6 3 4 5 7 8 9 10 1 1 1 1 1 1 1 1 1 1 1 1 1 1 1 1 1 1 1 1 1 1 1 1 1 1 1 1 11 12 1 1 1 1 1 1 1 1 1 1 1 1 1 1 1 1 1 1 1 1 1 1 1 1 1 1 1 1 1 1 1 1 1 1 1 1 1 1 1 1 1 1 1 1 1 1 1 1 1 1 1 13 1 1 1 1 1 1 1 1 1 1 1 1 1 1 1 1 1 1 1 1 1 1 1 1 1 1 1 1 1 1 1 1 1 1 1 1 1 1 1 1 1 1 1 1 1 1 1 1 1 1 1 1 1 1 1 1 1 1 1 1 1 1 1 1 1 1 1 1 1 1 1 1 1 1 1 1 1 1 1 1 1 1 1 1 1 1 1 1 1 1 1 1 1 1 1 1 1 1 1 1 1 1 1 1 1 1 1 1 1 1 1 1 1 1 1 1 1 1 1 1 1 1 1 1 1 1 1 1 1 1 1 1 1 1 1 1 1 1 1 1 1 1 1 1 1 1 1 1 1 1
Included with your UH8080NB Transceiver 0NB UH808 C ker MI e Spea sceiver Remot an CB Tr UHF site: t our web se visi .au ucts plea new prod .uniden.com nz den.co. e excitingtralia: www www.
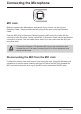
Connecting the Microphone MIC Jack Before connecting the Microphone Jack decide if you need to use the 2 metre Extension Cable - simply connect the MIC plug into the jack end of the Extension Cable Push the MIC plug or Extension Cable plug into the MIC jack of the radio until the connection locks into place. Gently tug the MIC or Extension Cable cord to test that the connection is locked. Use the rubber cover which is on the cord to seal the MIC jack entry from dust.
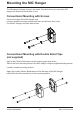
Mounting the MIC Hanger The Microphone Hanger comes in two parts. How and where you mount the MIC hanger will determine which parts to use. Conventional Mounting with Screws Use the front part of the MIC Hanger only. Locate a suitable mounting position and mark and drill two 3mm holes. Fix the MIC Hanger into place with screws. Conventional Mounting with Double Sided Tape (not supplied) High quality Double-Sided tape can be found at good retail stores.
Mounting the MIC Hanger MIC Hanger mounted over MIC Cable NOTE The curly cord of the Remote LCD Speaker MIC can extend up to 1.5m. For practical installation of the MIC Hanger mounted over MIC Cable use this method with the Extension Cable. Microphone 3 2 4 1 5 Radio Extension Cable The plug of the extension cable connects to the Radio. The socket end of the extension cable connects with the microphone plug. 1.
Operation Turning on the Power Press and hold [POWER]. Low-Voltage/High-Voltage Alert The UH8080NB can operate on 12VDC (13.8V) or 24VDC (27.6V) power supply, with the range between 10.2VDC to 28.8VDC. NOTE If the power supply voltage exceeds 28.8VDC, an alert tone sounds and HI DC flashes for 5 seconds. The power source must not exceed 32VDC otherwise permanent damage may occur to your radio, which may not be covered by the manufacturer’s warranty. If the input voltage falls below 10.
Operation Setting the Auto Squelch Level The Auto Squelch feature has 5 preset squelch levels: SQL-0 - Squelch open SQL-1 - maximum sensitivity (minimum squelch) SQL-2 - moderate sensitivity SQL-3 - medium sensitivity SQL-4 - minimum sensitivity (max/tight squelch) 1. Press [SQL]. The squelch setting flashes. 2. Press / to change the setting. • If SQL-0 (squelch open) is selected then MON (monitor) icon flashes. • If SQL-4 (tight squelch) is selected then SQT icon flashes.
Operation Selecting a Channel Press / to select the desired channel. Channel Banks - Using the POLICE Button The UH8080NB has three banks (groups) of channels to select from; CB UHF CB + User programmable RX channels¹ POL Pre-programmed Police frequencies² FIRE Pre-programmed Fire & Ambulance frequencies² When the CB icon is showing the 80 UHF-CB and any user programmed RX channels will be available for selection or scanning. The 80 UHF-CB channels are numbered 01-80.
Operation Programming the Instant Priority Channel Press / to select the Priority Channel you prefer. Press and hold [INST] for 2 seconds to store the new setting. INST icon appears to designate the Instant channel. Recalling the Instant Channel CALL INST PTT Momentarily press [INST] to return to the Instant Channel. Press [INST] again to return to the previous channel. Transmitting The UH8080NB transmits only on UHF-CB Channels.
Operation CTCSS (Continuous Tone Coded Squelch System) Use the CTCSS or DCS privacy codes to talk to UHF-CB users, who are using the same code, without hearing other users on the same channel. When a CTCSS or DCS tone is set for a UHF-CB channel, the CTCSS or DCS tone is displayed in the DCS/CTCSS code area. For channels with the setting of CTCSS OFF, there will be no display in the DCS/CTCSS code area. CTCSS and DCS is not available on CH 05 and CH 35.
Operation Call Tone Function (Wake Up Tones) Press the microphone [CALL/SELCALL] Button. A three second wake up ringing tone will be transmitted. You may select from 10 types of tones (see p.22). NOTE Current regulations require calling tones to be restricted to one transmission per minute. If a second transmission is attempted within one minute then an error tone will sound.
Operation Operation with the aid of a Repeater Station (Duplex). The signal coming from your radio is received by the Repeater Station and the retransmitted at the same time on another channel. This operation is called “Duplexing”. For example, CH01 on Duplex Mode will Receive on CH01 but Transmit on CH31 CH02 on Duplex Mode will Receive on CH02 but Transmit on CH32 etc...
Operation Scanning The UH8080NB has a scanning feature that allows you to search for active channels automatically. SCAN only checks channels or frequencies that are in the SCAN Memory, which are indicated by the M (memory) icon. The UH8080NB has two SCAN Memory modes; Open Scan (OS) mode and Group Scan (GS) mode, to give you flexibility and allow you to use the radio more effectively.
Operation Open Scan (OS) Mode OS Mode is the default scan setting. All UHF-CB, user-programmed extra RX channels, Police and Fire & Ambulance frequencies have been added to the OS SCAN Memory for convenience. To add/remove channels from OS SCAN Memory, refer to p.19. Allows continuous scanning of all selected channels. If an active channel is found, scanning will stop on that channel. If the received signal ceases, the unit will wait 3 seconds for the signal to return, otherwise scanning resumes.
Operation Group Scan (GS) Mode GS Mode has no channels in the SCAN Memory by default. Channels must be added to the GS SCAN Memory before group scan can start. To add/remove channels from GS SCAN Memory, refer to p.19. Includes the accessory feature Priority Watch which allows you to monitor the Instant Priority Channel while scanning (see p.15 for setting Instant Priority Channel and p.22 to turn on Priority Watch).
Operation Priority Watch To switch Priority Watch On/Off; 1. Press [MENU] two times. The Priority Watch setting flashes. 2. Press / to change the setting between ON or OFF. 3. Press and hold [MENU] to save & exit from the menu mode. NOTE If SCAN is deactivated while it is tuned to an active channel, the UH8080NB will stay on that active channel. If none of the channels are active, the UH8080NB will reinstate the scan start channel.
Operation Busy Channel Lockout If the channel is already in use, you can prevent the UHF CB Radio from transmitting . This is particularly important when using CTCSS/DCS. 1. Press [MENU] five times. The BCL setting flashes. 2. Press / to change the setting between ON or OFF. 3. Press and hold [MENU] to save & exit from the menu mode. NOTE If a button is not pressed within 10 seconds the UH8080NB will automatically exit the Menu Mode. Roger Beep 1. Press [MENU] six times.
Operation Key Beep On/Off 1. Press [MENU] seven times. The key beep (BEEP) setting flashes. 2. Press / to change the setting between OFF, 1, 2, 3... 7. 3. Press and hold [MENU] to save & exit from the menu mode. NOTE If a button is not pressed within 10 seconds the UHF CB Radio will automatically exit the Menu Mode. Alpha Tag The SELCALL IDs and Extra Receive Channels have the option of displaying a name (Alpha Tag) instead of the ID or frequency.
Operation Volume Sync Use this set which speaker(s) the Volume / buttons control. Set 01 to control the speaker volume of the Base unit only. Set 02 to control the speaker volume of Remote MIC only. Set 03 to control the speaker volume of both Base unit and Remote MIC - both volume levels will be synchronised. 1. Press [MENU] nine times. The Volume Sync setting flashes. 2. Press / to change the setting between 01, 02 or 03. 3. Press and hold [MENU] to save & exit from the menu mode.
Operation Backlight Colour 1. Press [MENU] ten times. The current Backlight colour (CLEAR, BLUE, RED, PURPLE, GREEN, CYAN or YELLOW) setting flashes. 2. Press / colour setting. to change to the desired 3. Press and hold [MENU] to save & exit from the menu mode Backlight Level 1. Press [MENU] eleven times. The Backlight level (LIGHT) setting flashes. 2. Press / to change the setting between OFF, 01, 02 and 03. 3. Press and hold [MENU] to save & exit from the menu mode. LCD Contrast 1.
Operation - Special Features 100 User Programmable RX Channels The UH8080NB has 100 receive only channels (CH81 to CH180) which can be programmed with frequencies ranging from 400-520MHz (in 12.5kHz steps). The extra RX channels only appear, as part of the CB channel bank, when a frequency has been programmed to a channel. There are three ways to programme RX channels; 1. If you know the frequency you may manually programme it to a channel. 2. Store a Police or Fire (& Ambulance) frequency to a channel. 3.
Operation - Special Features Store a Police or Fire frequency to a RX Channel Select the Police or Fire (& Ambulance) channels group by pressing [POLICE], and then select a desired frequency using / . Or during SCAN, when scan stops on a Police or Fire (& Ambulance) frequency which you wish to store press [HOLD] to stay on that frequency. 1. Press and hold [MENU]. The lowest available empty RX channel will appear, alternating with the selected Police and Fire (& Ambulance) frequency. 2.
Operation - Special Features Instant Replay The Instant Replay feature automatically records up to 1 minute of received signal(s) which can be instantly replayed (through the speaker) by pressing [REPLAY]. Instant Replay automatically records receive signal(s) in the following modes; • CB & Extra RX channel, Police and Fire (& Ambulance) channel mode • Scan Mode • Close Call RF Capture mode Instant Replay does not record when in monitor mode (SQT-0 setting in normal channel mode).
Operation - Special Features Close Call™ RF Capture The Close Call RF Capture feature sets the UH8080NB so it detects and then displays the frequency of a nearby strong radio transmission. Close Call RF capture works great for finding frequencies at venues such as malls and sporting events. Close Call RF Capture doesn’t tune to a frequency to check for a transmission, instead it directly detects the presence of a strong, nearby signal and instantly tunes to the source’s frequency.
Operation - Special Features Using Close Call To start or stop Close Call RF Capture: 1. Press [CLOSE CALL]. The C-C icon appears and C.CALL is displayed when Close Call RF Capture mode. When a signal is found a confirmation chirp is sounded and CC FOUND flashes on the display. Press any key (except CLOSE CALL key) when CC FOUND is displayed to show the frequency. The signal strength is also displayed with CC FOUND display.
Operation - Special Features Selective Calling Selective Calling (Selcall) is a special Sequential Tone Squelch System that allows the user to receive/transmit calls selectively from/to an individual or group, on a shared busy channel. Therefore Selcall is a group feature used by groups with similarly set up radios. The UH8080NB has a Selective Calling system.
Operation - Special Features Programming the Selcall ID for your UH8080NB The radio Selcall ID is the ID other users will identify as being your radio. It is set in the Selcall settings menu as follows: 1. Power Off the UH8080NB. 2. Press and hold [POWER] and [MENU]. The UH8080NB should turn on in the SELCALL Menu selection state (no tone will sound). Cd dispays to indicate the Call ID setting (factory default ID is 00000). 3. Press [SQL] to begin the frequency edit. The 5th digit of the ID flashes.
Operation - Special Features Tone Calling (Making a Selcall Call) Tone Calling allows you to selectively call other radios. For convenience, the Selcall ID of the radio you are going to call should be in the Selcall ID memory (see Storing Sellcall IDs of other users to the ID Memory p.33). If not then the Selcall ID can be manually entered for this call. To Call: 1. Select the channel that you and your group agreed to use for Selective Calling. 2. Press and hold [SELCALL] for 2 seconds.
Operation - Special Features To Activate/Deactivate Tone Squelch (TSQ) on a Channel 1. Use / to select the channel you want to put in or take out of ‘QUIET’ mode. 2. Press and hold [TSQ] for 2 seconds. Two beeps will sound and the TSQ icon appears on or disappears from the LCD display. Receiving a Selcall While in TSQ mode, when UH8080NB receives a code matching your Selcall ID, it will perform the following operations: a) Automatically responds to the caller by transmitting Acknowledge Tones.
Operation - Special Features Scanning Tone Squelched Channels If you are using two or more Channels in the TSQ mode, you can monitor all of these Channels for selective calls by using the TSQ scanning feature. To use this feature start the TSQ Scan by pressing and holding [TSQ] for 2 seconds during Open Scan or Group Scan. Unlike Normal Scanning, TSQ scans and checks detected signals for Selcall information. If this information is not found, TSQ Scanning resumes.
Operation - Special Features Group Calling The UH8080NB has the capability to respond to Group Calling and to transmit Group Calling Codes. Group Calling allows you to call members of your group simultaneously. However, to do this, you need to follow a certain format (see below) when programming your TX Selcall ID.
Operation - Special Features SELCALL Settings Tone Period Tone period is the duration of one tone in a Selcall ID sequence. The setting of this parameter depends on the type of application. On long distance communications, for example: where the signal strength of the transmitted information is greatly reduced and affected by noise, it is advisable to use a longer Tone Period. A long Tone Period gives the decoder more time and information to check and evaluate the code.
Operation - Special Features Lead-in Delay Programming 1. Power Off the UH8080NB. 2. Press and hold [POWER] and [MENU]. The SELCALL Settings Menu will display (no tone will sound). 3. Press [MENU] repeatedly to select the Lead-in Delay setting - which is indicated on the display as Ld. 4. Press [SQL] to edit the setting. The current setting flashes. / to select the desired Lead-in delay period from 500ms, 1000ms, 5. Press 2000ms, 3000ms or 4000ms. 6. Press [SQL] to exit the setting. 7.
Operation - Special Features Alarm Mode When a received code matches to your receiver Selcall ID the UH8080NB will respond based on the Call Alarm mode. Call Alarm - Auto mode (Default) a) Transmit an Acknowledge tone to the Caller. b) Emit CALL Alarm for 10 seconds only. c) Resume Quiet condition automatically after 20 seconds if the call is not answered. d) The Unit will start decoding again when the 20 second period elapsed and the call remained unanswered.
SELCALL Tone Frequency List Tone No. Tone Frequency (Hz) Tone No. Tone Frequency (Hz) 0 1981 8 1747 1 1124 9 1860 2 1197 A (Group) 2400 3 1275 B 930 4 1358 C 2247 5 1446 D 991 6 1540 E (Repeat) 2110 7 1640 F 1055 CTCSS Codes Table Code No. Frequency (Hz) Code No. Frequency (Hz) “oF’ OFF 20 131.8 1 67.0 21 136.5 2 71.9 22 141.3 3 74.4 23 146.2 4 77.0 24 151.4 5 79.7 25 156.7 6 82.5 26 162.2 7 85.4 27 167.9 8 88.5 28 173.8 9 91.
DCS Codes Table 1 DCS Code (Octal) 023 36 DCS Code (Octal) 223 71 DCS Code (Octal) 445 2 025 37 225 72 446 3 026 38 226 73 452 4 031 39 243 74 454 5 032 40 244 75 455 6 036 41 245 76 462 7 043 42 246 77 464 8 047 43 251 78 465 Code No. Code No. Code No.
UHF-CB Channel Guidelines Always listen on a channel (or observe the receive signal level meter) to ensure it is not already being used before transmitting. Channels 5 and 35 are used for emergency channels. CTCSS, DCS, TSQ and SELCALL will not operate on these channels. NOTE Please follow these guidelines for channel use in Australia: • Channels 05 and 35 are Emergency Channels. • Channel 11 is a Calling Channel.
UHF-CB Channels and Frequencies CH No. Simplex Mode Transmit / Receive Frequency (MHz) Duplex Mode Transmit Frequency (MHz) CH No. Simplex Mode Transmit / Receive Frequency (MHz) 1 476.425 477.175 (CH31) 21 476.925 2 476.450 477.200 (CH32) 22 476.950 (RX only) 3 476.475 477.225 (CH33) 23 476.975 (RX only) 4 476.500 477.250 (CH34) 24 477.000 5 476.525 477.275 (CH35) 25 477.025 6 476.550 477.300 (CH36) 26 477.050 7 476.575 477.325 (CH37) 27 477.075 8 476.600 477.
UHF-CB Channels and Frequencies CH No. Simplex Mode Transmit / Receive Frequency (MHz) Duplex Mode Transmit Frequency (MHz) CH No. 41 476.4375 477.1875 (CH 71) 61 42 476.4625 477.2125 (CH 72) 62 43 476.4875 477.2375 (CH 73) 63 44 476.5125 477.2625 (CH 74) 64 477.0125 45 476.5375 477.2875 (CH 75) 65 477.0375 46 476.5625 477.3125 (CH 76) 66 477.0625 47 476.5875 477.3375 (CH 77) 67 477.0875 48 476.6125 477.3625 (CH 78) 68 477.1125 49 476.6375 69 477.1375 50 476.
Warranty UNIDEN UH8080NB UHF CB Transceiver IMPORTANT: Satisfactory evidence of the original purchase is required for warranty service Please refer to our Uniden website for any details or warranty durations offered in addition to those contained below. Warrantor: The warrantor is either Uniden Australia Pty Limited ABN 58 001 865 498 (“Uniden Aust”) or Uniden New Zealand Limited (“Uniden NZ”) as the case may be.
Warranty Our goods come with guarantees that cannot be excluded under the Australian Consumer Law. You are entitled to a replacement or refund for a major failure and for compensation for any other reasonably foreseeable loss or damage. You are also entitled to have the goods repaired or replaced if the goods fail to be of acceptable quality and the failure does not amount to a major failure.
© 2013 Uniden Australia Pty Limited. Uniden New Zealand Ltd. Printed in Vietnam.